使用表格 Table
配置列的样式
配置 Avatar 列
简单列单独显示头像
如果 Table 的数据源表单有个上传字段,那么直接讲 Table 列的类型选择为 “头像” 即可。配置和效果如图:
表单上传头像字段, ID 随意,不一定要叫 avatar,按需设置即可。
![]()
Table 列设置
![]()
运行效果
![]()
头像和名称合并为一列
大多数情况 avatar 并不会单独显示为一列,而是如下图效果:
![]()
要实现这种配置需要进行数据转换。Avatar 列要求的数据为:
{
  "avatar": "图片地址",
  "label": "显示 label"
}
例如,上图实例效果的数据转换配置为:
![]()
![]()
其中 JS 数据转换代码如下:
(function transform(data) {
  return data.map((item) => {
    return {
      ...item,
      nickName: {
        avatar: item.avatar?.resources?.[0]?.url,
        label: item.nickName,
      },
    };
  });
})(this);
多选头像 Group
当有多个 avatar 头像的时候,可以设置 group 组的展示形式,此时 Avatar 列要求的数据格式为数组形式:
[
  {
    "avatar": "图片地址",
    "label": "显示 label"
  },
  {
    "avatar": "图片地址",
    "label": "显示 label"
  }
]
例如,这里有一个多选的上传组件,希望把多个图片展示为多个 avatar 的形式。配置和运行效果如下:
Table 列设置
![]()
数据转换
![]()
其中 JS 数据转换代码如下:
(function transform(data) {
  return data.map((item) => {
    const c817f839 = item.c817f839?.resources?.map((x) => {
      return { avatar: x.url, label: item.name };
    });
    return { ...item, c817f839 };
  });
})(this);
运行效果
![]()
合并多行选择列(GROUP_SELECT_COLUMN)
GROUP_SELECT_COLUMN 与 AG Grid 原生的 Row Grouping(行分组)功能类似但并非同一功能,两者不可混用。启用合并多行选择列后,AG Grid 的行分组功能会被自动禁用。
GROUP_SELECT_COLUMN 是表格的一种特殊列类型,用于将值相同且相邻的多行合并为一个单元格,并在合并后的单元格中显示一个 checkbox,实现"整组勾选"的交互效果。
典型使用场景:数据中某个字段(如订单号、批次号)会对应多行明细,用户需要按组批量选中/取消选中这些行。
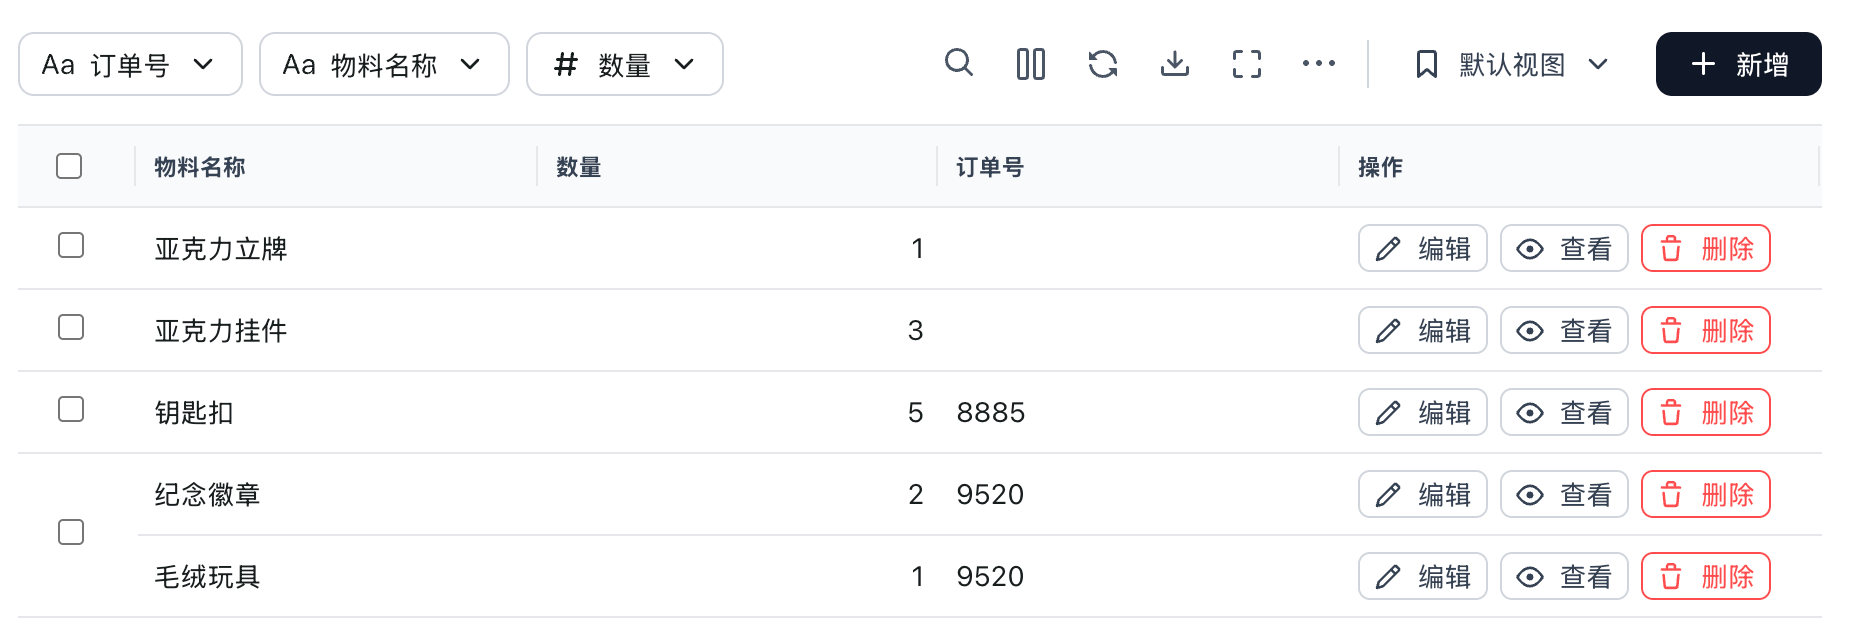
运行效果如下图所示,多行被合并并共用一个 checkbox:
快速开始
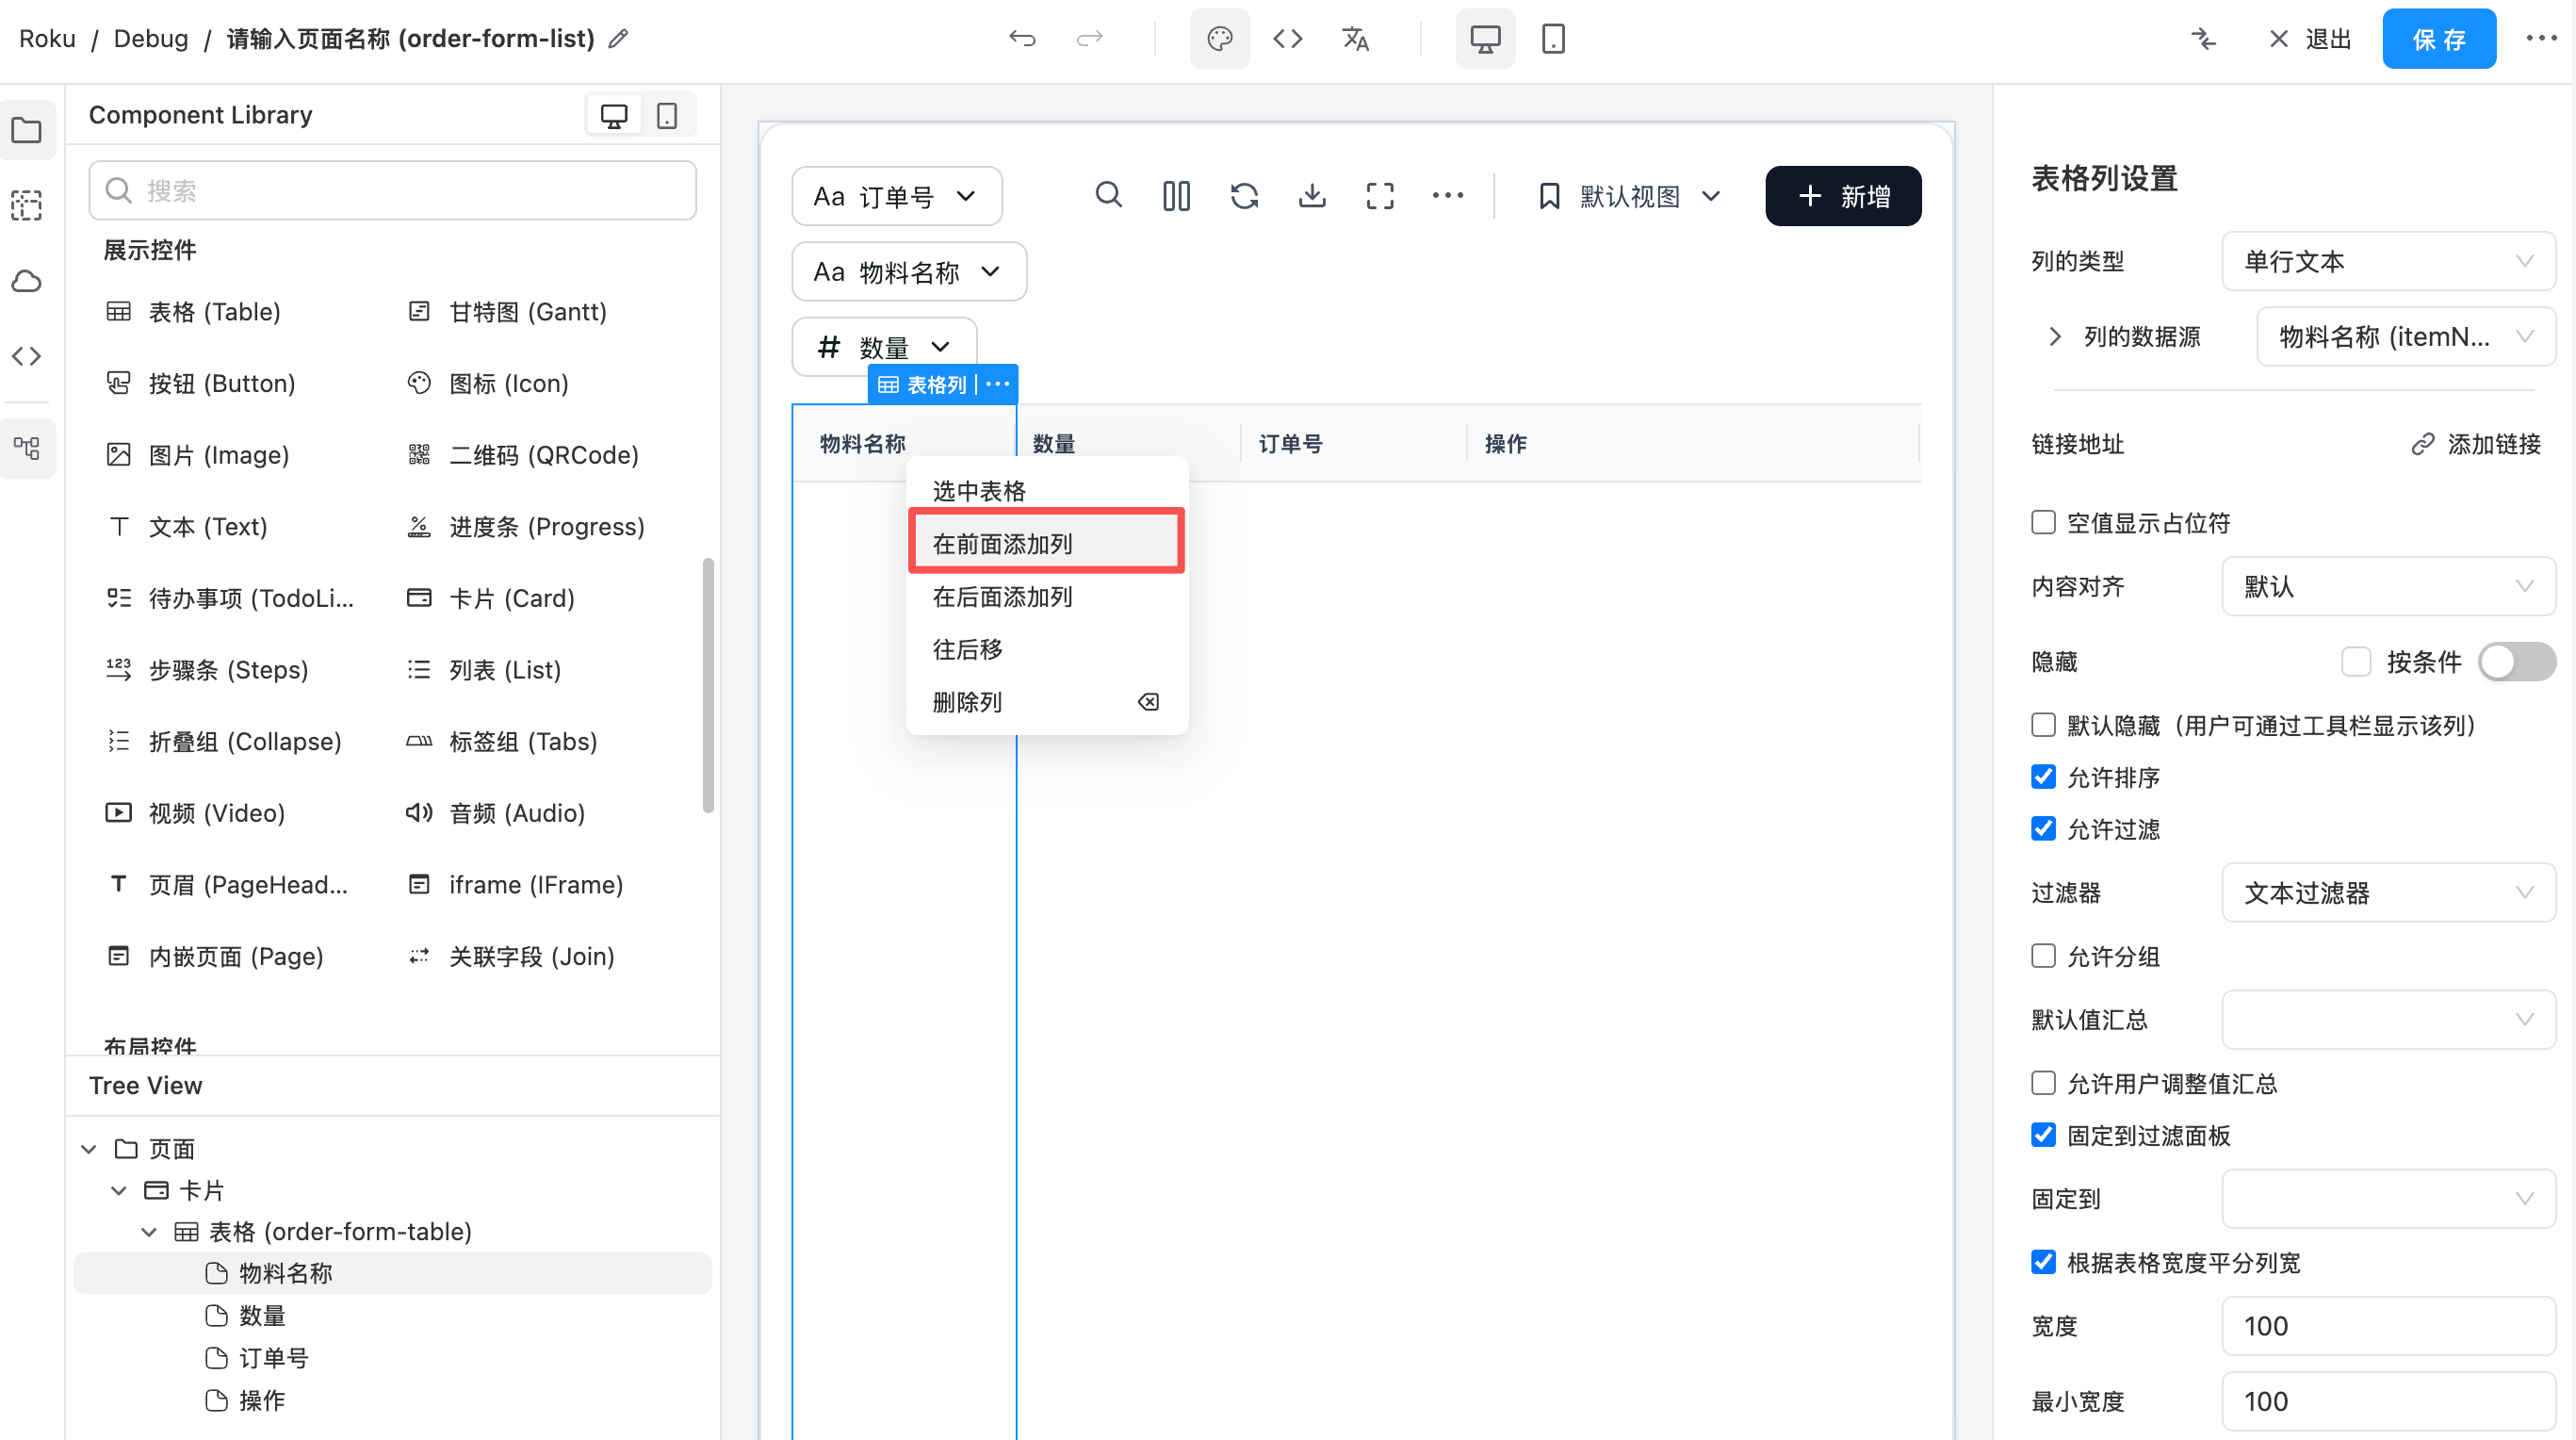
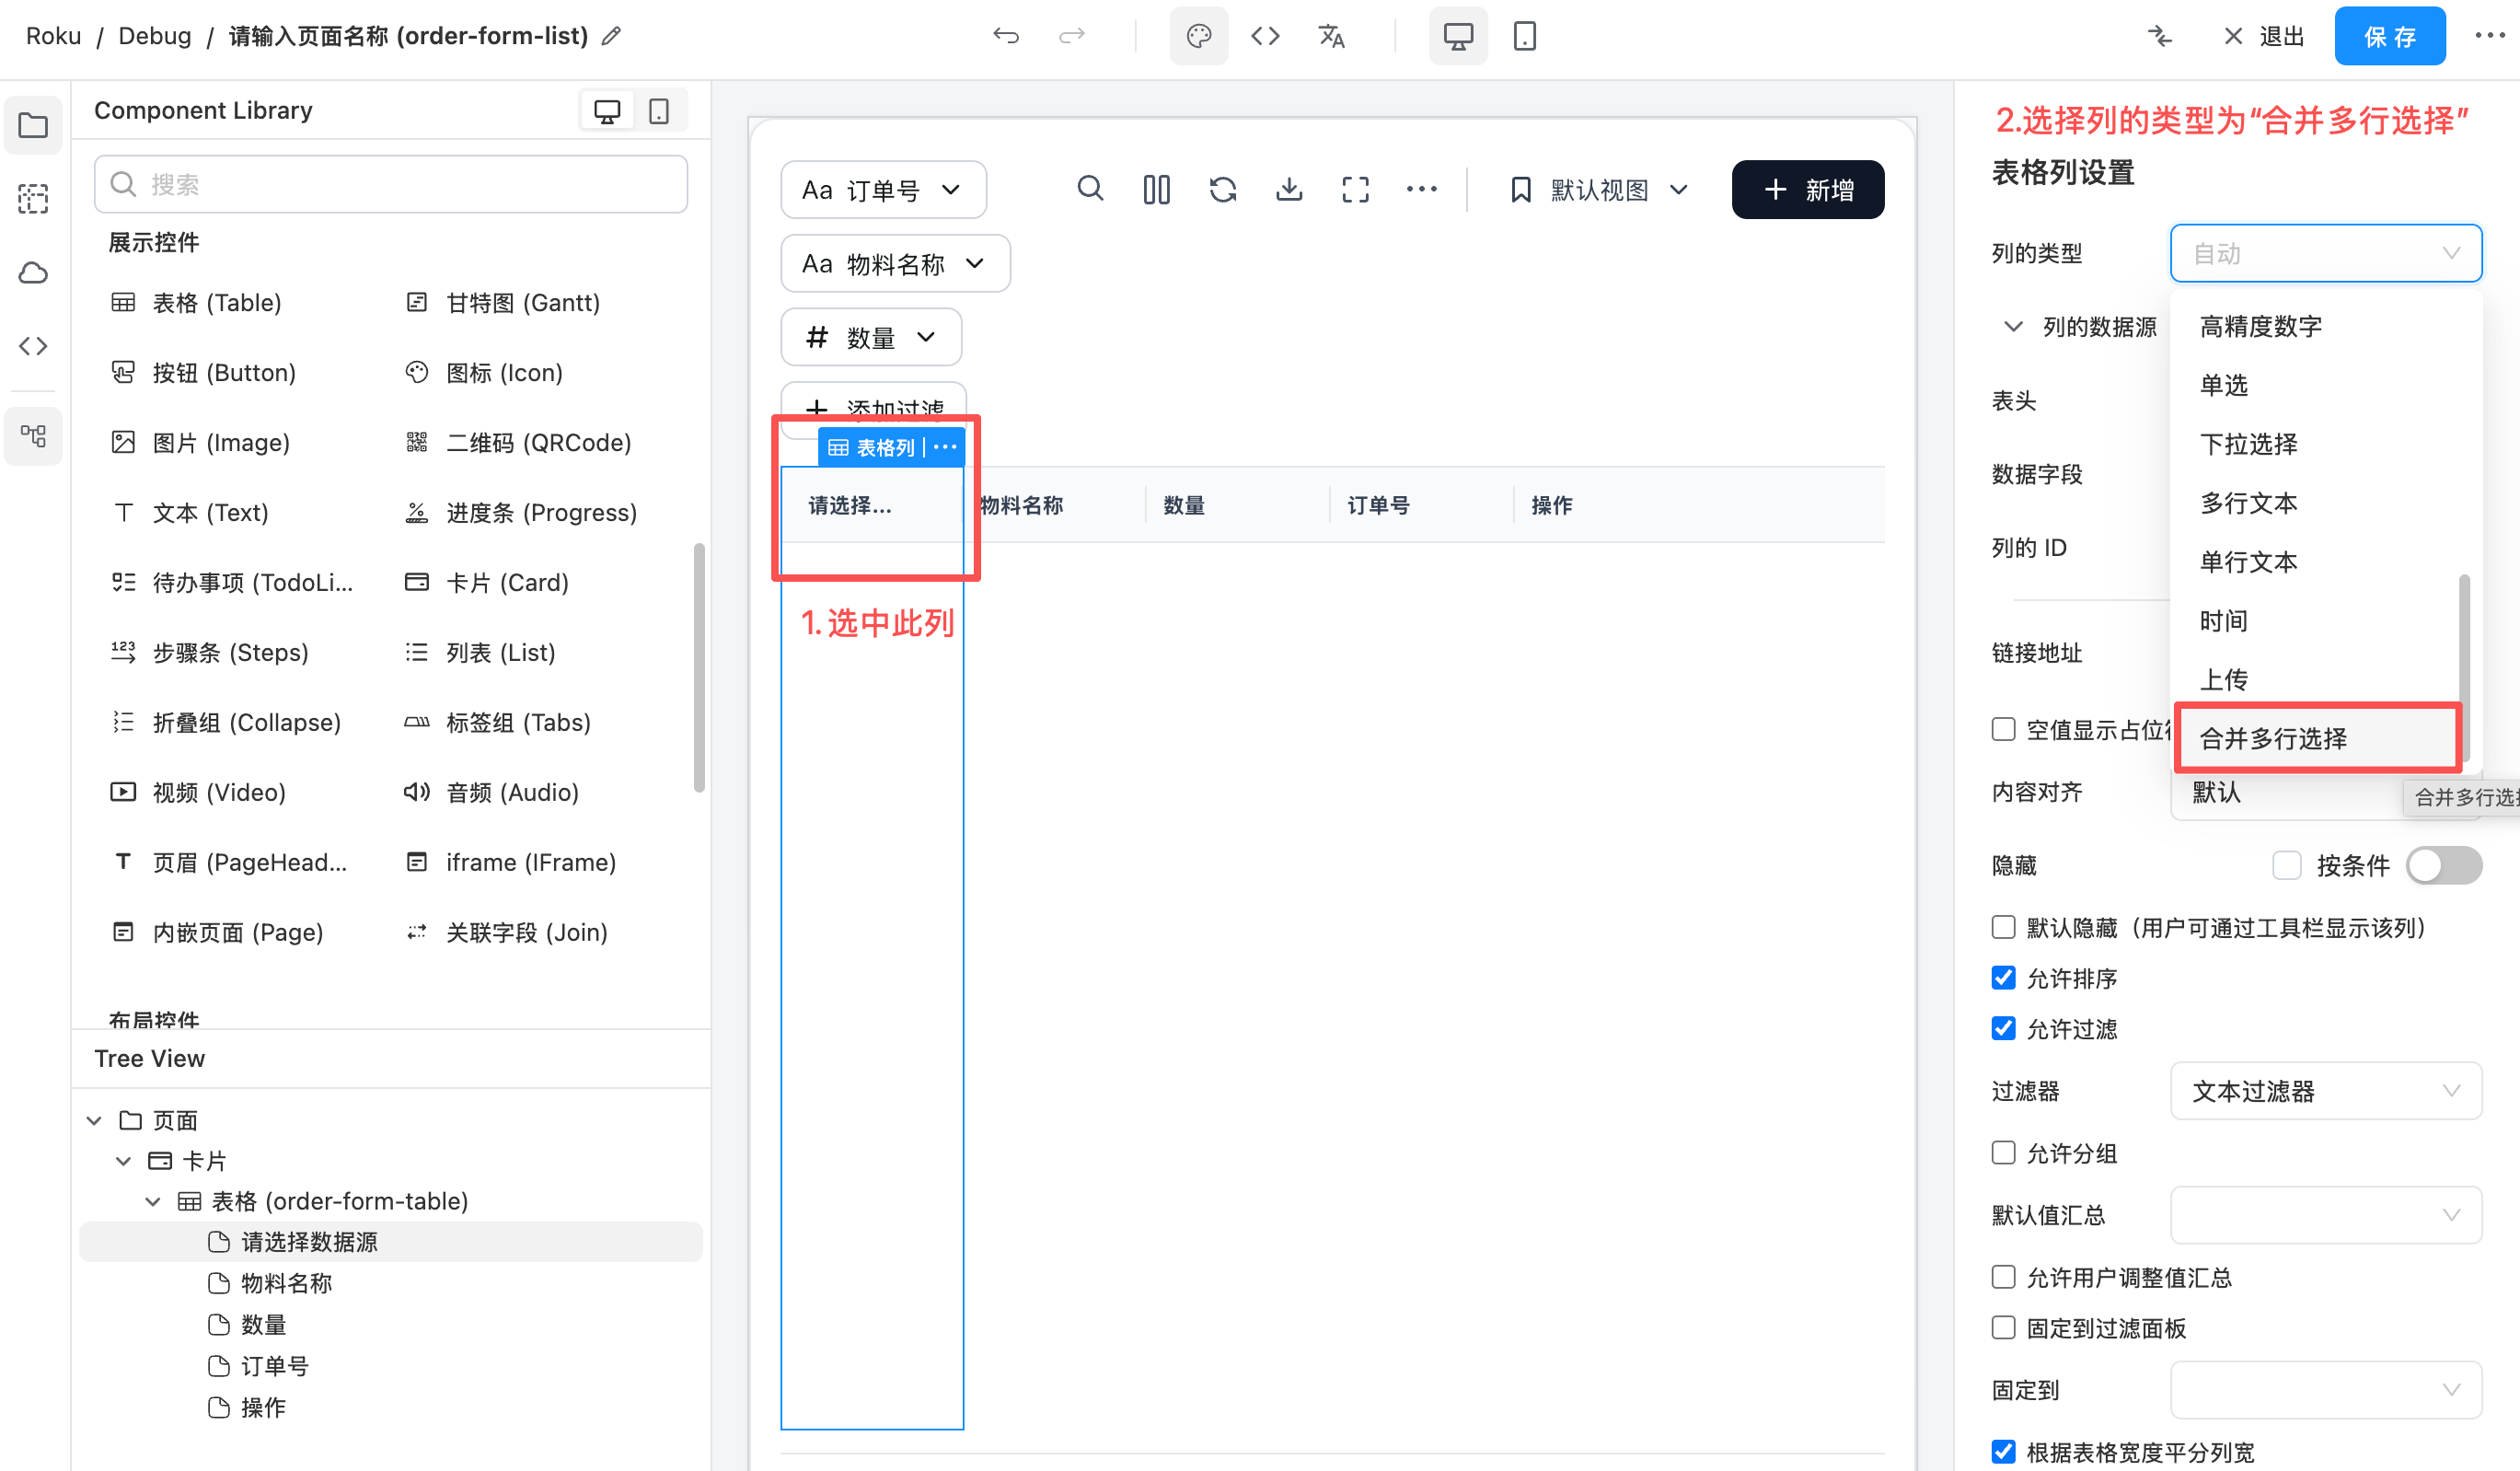
在表单设计器中,选中表格的某一列,将列的类型切换为 "合并多行选择",设计器会自动完成以下配置:
- 将表格切换为
clientSide(一次性加载)模式 - 开启单元格合并
- 关闭分页
- 隐藏分组面板
- 配置多选行为(隐藏 ag-grid 自带的 checkbox 列,由本列接管选择逻辑)
用户只需配置分组字段即可使用。
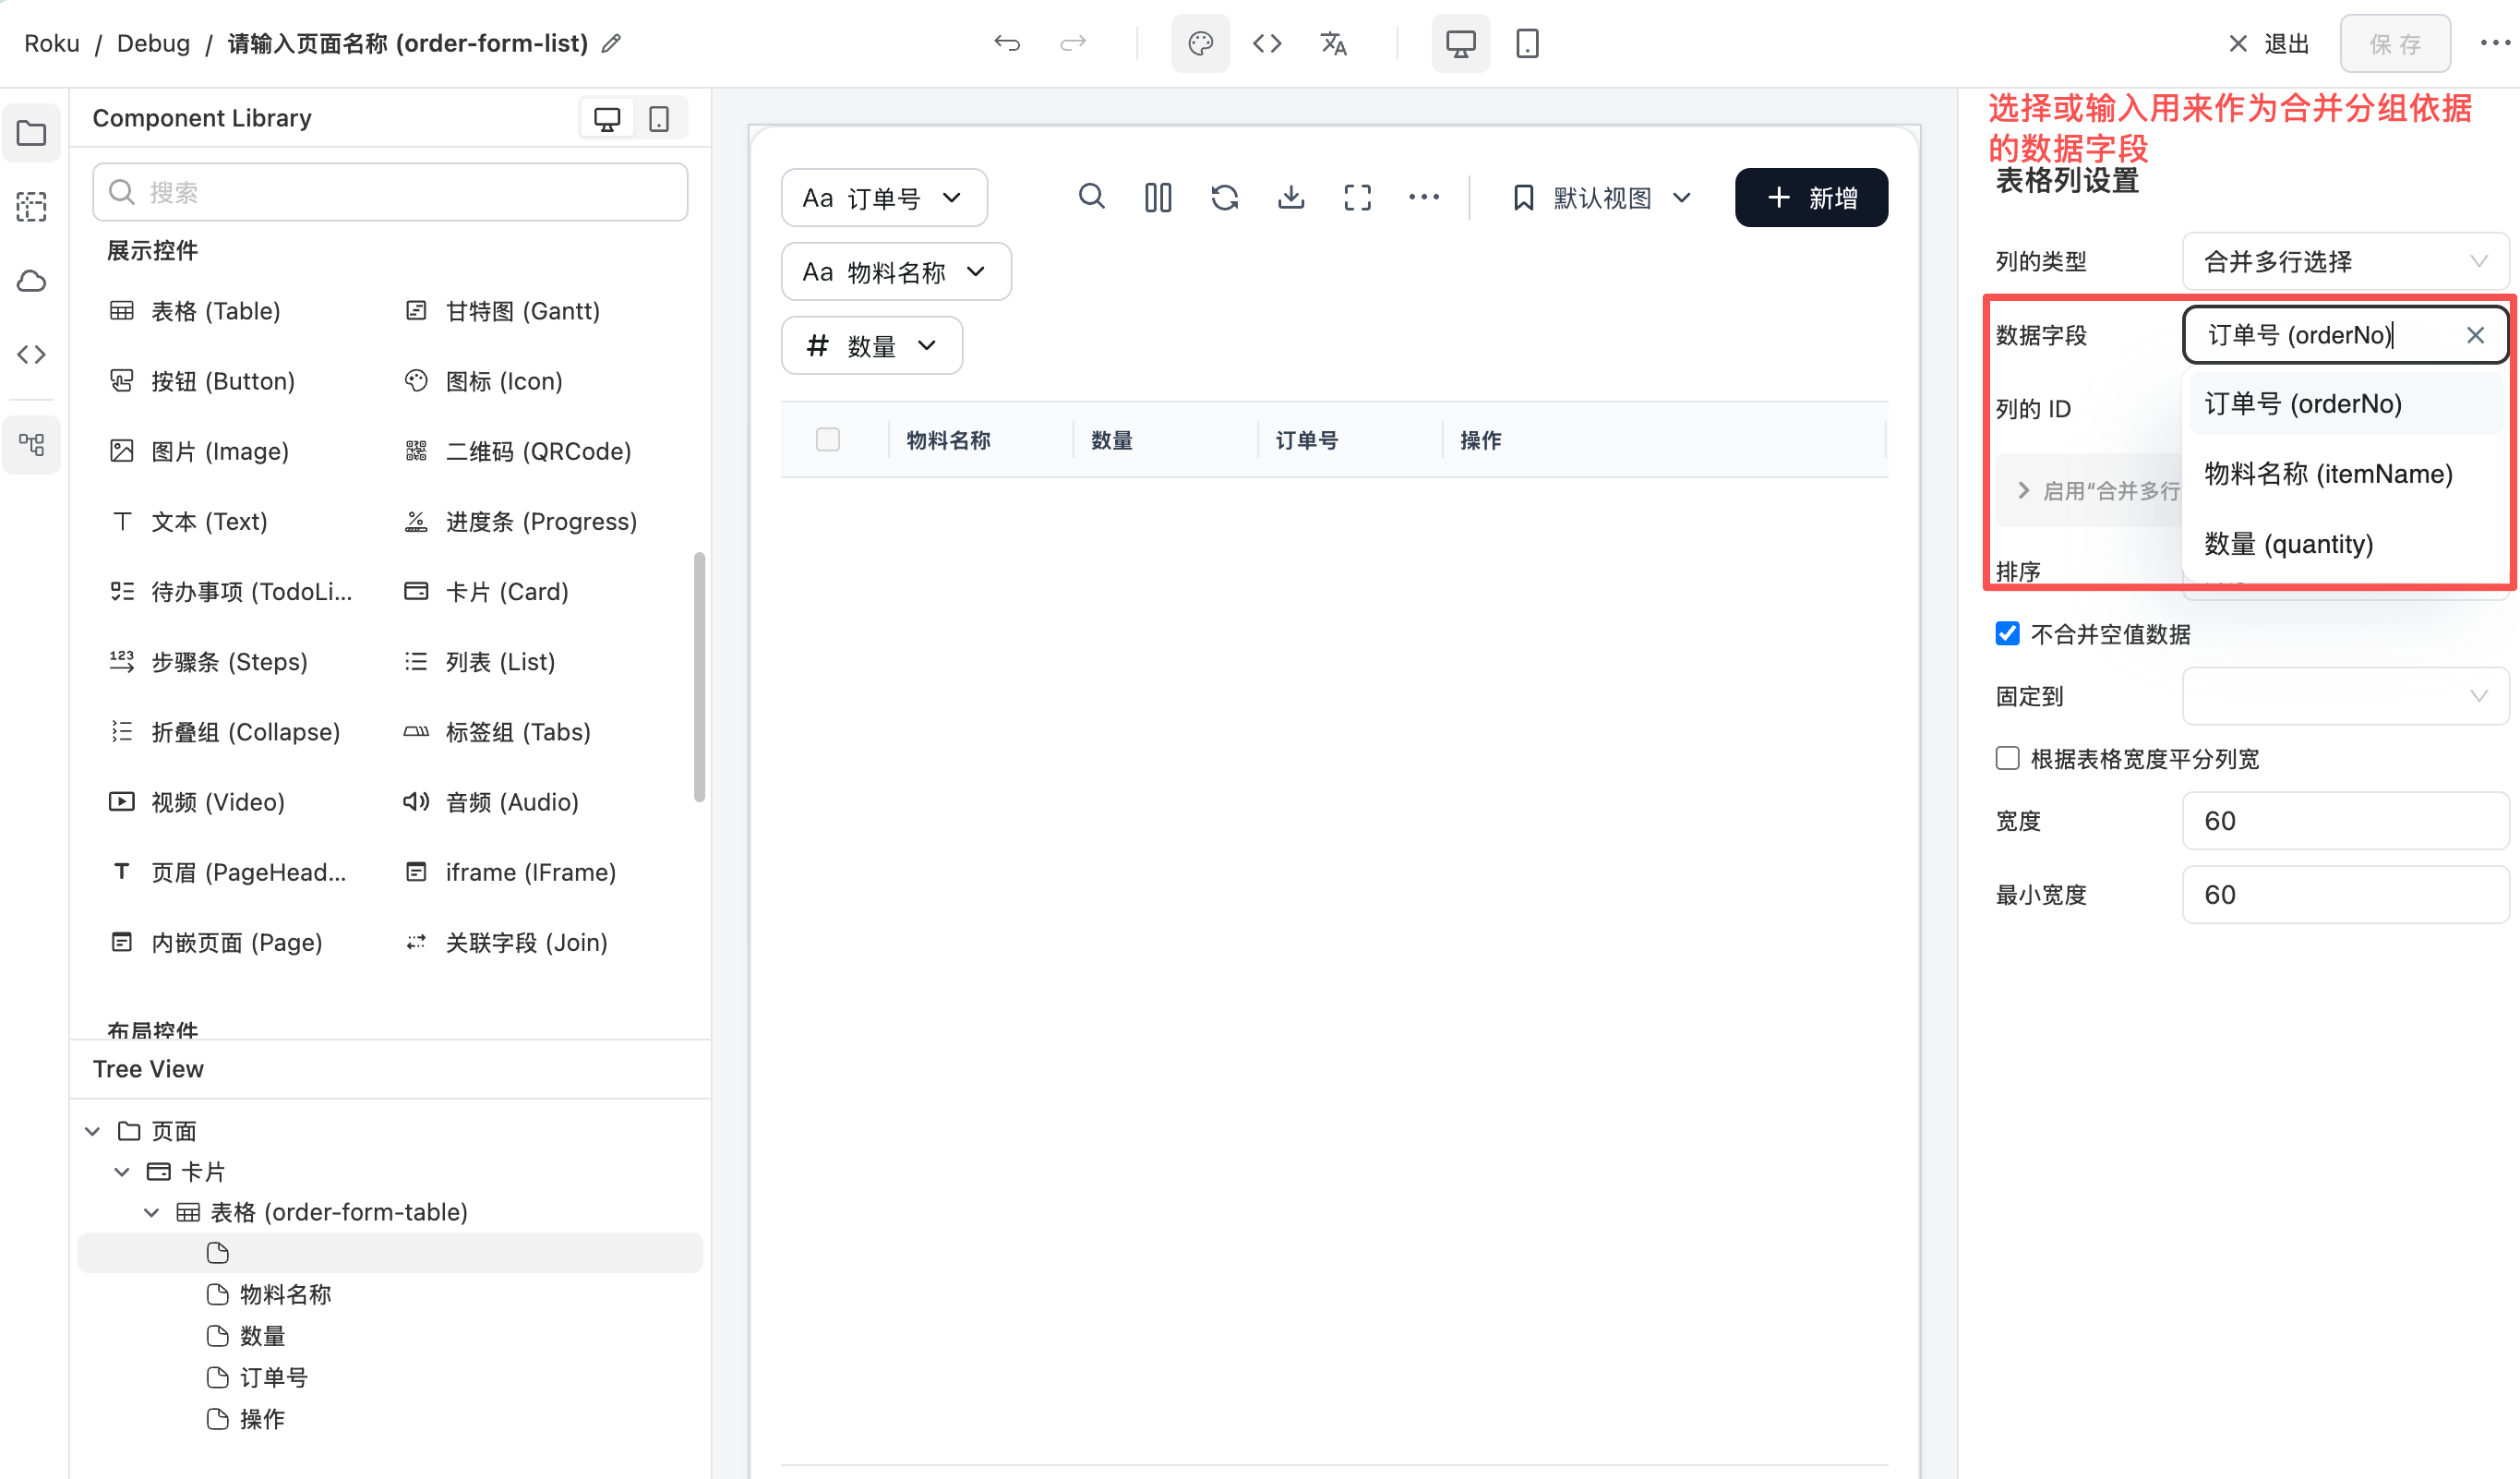
设计器中新增一列并选中“合并多行选择”然后配置数据字段:
配置项说明
| 配置项 | 说明 | 默认值 |
|---|---|---|
分组字段 (field) | 值相同的相邻行会被合并成一组,共用一个勾选框。支持从当前数据源的字段列表中选择,也可手动输入任意字段路径。 | — |
列的 ID (colId) | 列的唯一标识。 | 'group-selection' |
排序 (sort) | 排序方向,确保同组数据相邻排列,合并才能正确生效。 | 升序 |
不合并空值数据 (notMergeEmptyValue) | 默认勾选:空值各自独立,不会与其它空值行合并。取消勾选时空值之间也会合并成一组。 | 勾选(空值不合并) |
运行时行为
分组与合并逻辑
- 表格加载数据后,按照配置的排序方向对分组字段进行排序,确保同组数据相邻。
- 相邻行的分组字段值相同时会被合并成一个单元格;值为
null/undefined/''(空值)的行默认各自独立,除非取消勾选"不合并空值数据"。
Checkbox 选择逻辑
- 单元格 checkbox:勾选时会同时选中/取消选中该组内所有可选行。
JSON 配置示例
以下为一个完整的列配置示例(columnDefs 部分):
{
  "columnDefs": [
    {
      "type": "GROUP_SELECT_COLUMN",
      "colId": "group-selection",
      "field": "orderNo",
      "sort": "asc",
      "width": 60,
      "minWidth": 60,
      "flex": null
    },
    {
      "field": "orderNo",
      "headerName": "订单号"
    },
    {
      "field": "itemName",
      "headerName": "物料名称"
    },
    {
      "field": "quantity",
      "headerName": "数量"
    }
  ]
}
通过设计器切换列类型时,表格级配置(clientSide 模式、关闭分页等)会自动设置,无需手动编写。如果是手动编写 JSON,还需要在表格的 componentProps 中配置 rowModelType: "clientSide"、enableCellSpan: true、pagination: false、rowGroupPanelShow: "never" 以及 rowSelection。
获取选中行数据
配合按钮使用,可以获取用户勾选的行数据并进行后续操作(如批量审批等)。
实现步骤:
- 为当前表格设置一个 ID(如
my-table),后续在 JS 中通过该 ID 获取表格 API。 - 在表格旁添加一个按钮,设置按钮的 action 为调用自定义方法(如
approve)。 - 在 JS 中通过
formApi.registerMethod注册该方法,方法内通过formApi.getFieldApi获取表格的 AG Grid API,再调用getSelectedRows()获取选中行。
设计器中按钮配置调用自定义方法的界面:
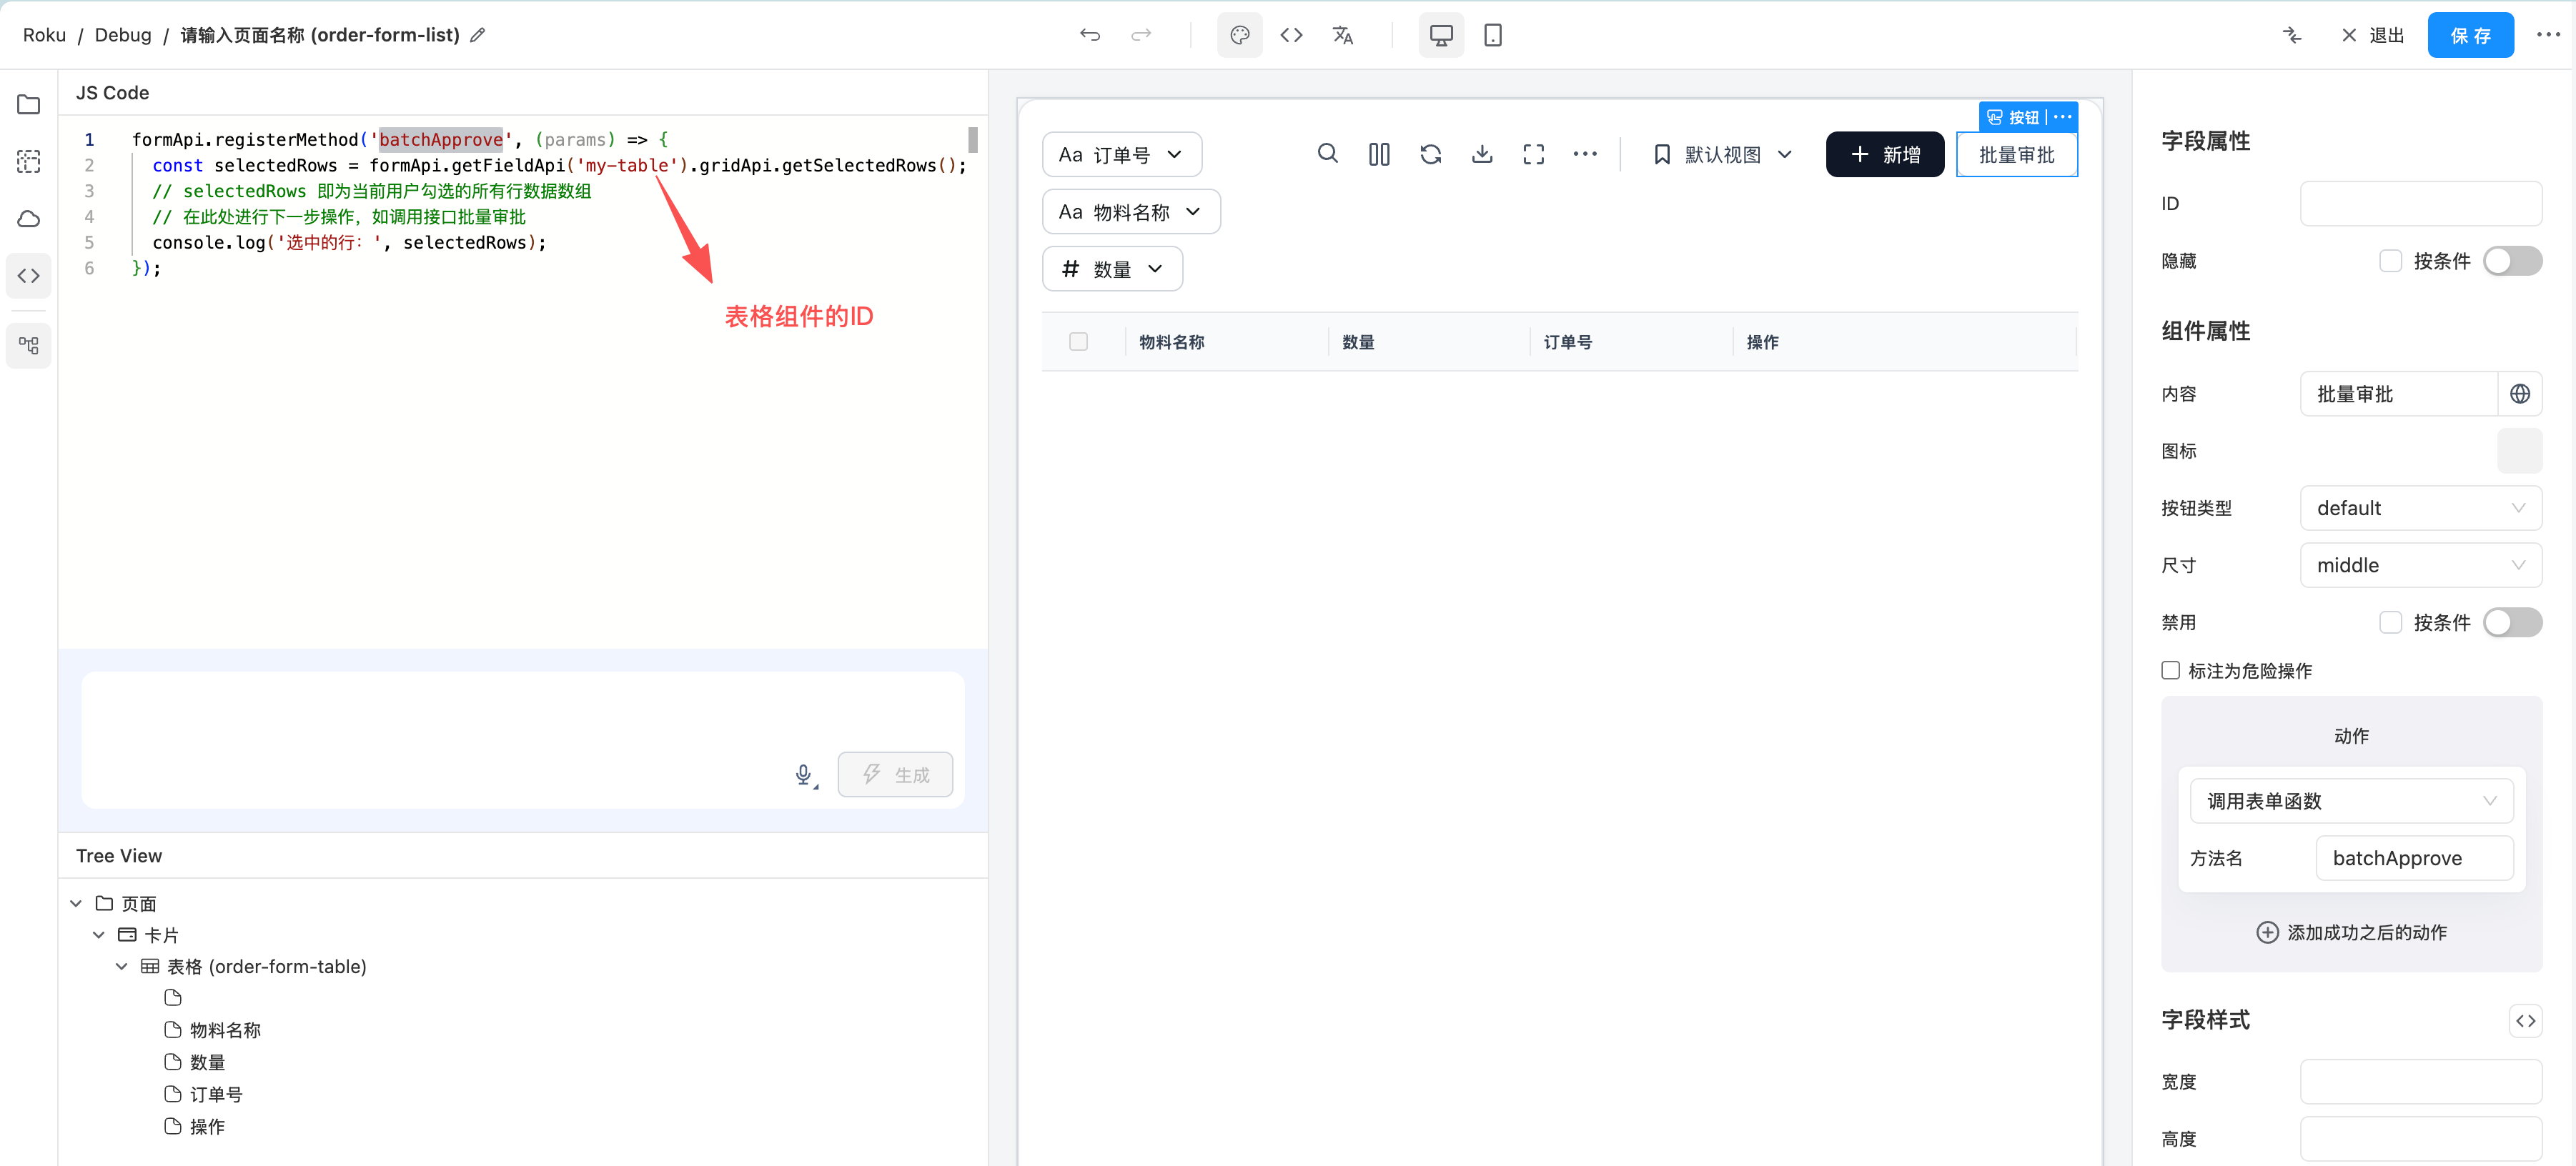
formApi.registerMethod('batchApprove', (params) => {
  const selectedRows = formApi.getFieldApi('my-table').gridApi.getSelectedRows();
  // selectedRows 即为当前用户勾选的所有行数据数组
  // 在此处进行下一步操作,如调用接口批量审批
  console.log('选中的行:', selectedRows);
});
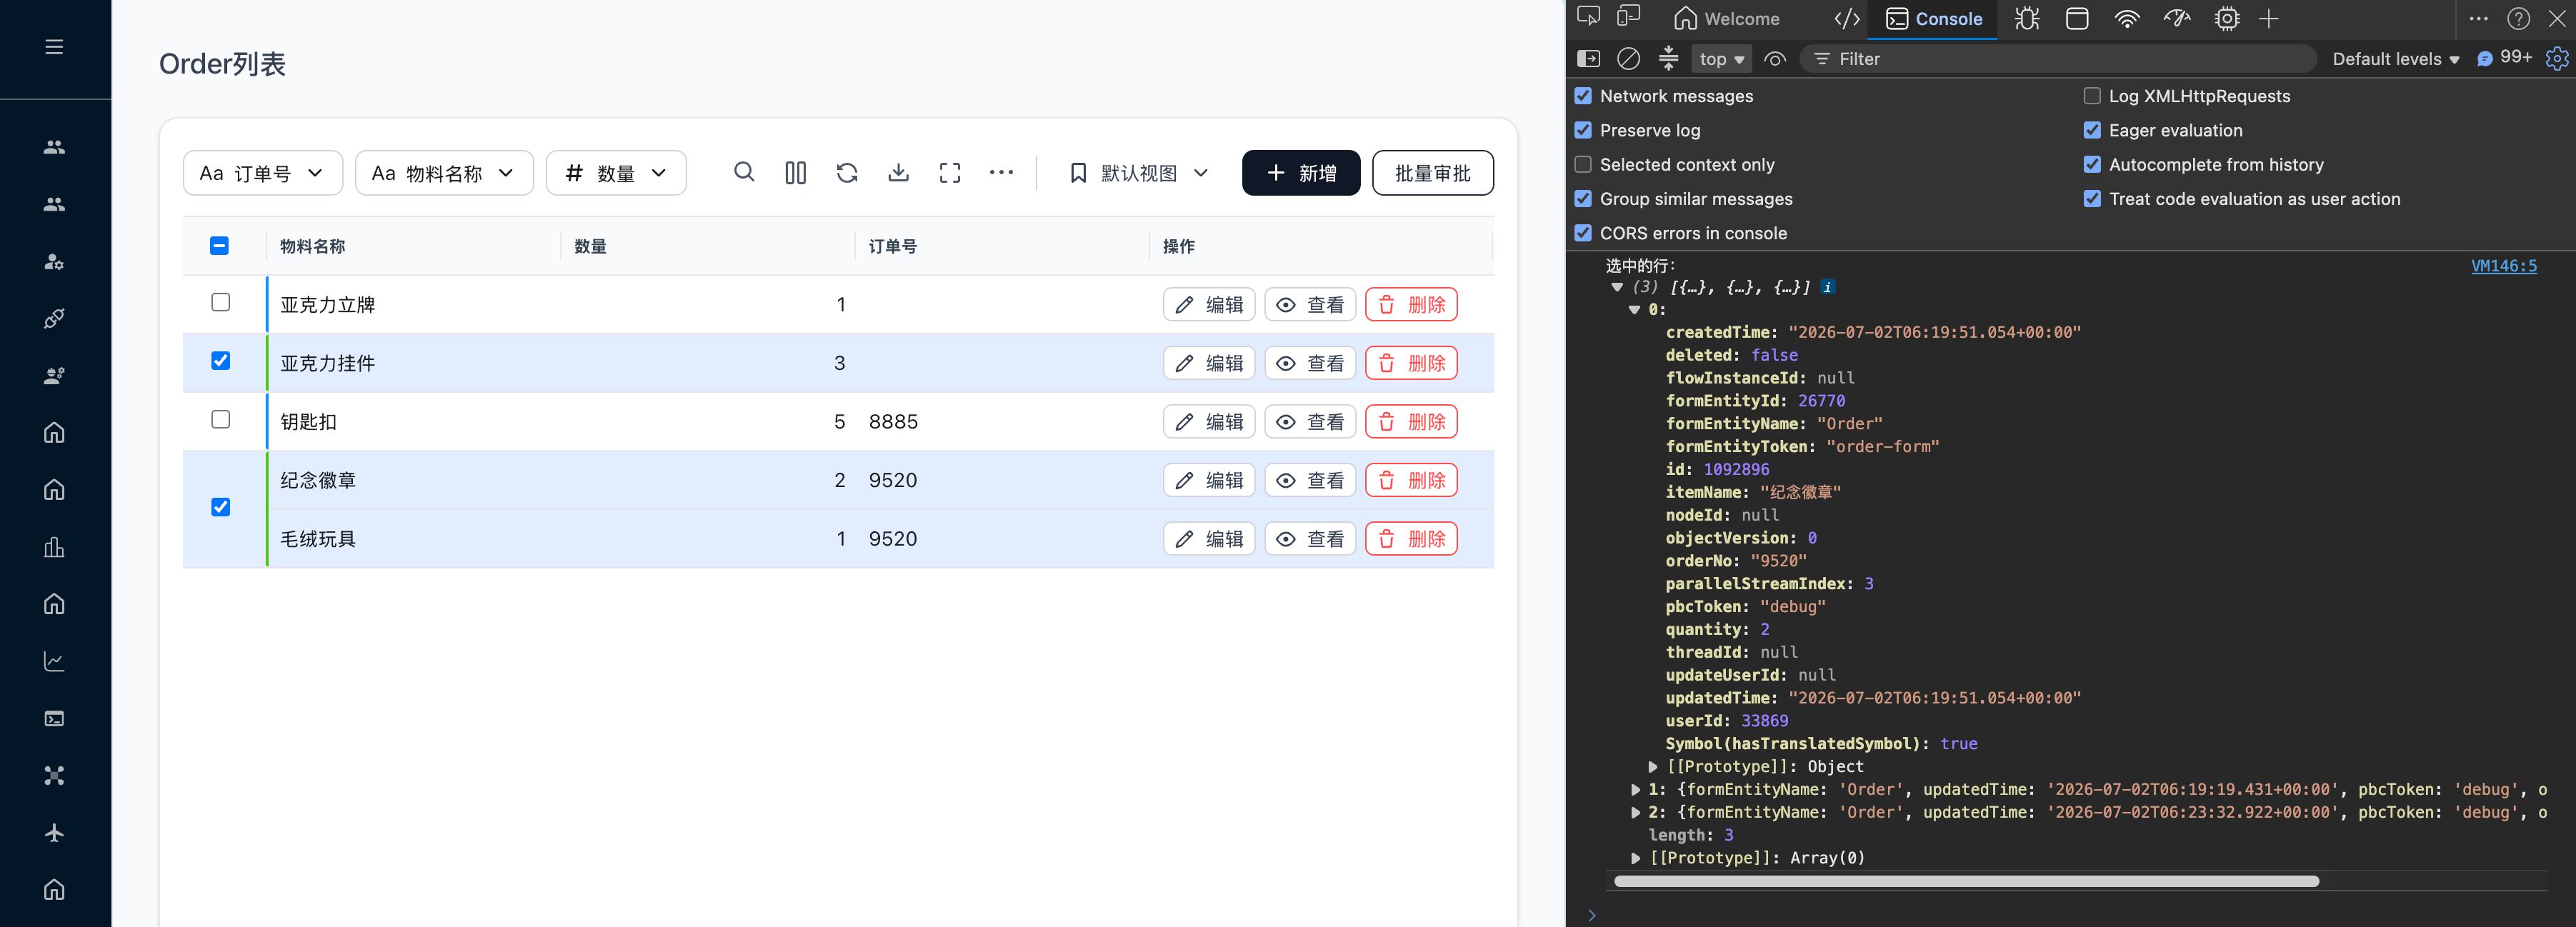
运行时点击按钮后获取选中行数据的效果:
CSS 样式自定义
组件在运行时会为合并的单元格动态添加 CSS class,方便自定义样式:
可用的 class
| Class 名称 | 添加时机 | 说明 |
|---|---|---|
icp-group-select-cell-selected | 组内有任意行被选中时 | 控制合并单元格的选中背景色 |
icp-group-select-even | 分组序号为偶数(0, 2, 4...) | 用于区分相邻组 |
icp-group-select-odd | 分组序号为奇数(1, 3, 5...) | 用于区分相邻组 |
自定义奇偶组样式示例
利用 icp-group-select-even / icp-group-select-odd 可以为相邻组添加不同的视觉区分,例如不同颜色的右边框:
/* 偶数组:蓝色右边框 */
.icp-group-select-even {
  border-right: 3px solid #1890ff !important;
}

/* 奇数组:绿色右边框 */
.icp-group-select-odd {
  border-right: 3px solid #52c41a !important;
}
通过 columnDef 的 cellClass 自定义
如果只想为某张特定表格的合并选择列定制样式,可以在列配置 JSON 中使用 cellClass:
{
  "type": "GROUP_SELECT_COLUMN",
  "colId": "group-selection",
  "field": "orderNo",
  "cellClass": "my-custom-group-cell"
}
结合奇偶组 class 编写对应的 CSS 样式:
/* 偶数组:蓝色右边框 */
.my-custom-group-cell.icp-group-select-even {
  border-right: 3px solid #1890ff !important;
}

/* 奇数组:绿色右边框 */
.my-custom-group-cell.icp-group-select-odd {
  border-right: 3px solid #52c41a !important;
}
在哪里配置 CSS
以上自定义 CSS 可以在前端配置中进行设置,详细操作请参考:外观配置 - CSS 自定义。
注意事项与限制
-
仅支持一次性加载(clientSide)模式
合并多行选择依赖客户端 API 来实现表头全选和整组连续判断,不支持 serverSide(服务端分页/排序)模式。切换为该列类型时,表格会自动从 serverSide 切换到 clientSide。 -
必须关闭分页
分页会将数据拆分到不同页面,导致同一组的行可能被分到不同页中,无法跨页合并。 -
其它列的排序与分组被禁用
用户手动排序或分组其它列会打破分组字段的排序连续性,导致合并失效。因此启用该列后,其它列的排序和分组功能会被自动禁用。 -
性能考虑
由于必须使用 clientSide 模式且关闭分页,所有数据会一次性加载到前端。数据量较大时(如数万行以上)可能会影响性能,请根据实际业务量评估。 -
空值处理
默认情况下,分组字段值为空(null/undefined/'')的行各自独立,不会合并。如需空值行也参与合并,取消勾选"不合并空值数据"。 -
排序方向的作用
排序配置(升序/降序)的主要作用是确保同组数据相邻排列。选择升序或降序取决于业务上希望哪些组排在前面。
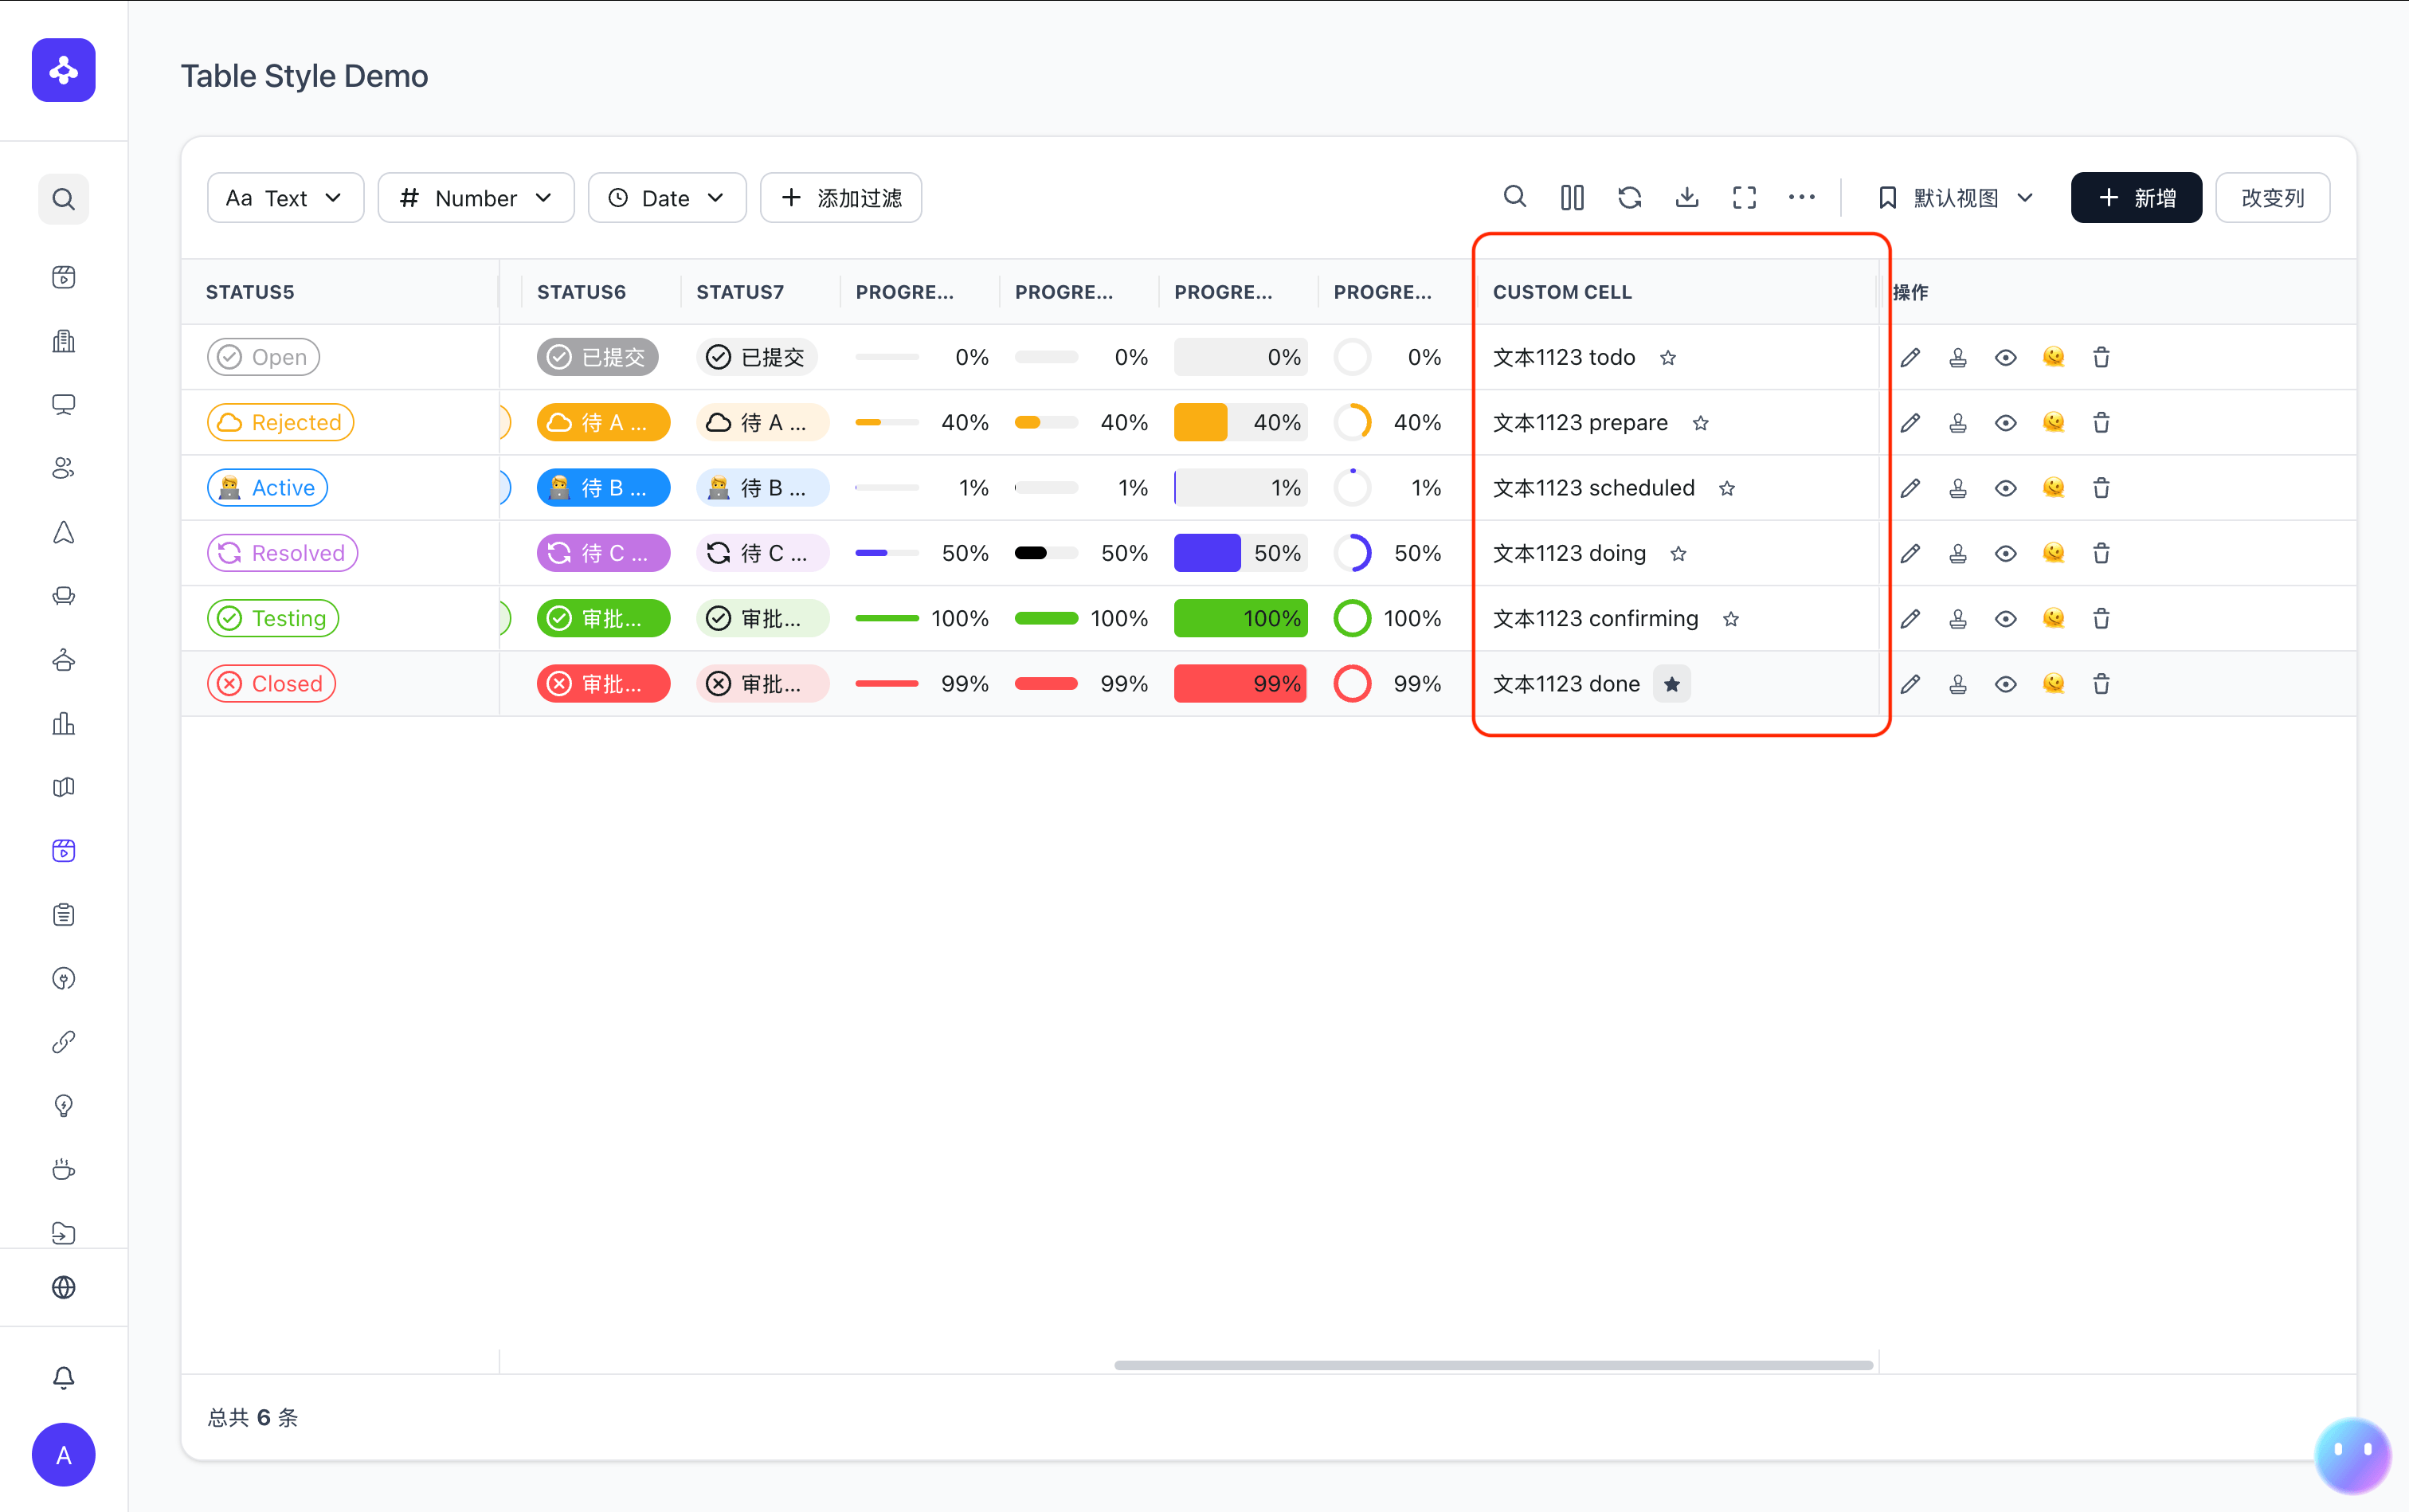
复杂表格列定义(CUSTOM_COLUMN)
请勿滥用 CUSTOM_COLUMN。由于每个自定义列都需要递归渲染低代码组件树,过多使用可能会带来性能问题。仅在已有的其他所有列类型(如 TEXT_COLUMN、SELECT_COLUMN、AVATAR_COLUMN 等)均无法满足需求时,才使用 CUSTOM_COLUMN 来实现自定义列内容。
当内置的列类型无法满足需求时,可以使用 CUSTOM_COLUMN 类型来自定义表格列的渲染内容。CUSTOM_COLUMN 允许你在列定义中直接使用低代码 JSON 配置来描述单元格的渲染结构,无需编写 JS 代码。
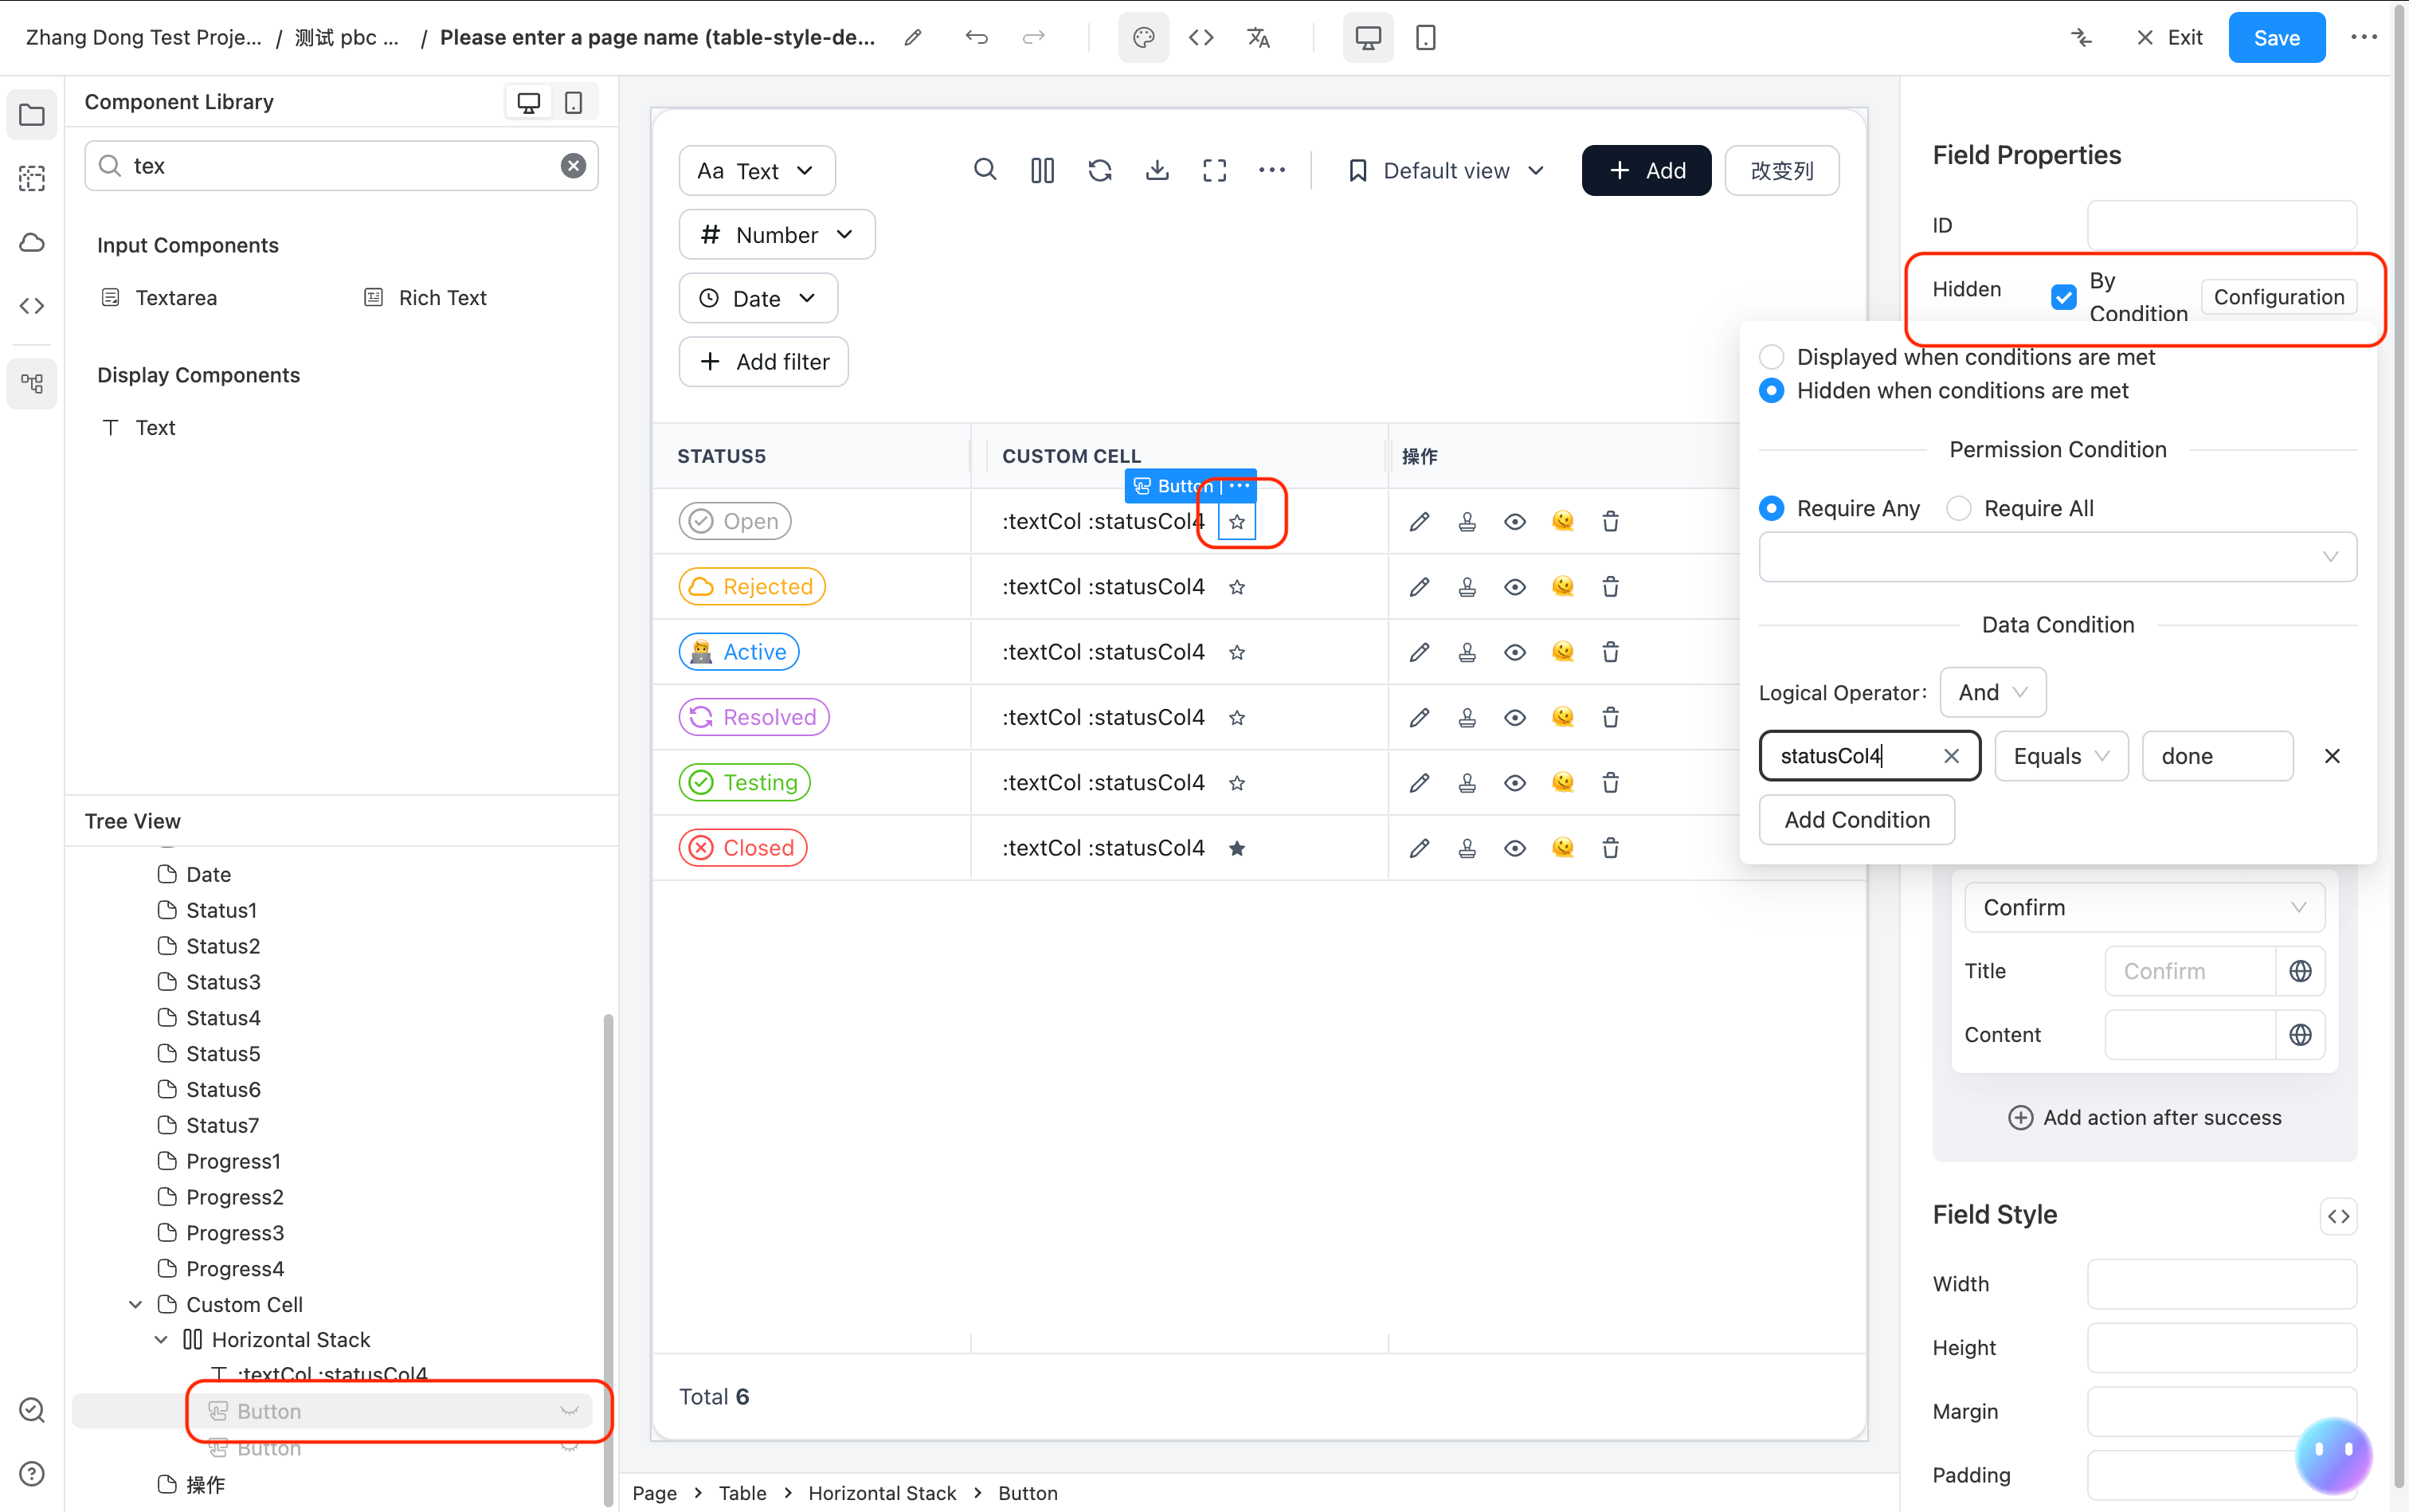
例如下图用红框圈起来的 2 个 Text 拼接 + 1 个 Button 动作。
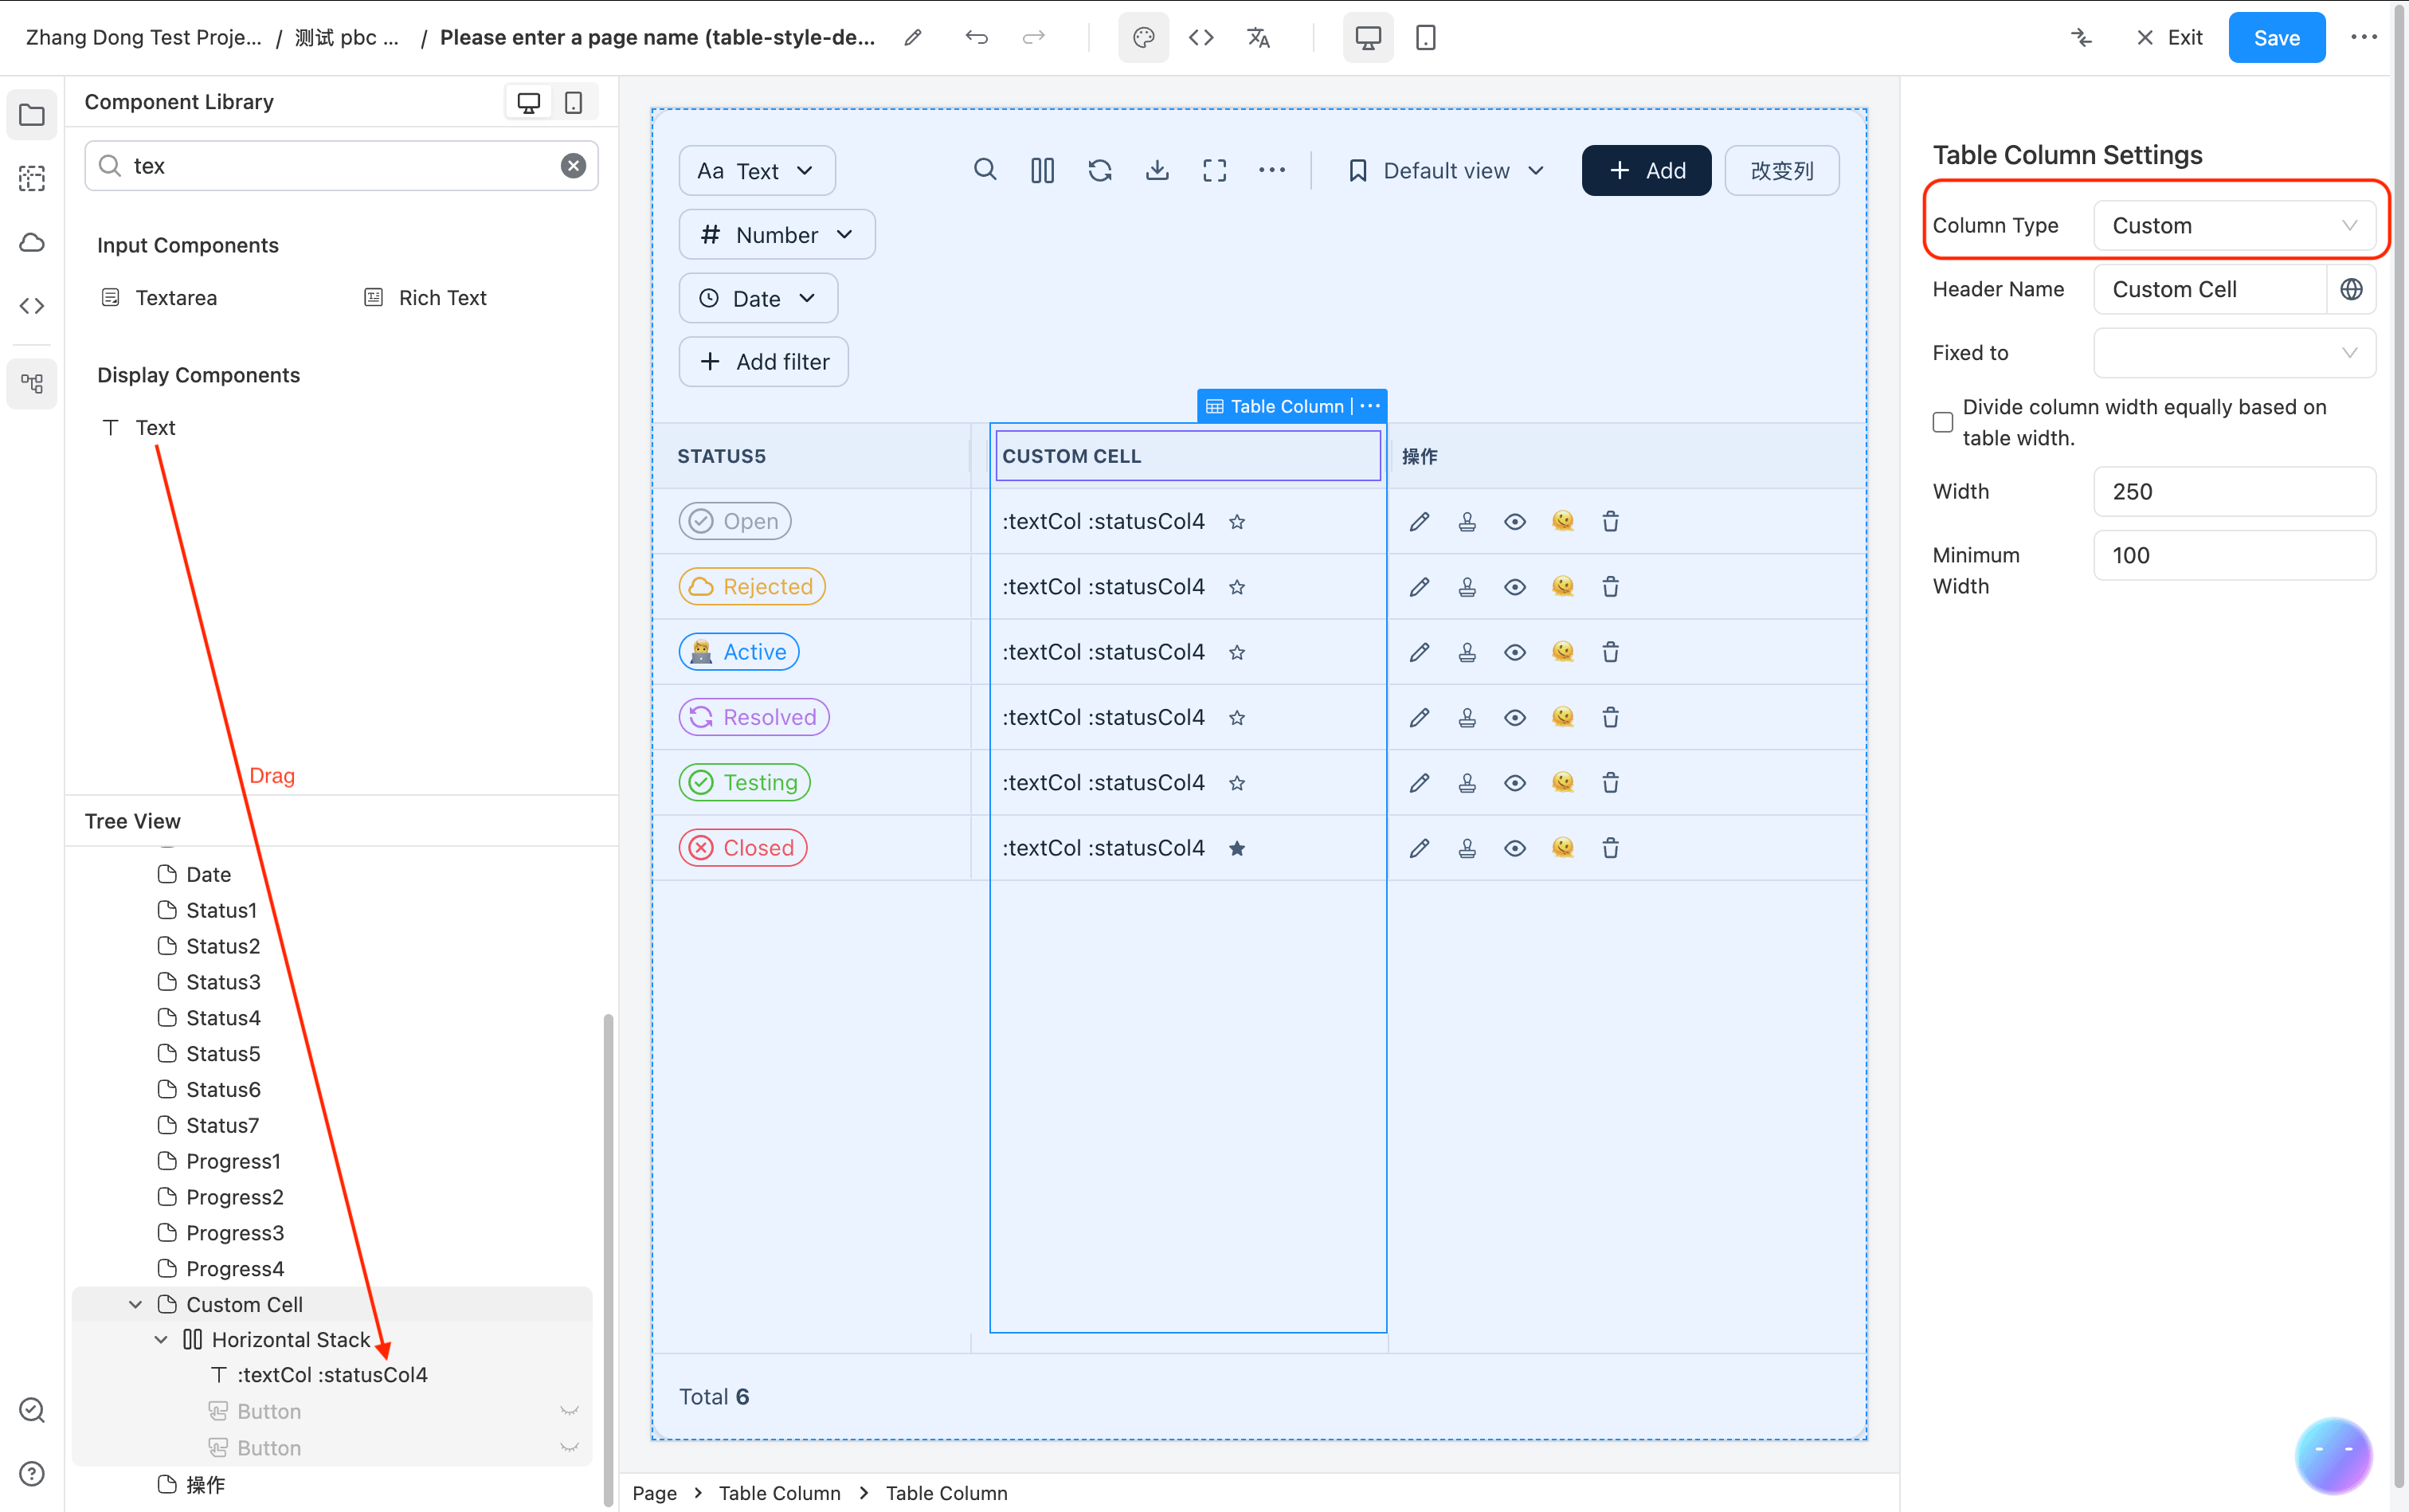
配置示例
以下示例展示了一个自定义列,包含文本显示和根据行数据条件显示不同图标按钮的效果:
{
  "type": "CUSTOM_COLUMN",
  "colId": "customCol",
  "headerName": "Custom Cell",
  "width": 250,
  "flex": null,
  "cellRendererParams": {
    "fields": [
      {
        "component": "Stack",
        "componentProps": {
          "flexDirection": "row",
          "alignItems": "center"
        },
        "fields": [
          {
            "component": "Text",
            "componentProps": {
              "content": ":textCol :statusCol4"
            }
          },
          {
            "component": "Button",
            "componentProps": {
              "icon": "material:star-border-rounded",
              "action": {
                "type": "confirm"
              },
              "type": "text",
              "size": "small"
            },
            "hidden": {
              "dataPredicate": {
                "operator": "AND",
                "conditions": [
                  {
                    "condition": "equals",
                    "value": "done",
                    "dataField": "statusCol4"
                  }
                ]
              }
            }
          },
          {
            "component": "Button",
            "componentProps": {
              "icon": "material:star-rounded",
              "action": {
                "type": "confirm"
              },
              "type": "text",
              "size": "small"
            },
            "hidden": {
              "dataPredicate": {
                "operator": "AND",
                "conditions": [
                  {
                    "condition": "equals",
                    "value": "done",
                    "dataField": "statusCol4"
                  }
                ]
              },
              "valueIfPositive": false,
              "valueIfNegative": true
            }
          }
        ]
      }
    ]
  }
}
上面的示例效果为:
- 显示当前行
textCol和statusCol4字段的拼接文本 - 当
statusCol4不等于"done"时,显示空心星标按钮(star-border) - 当
statusCol4等于"done"时,显示实心星标按钮(star)
基本原理
CUSTOM_COLUMN 列通过 cellRendererParams.fields 接收一组低代码组件 JSON 配置,使用 RecursionRenderer 递归渲染。渲染时会将当前行数据注入上下文,子组件中可以通过 :fieldName 变量语法引用当前行的字段值。
JSON 配置方式
在表格列定义中,将 type 设置为 CUSTOM_COLUMN,并在 cellRendererParams.fields 中定义要渲染的组件结构:
{
  "type": "CUSTOM_COLUMN",
  "colId": "customCol",
  "headerName": "自定义列",
  "width": 250,
  "cellRendererParams": {
    "fields": [
      // 低代码组件 JSON 配置
    ]
  }
}
关键属性说明:
| 属性 | 说明 |
|---|---|
type | 固定值 "CUSTOM_COLUMN" |
colId | 列的唯一标识 |
headerName | 列标题 |
cellRendererParams.fields | 低代码组件 JSON 数组,定义单元格的渲染内容 |
CUSTOM_COLUMN 默认 sortable: false、filter: false,因为自定义渲染列通常不具备排序和过滤能力。
引用当前行数据
在 fields 配置中,可以通过 :fieldName 语法引用当前行的字段值。例如当前行数据为 { "textCol": "Hello", "statusCol4": "done" },则:
:textCol会解析为"Hello":statusCol4会解析为"done"- 也支持拼接使用,如
":textCol :statusCol4"会解析为"Hello done"
使用场景
CUSTOM_COLUMN 适用于以下场景:
- 需要在单元格中组合多个组件(如文本 + 按钮 + 图标)
- 需要根据行数据条件渲染不同内容(通过
hidden+dataPredicate) - 需要在单元格中放置可交互组件(如按钮触发 action)
- 需要自定义单元格布局(通过 Stack 等布局组件)
CUSTOM_COLUMN 对可编辑表格 EditableTable 同样适用。
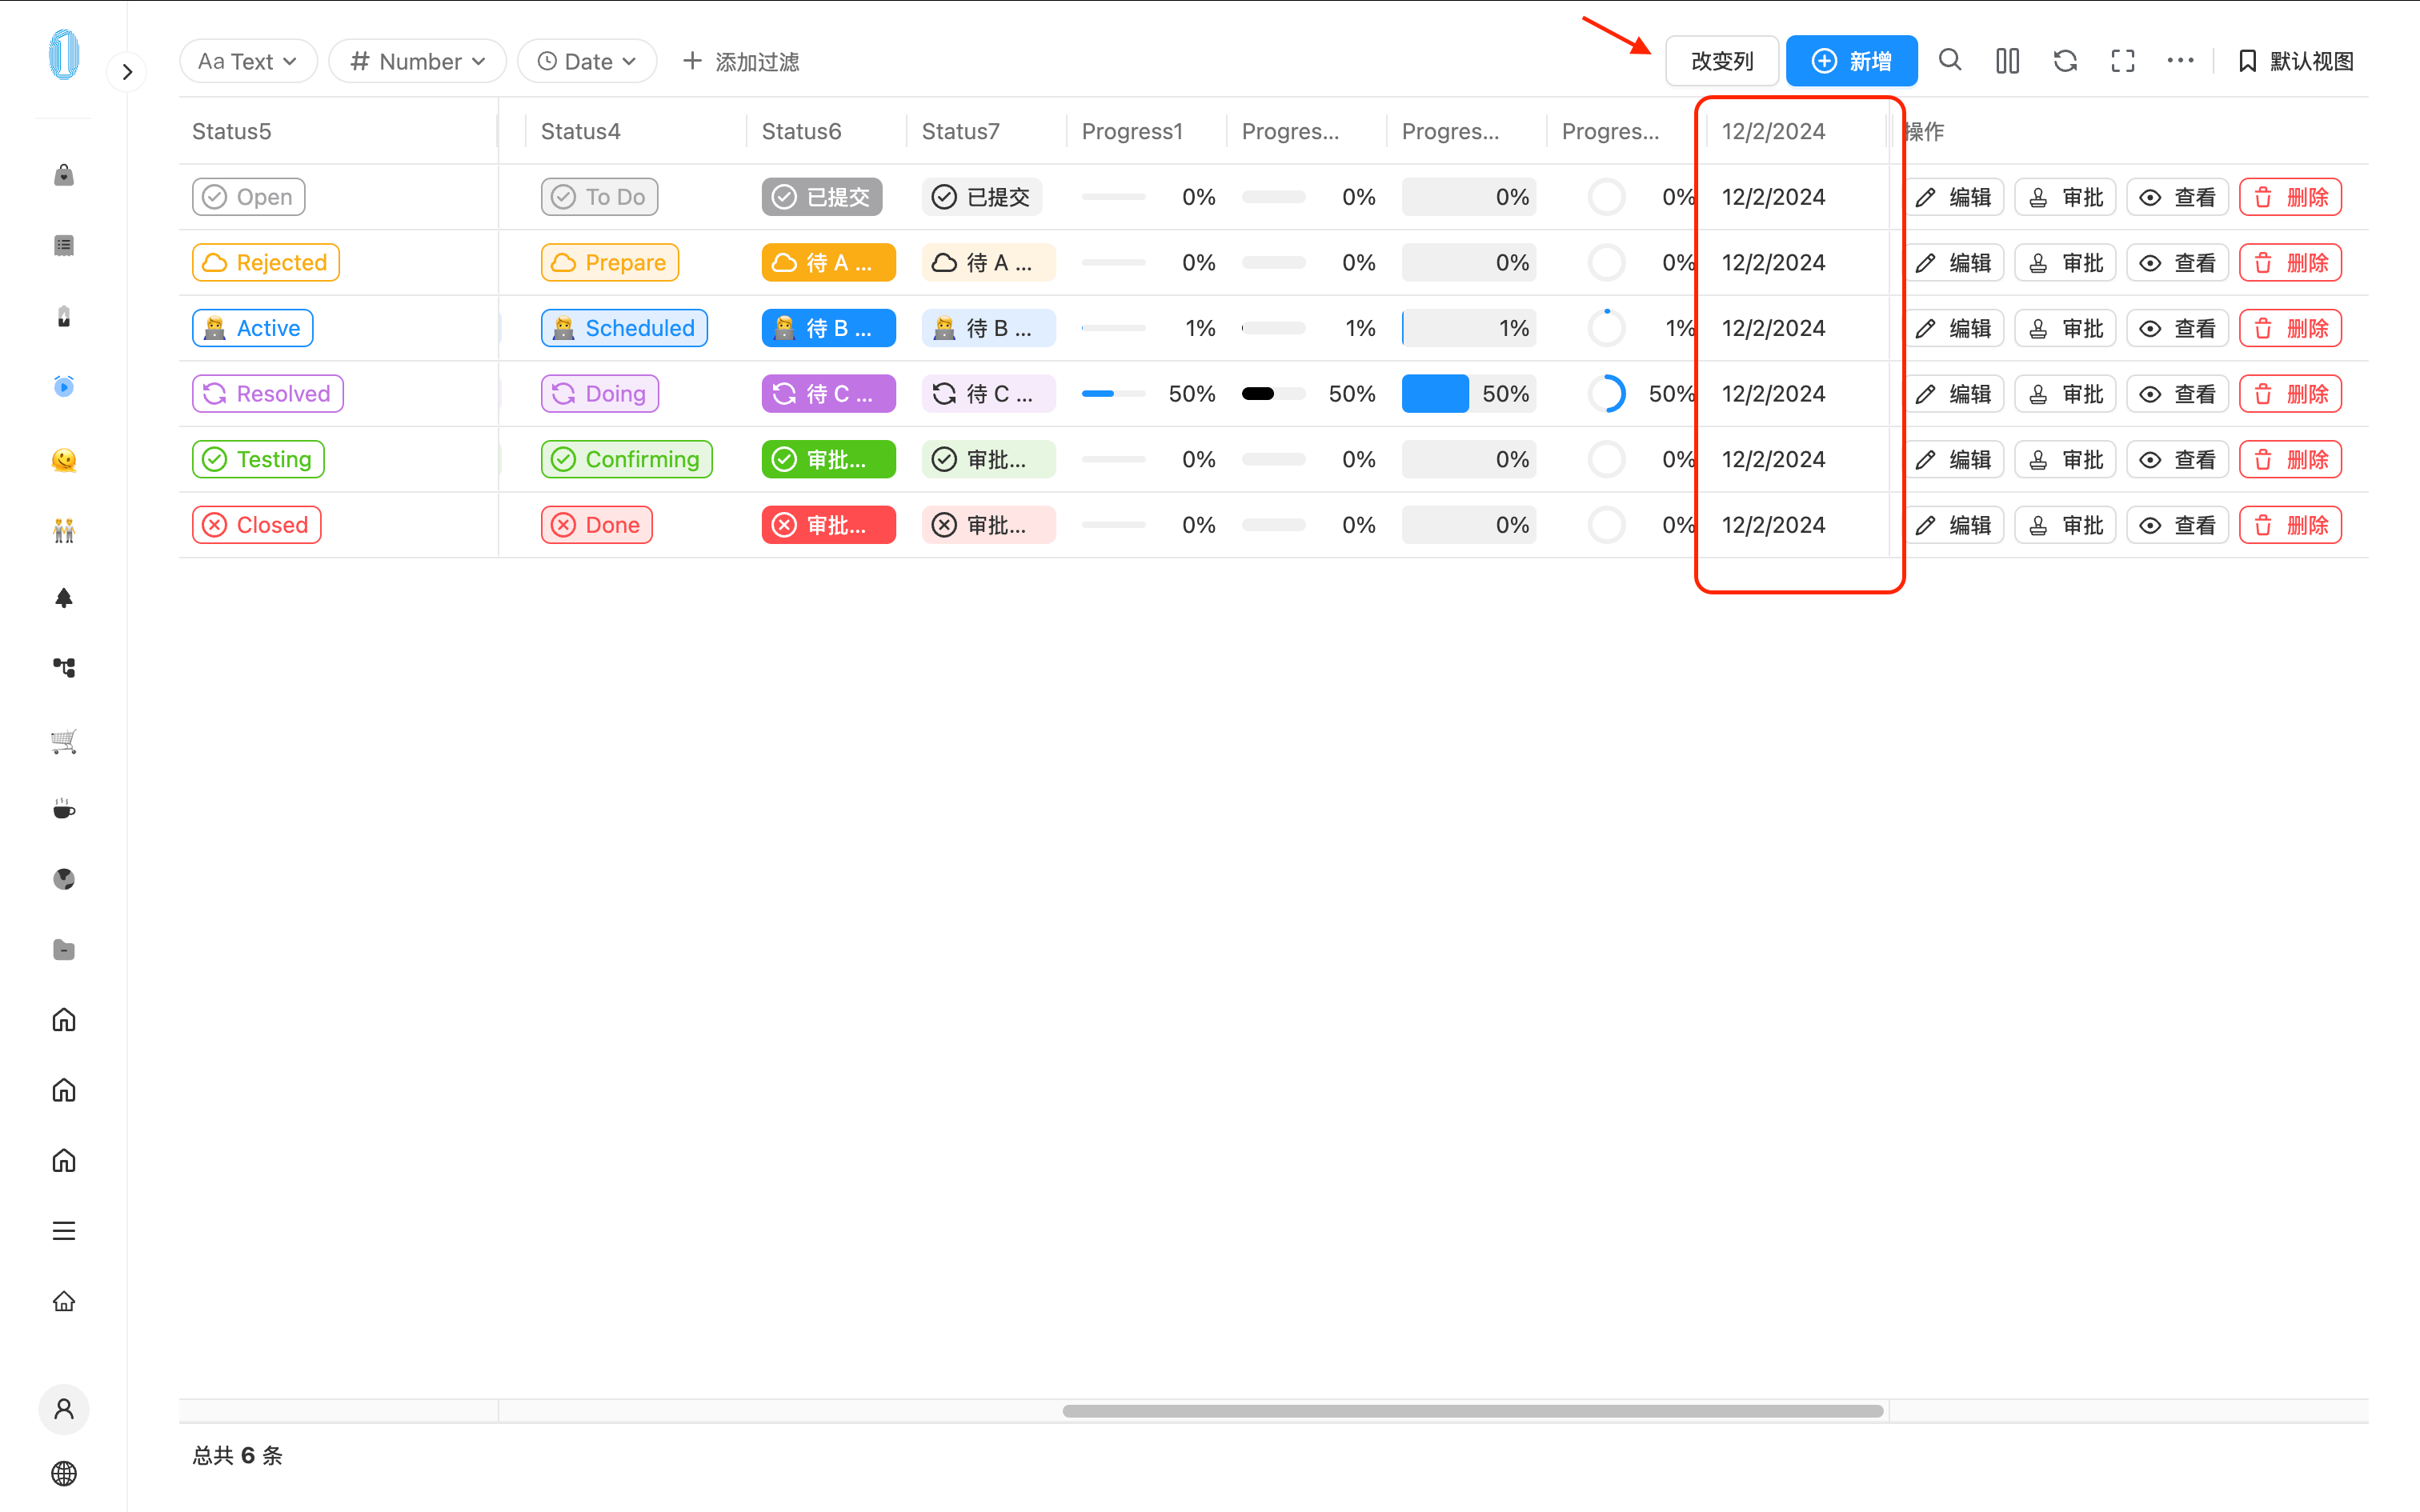
动态修改表格列
表格 API 接口有 updateComponentProps 方法,通过此方法可以修改任意的表格属性,包括表格列的定义 columnDefs。
如下示例所示,在表格渲染过后,点击 “添加列” 的按钮过后,动态往表格后面添加了一列 12/2/2024。
设计器中的配置如下:
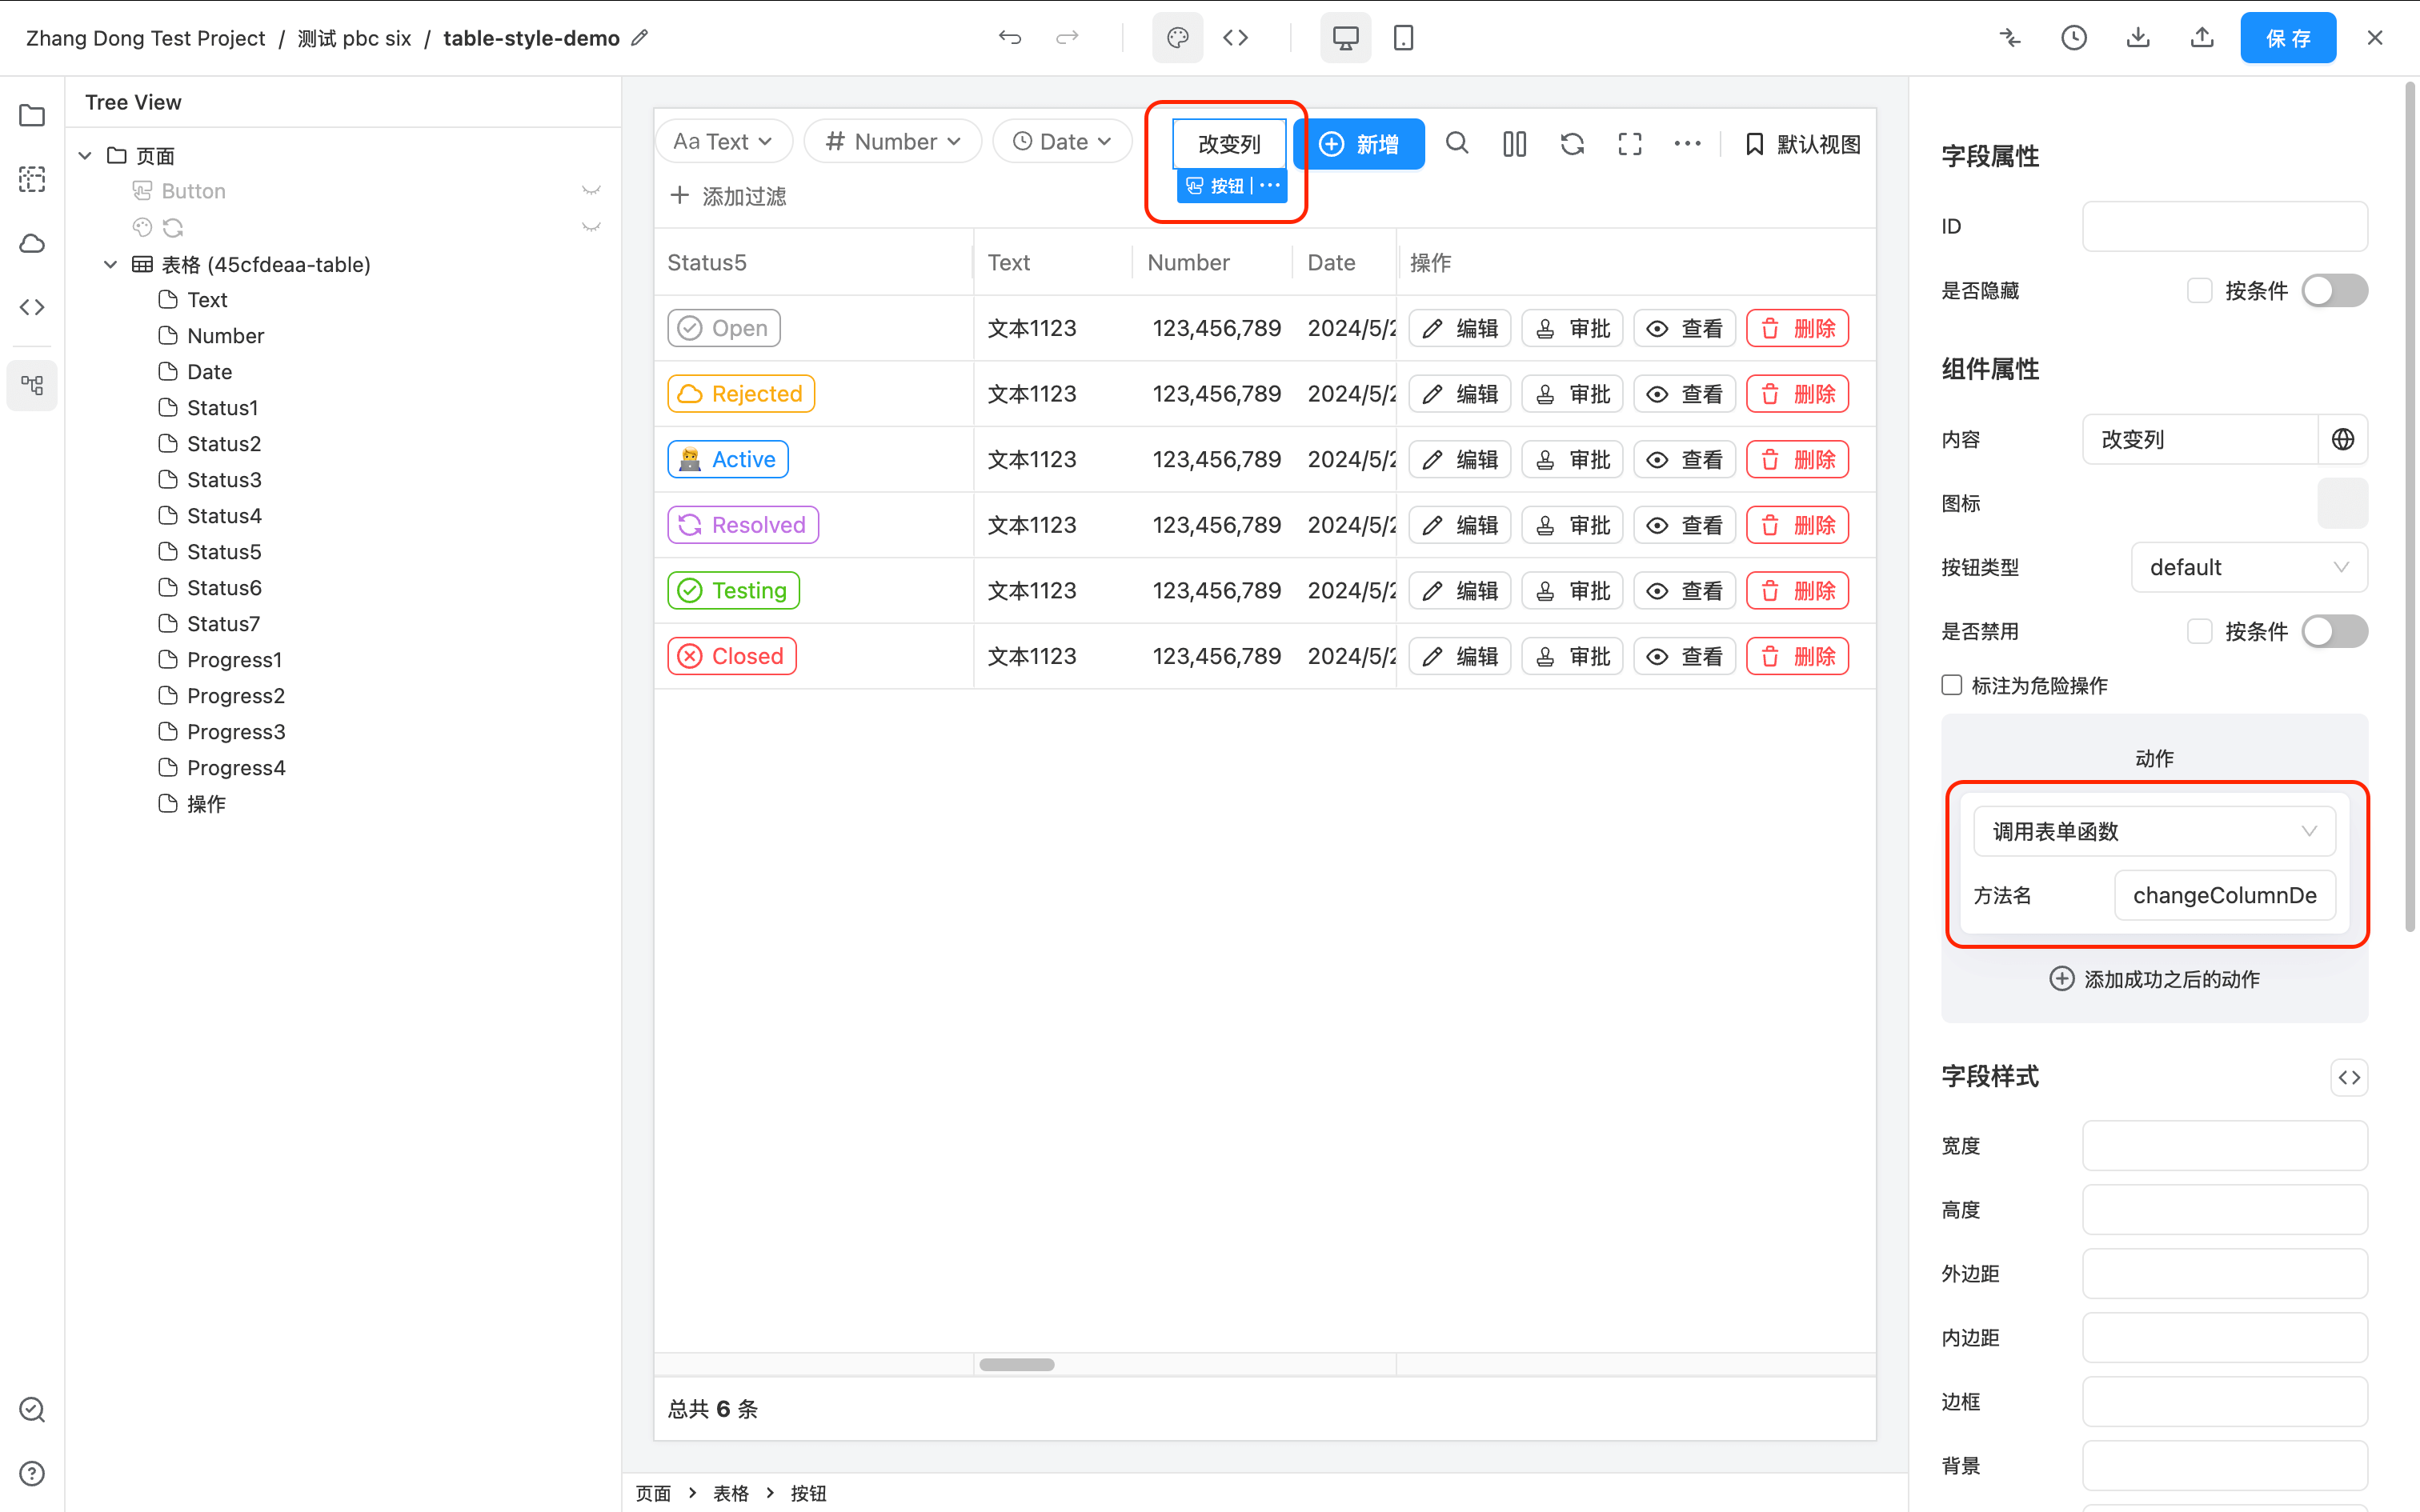
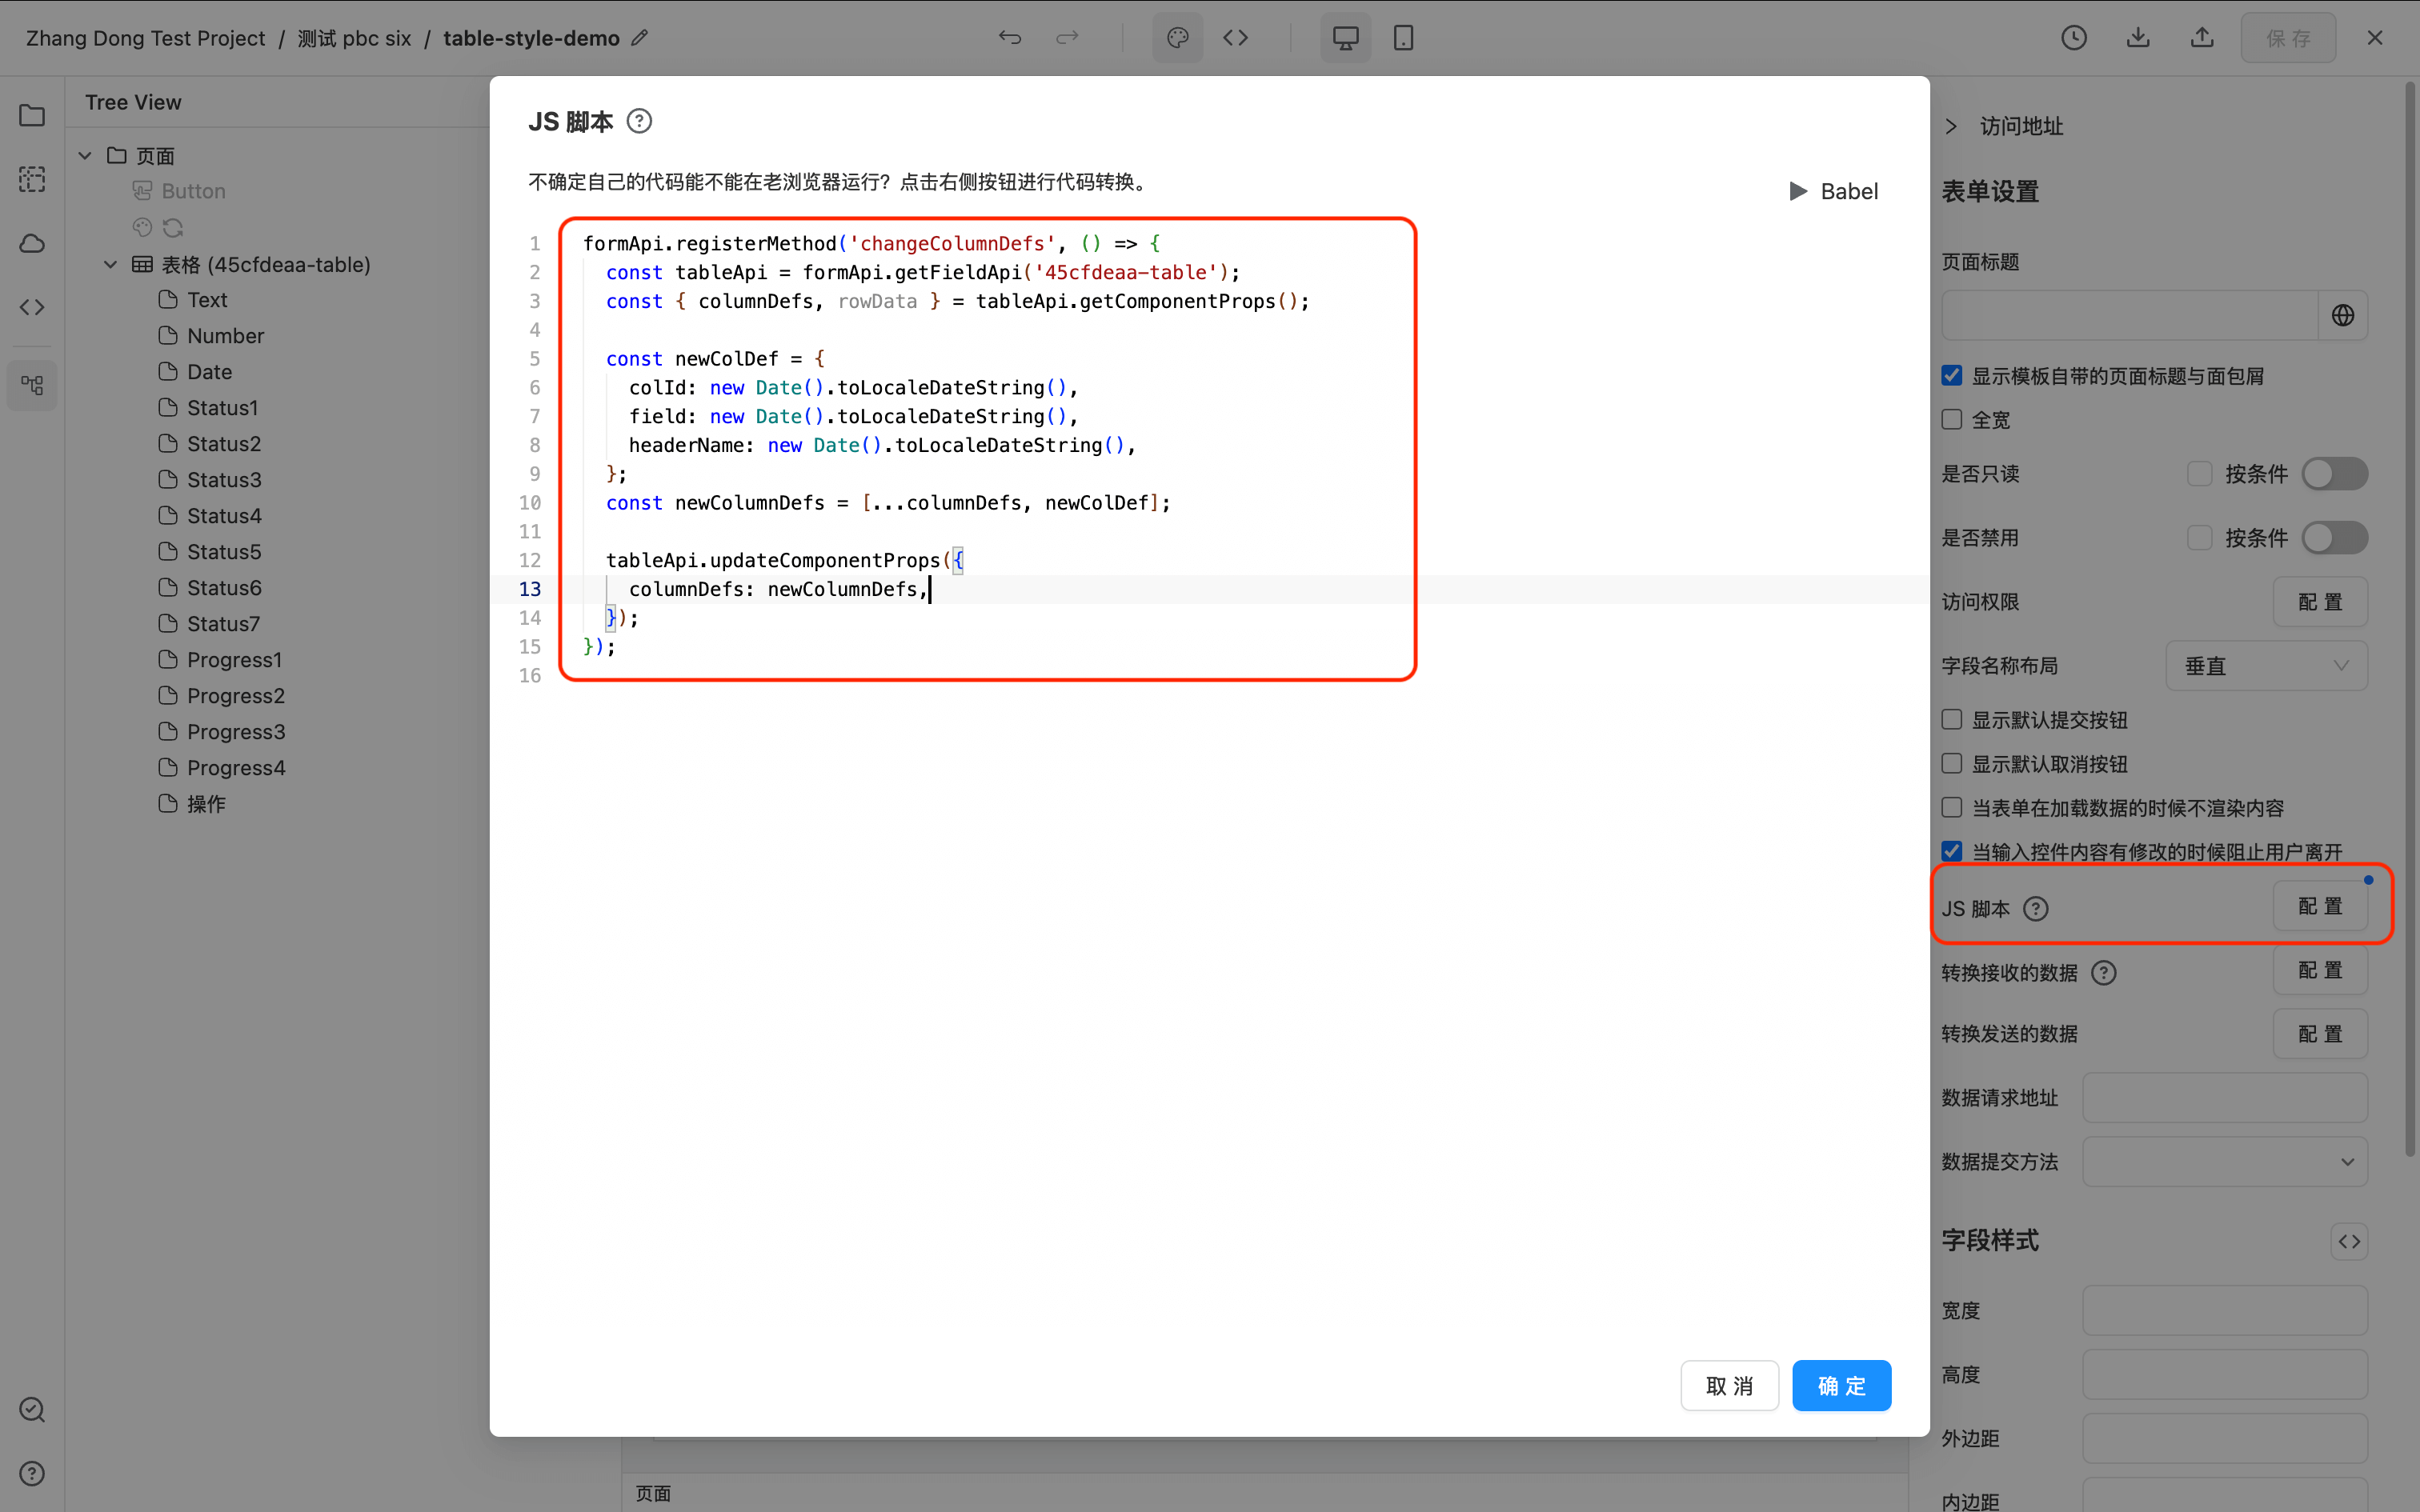
此示例的 JS 代码如下:
formApi.registerMethod('changeColumnDefs', () => {
  const tableApi = formApi.getFieldApi('45cfdeaa-table');
  const { columnDefs } = tableApi.getComponentProps();

  const newColDef = {
    colId: new Date().toLocaleDateString(),
    field: new Date().toLocaleDateString(),
    headerName: new Date().toLocaleDateString(),
  };
  const newColumnDefs = [...columnDefs, newColDef];

  tableApi.updateComponentProps({
    columnDefs: newColumnDefs,
  });
});
将外部过滤条件保存到表格视图
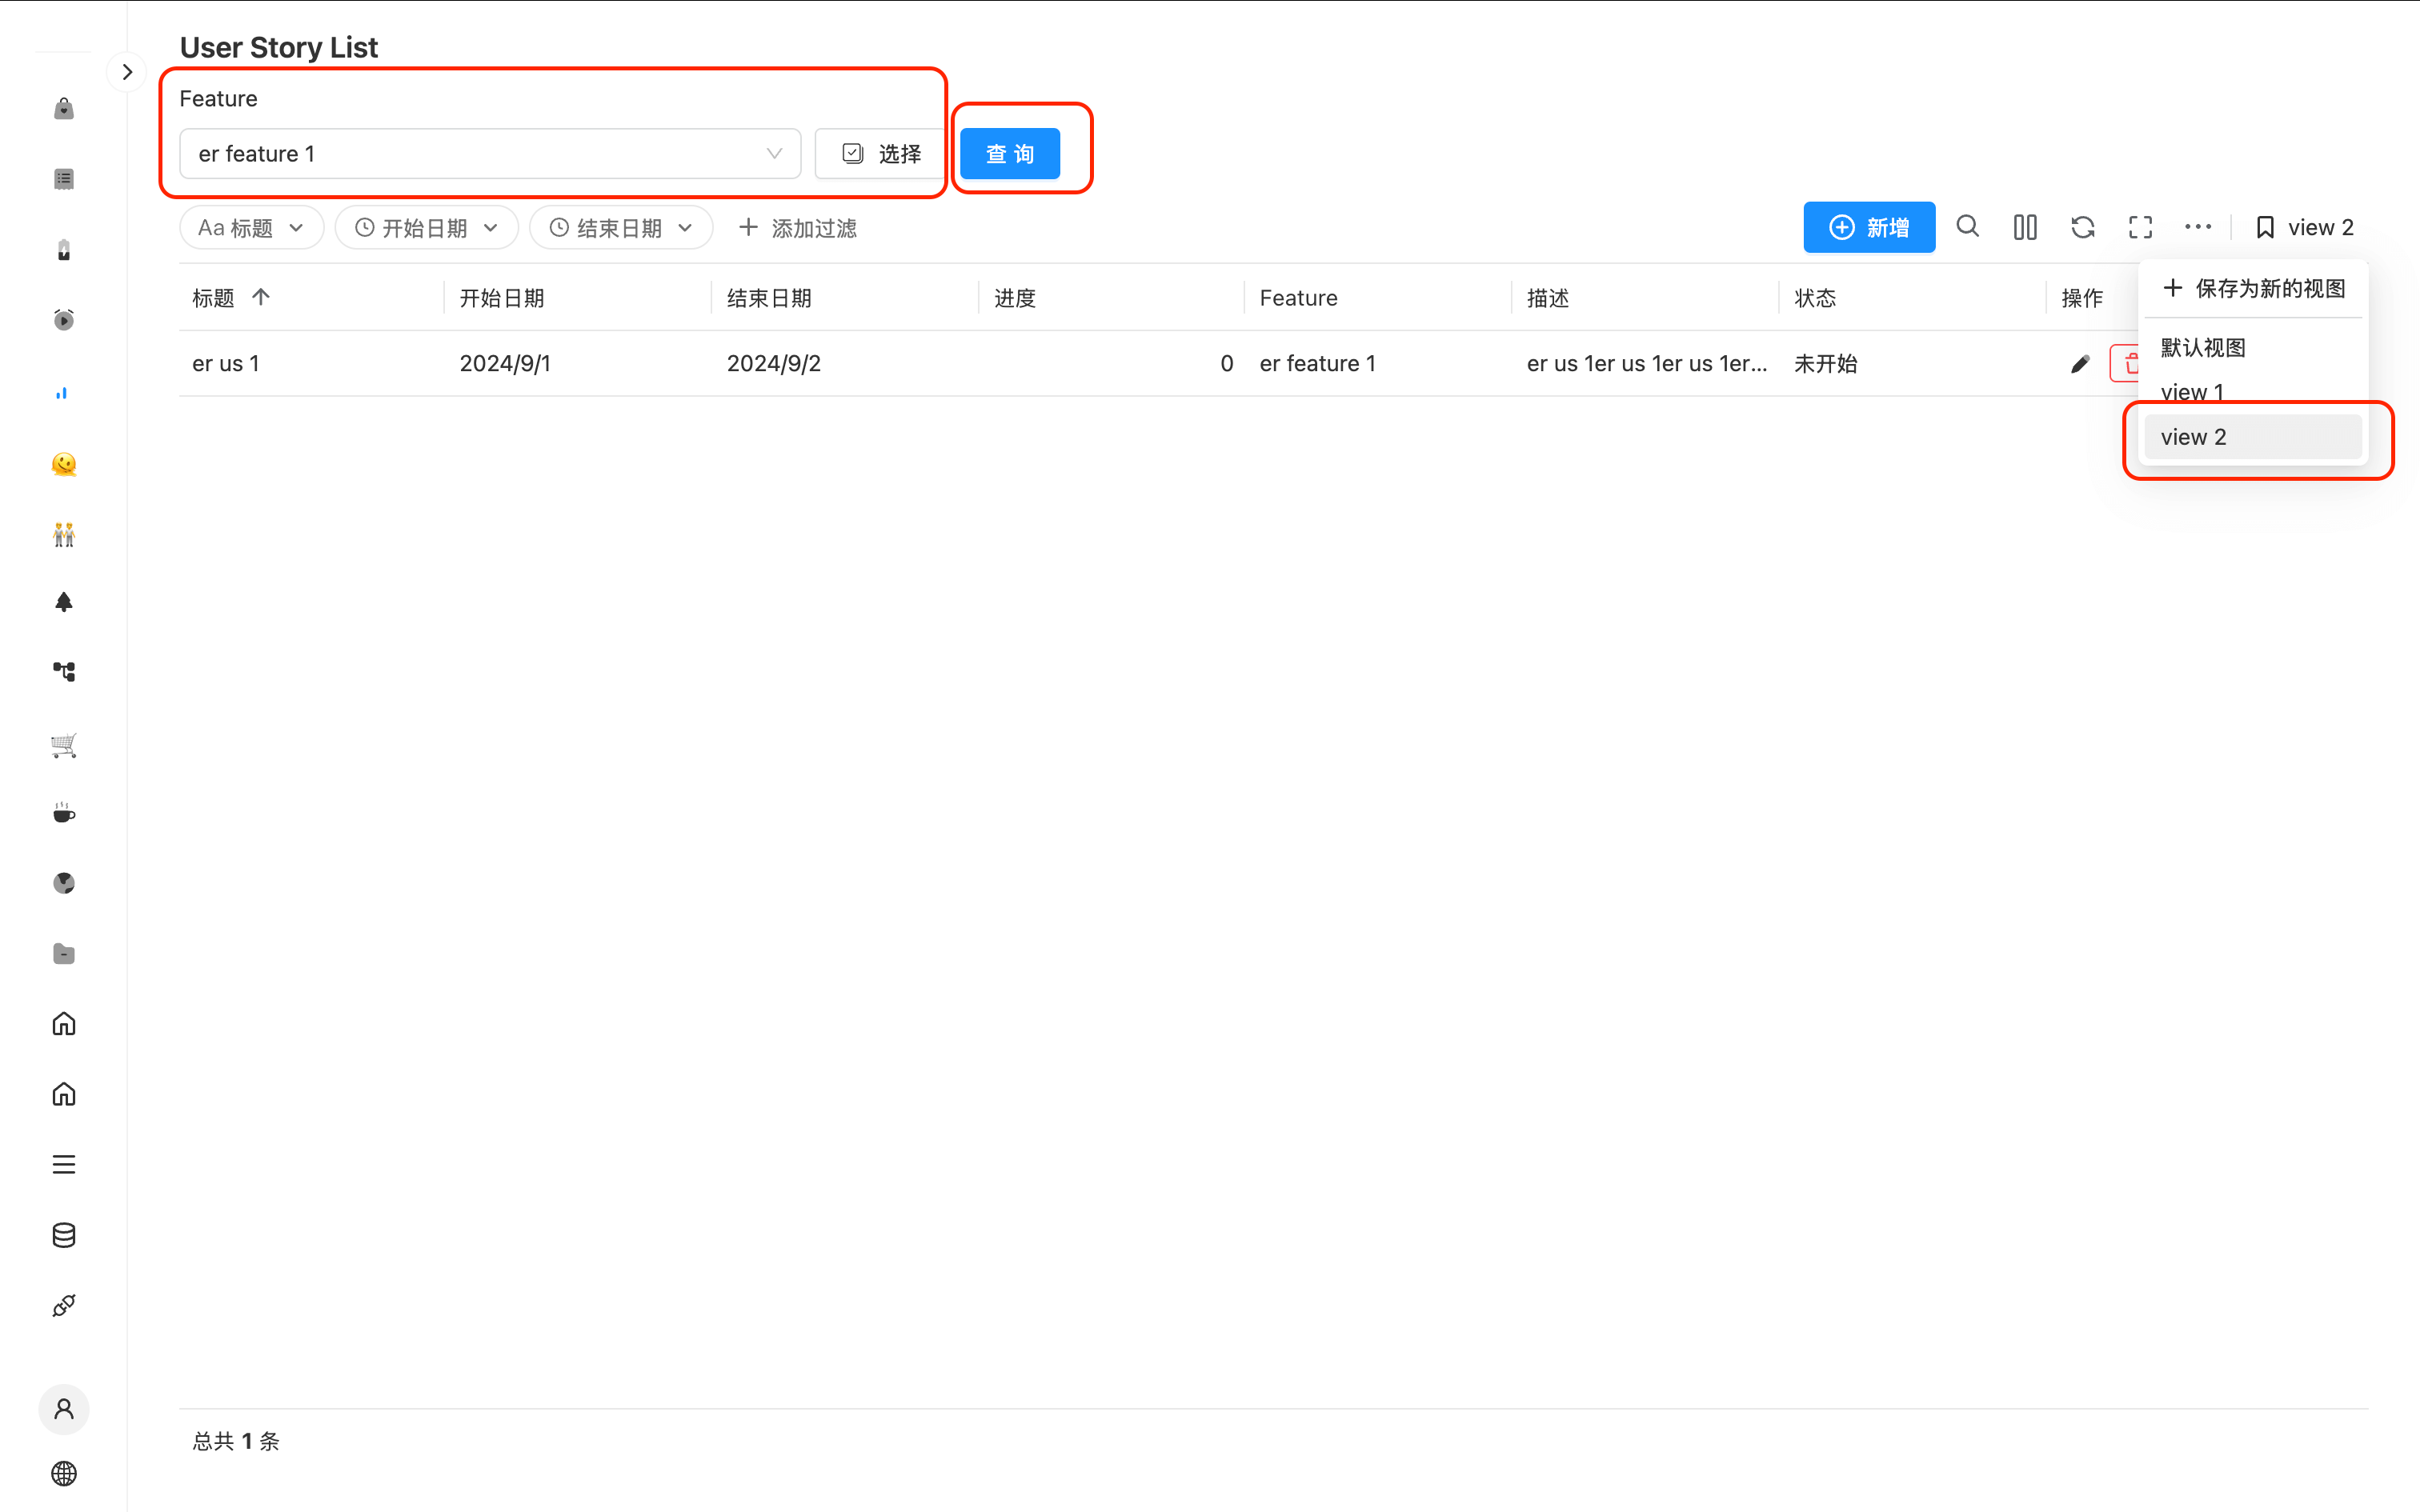
该示例针对场景:不想使用 table toolbar 自带的过滤功能,需要自己将过滤条件配置在表格外部,但是同时又希望跟 table toolbar 自带的 filter 一样将过滤条件存储到 table 的状态里,方便下次刷新页面它依然生效。同时想将外部过滤条件保存到表格的视图里,可以切换视图使用。
如下图所示。左上角是自定义的一个 feature 过滤条件,修改 feature,表格内容会刷新过滤请求。同时将改条件保存在 table toolbar 右上角 的视图里命名为 view 2,下次切换到 view 2 会自动带出 feature 设置的过滤条件。
实现步骤如下:
先实现表格联动外部过滤条件
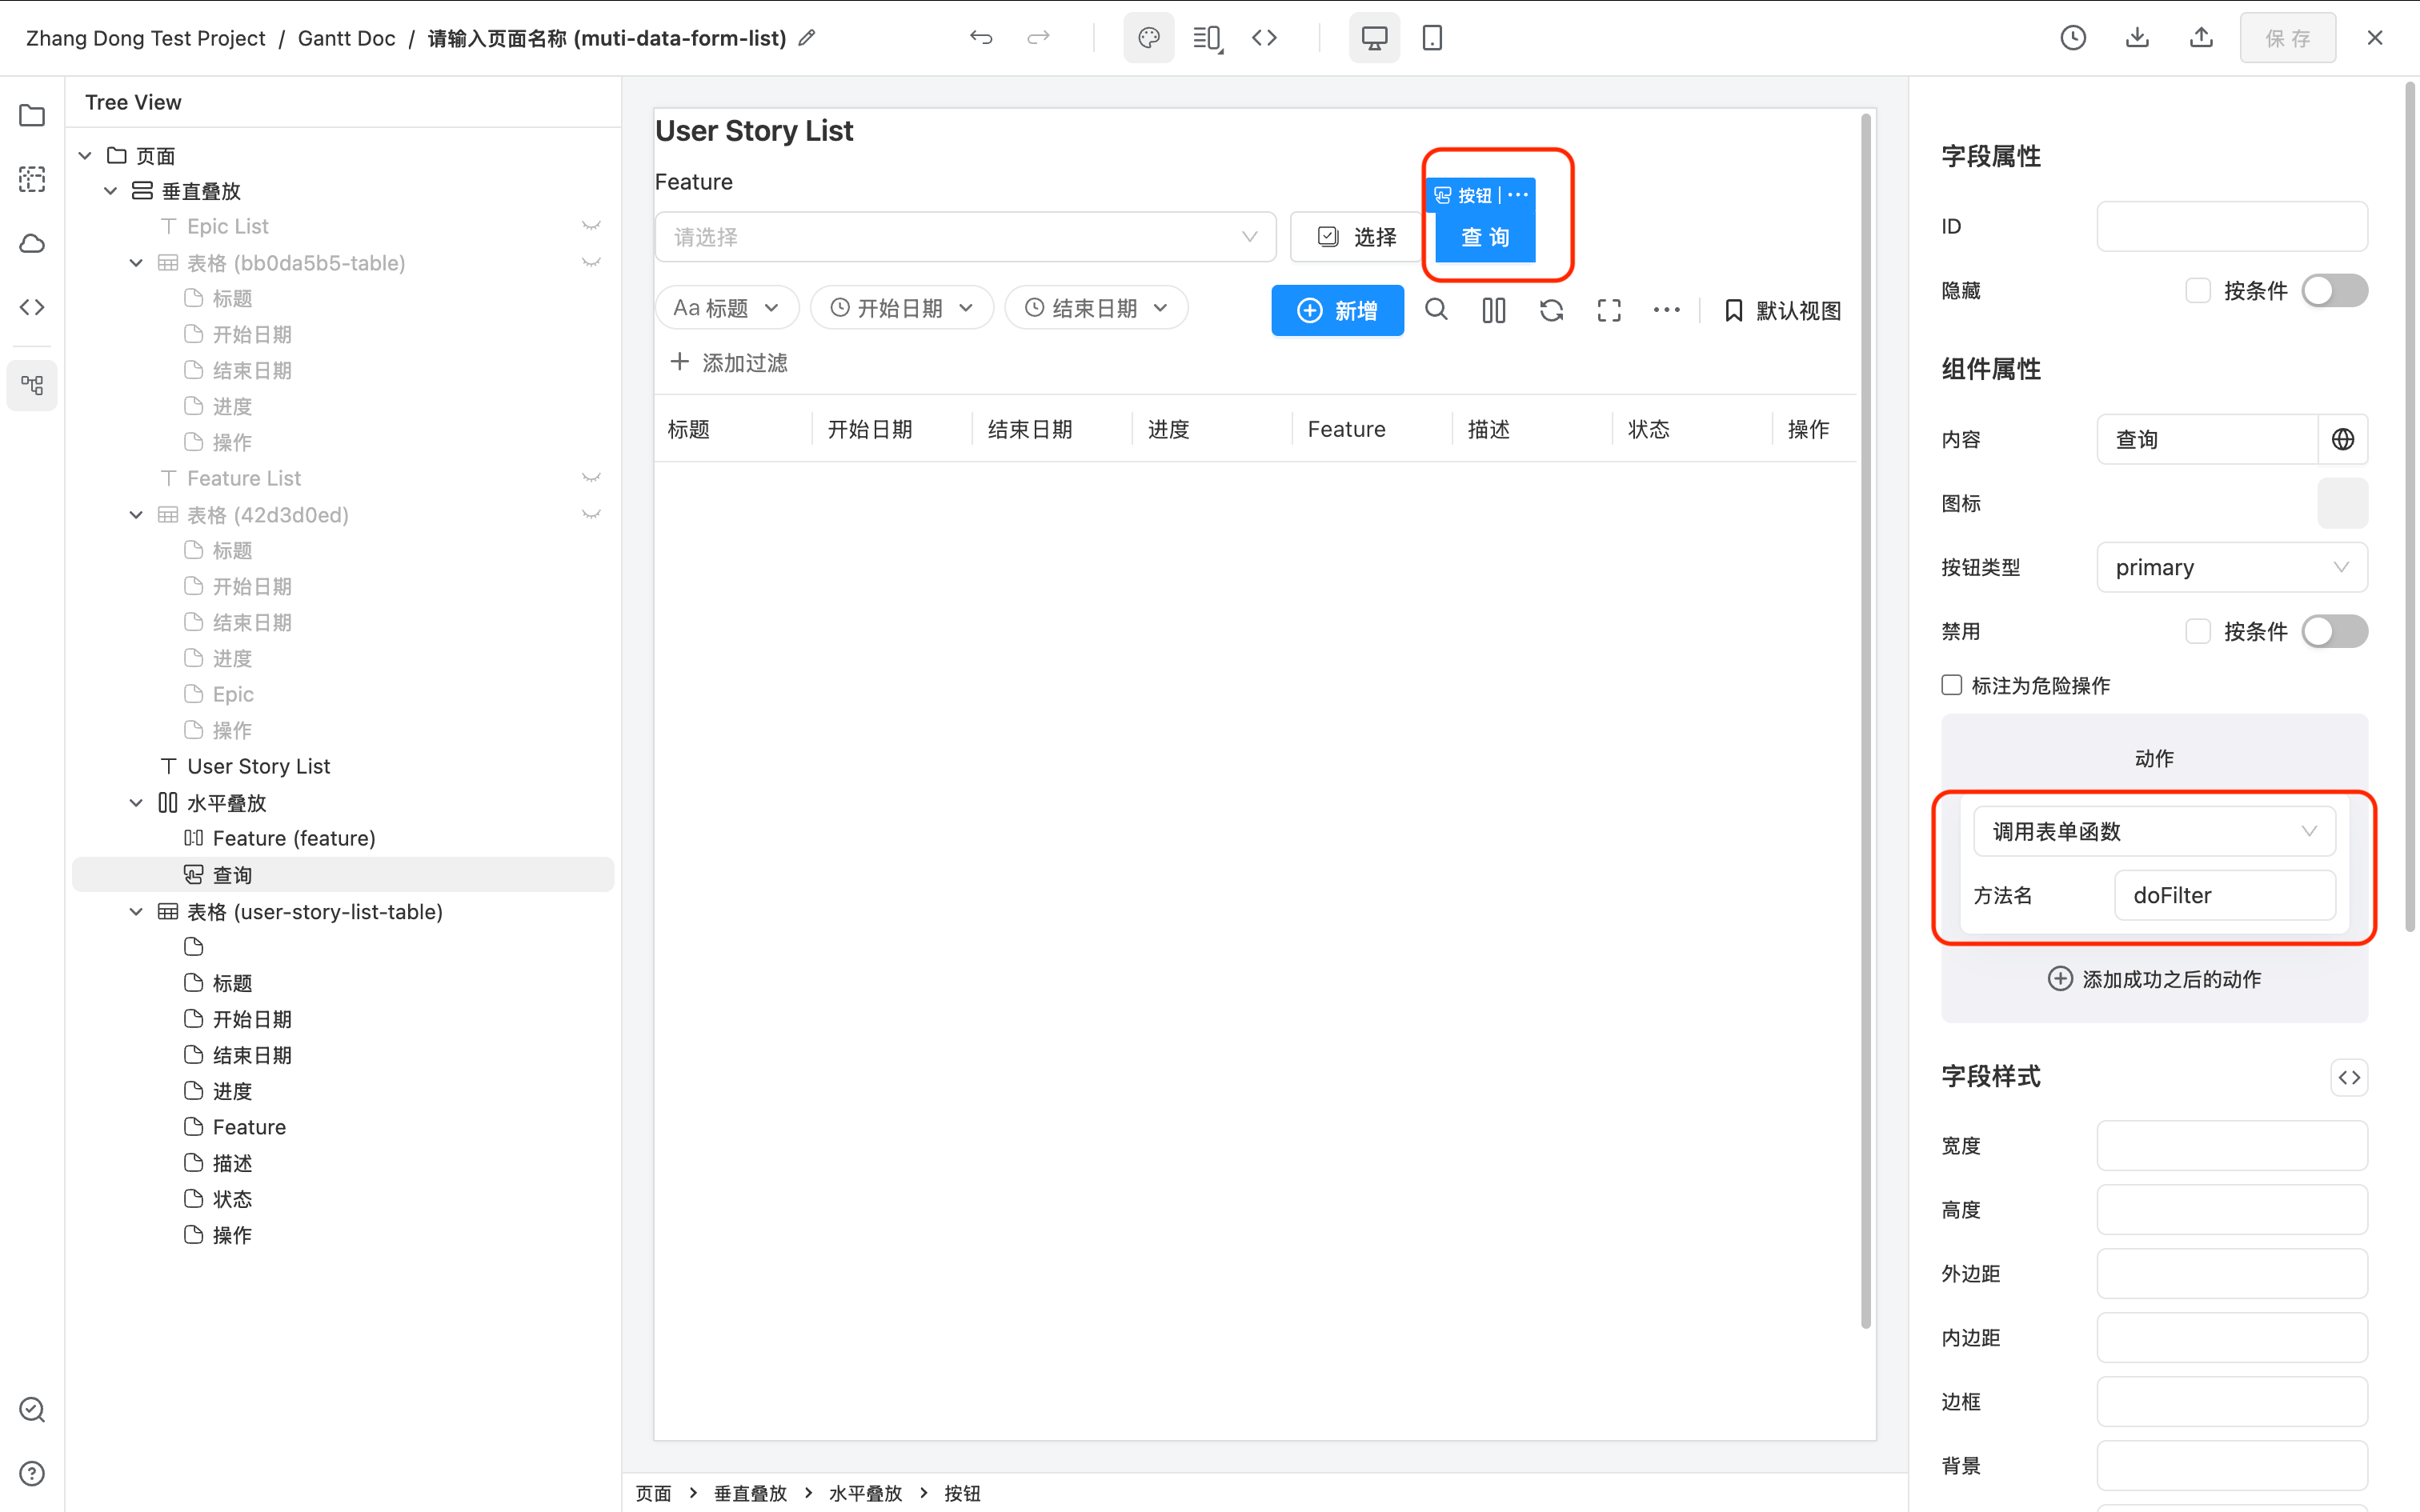
此例中,外部配置了一个过滤条件 acl,ID 是 feature。同时,表格的 ID 是 user-story-list-table

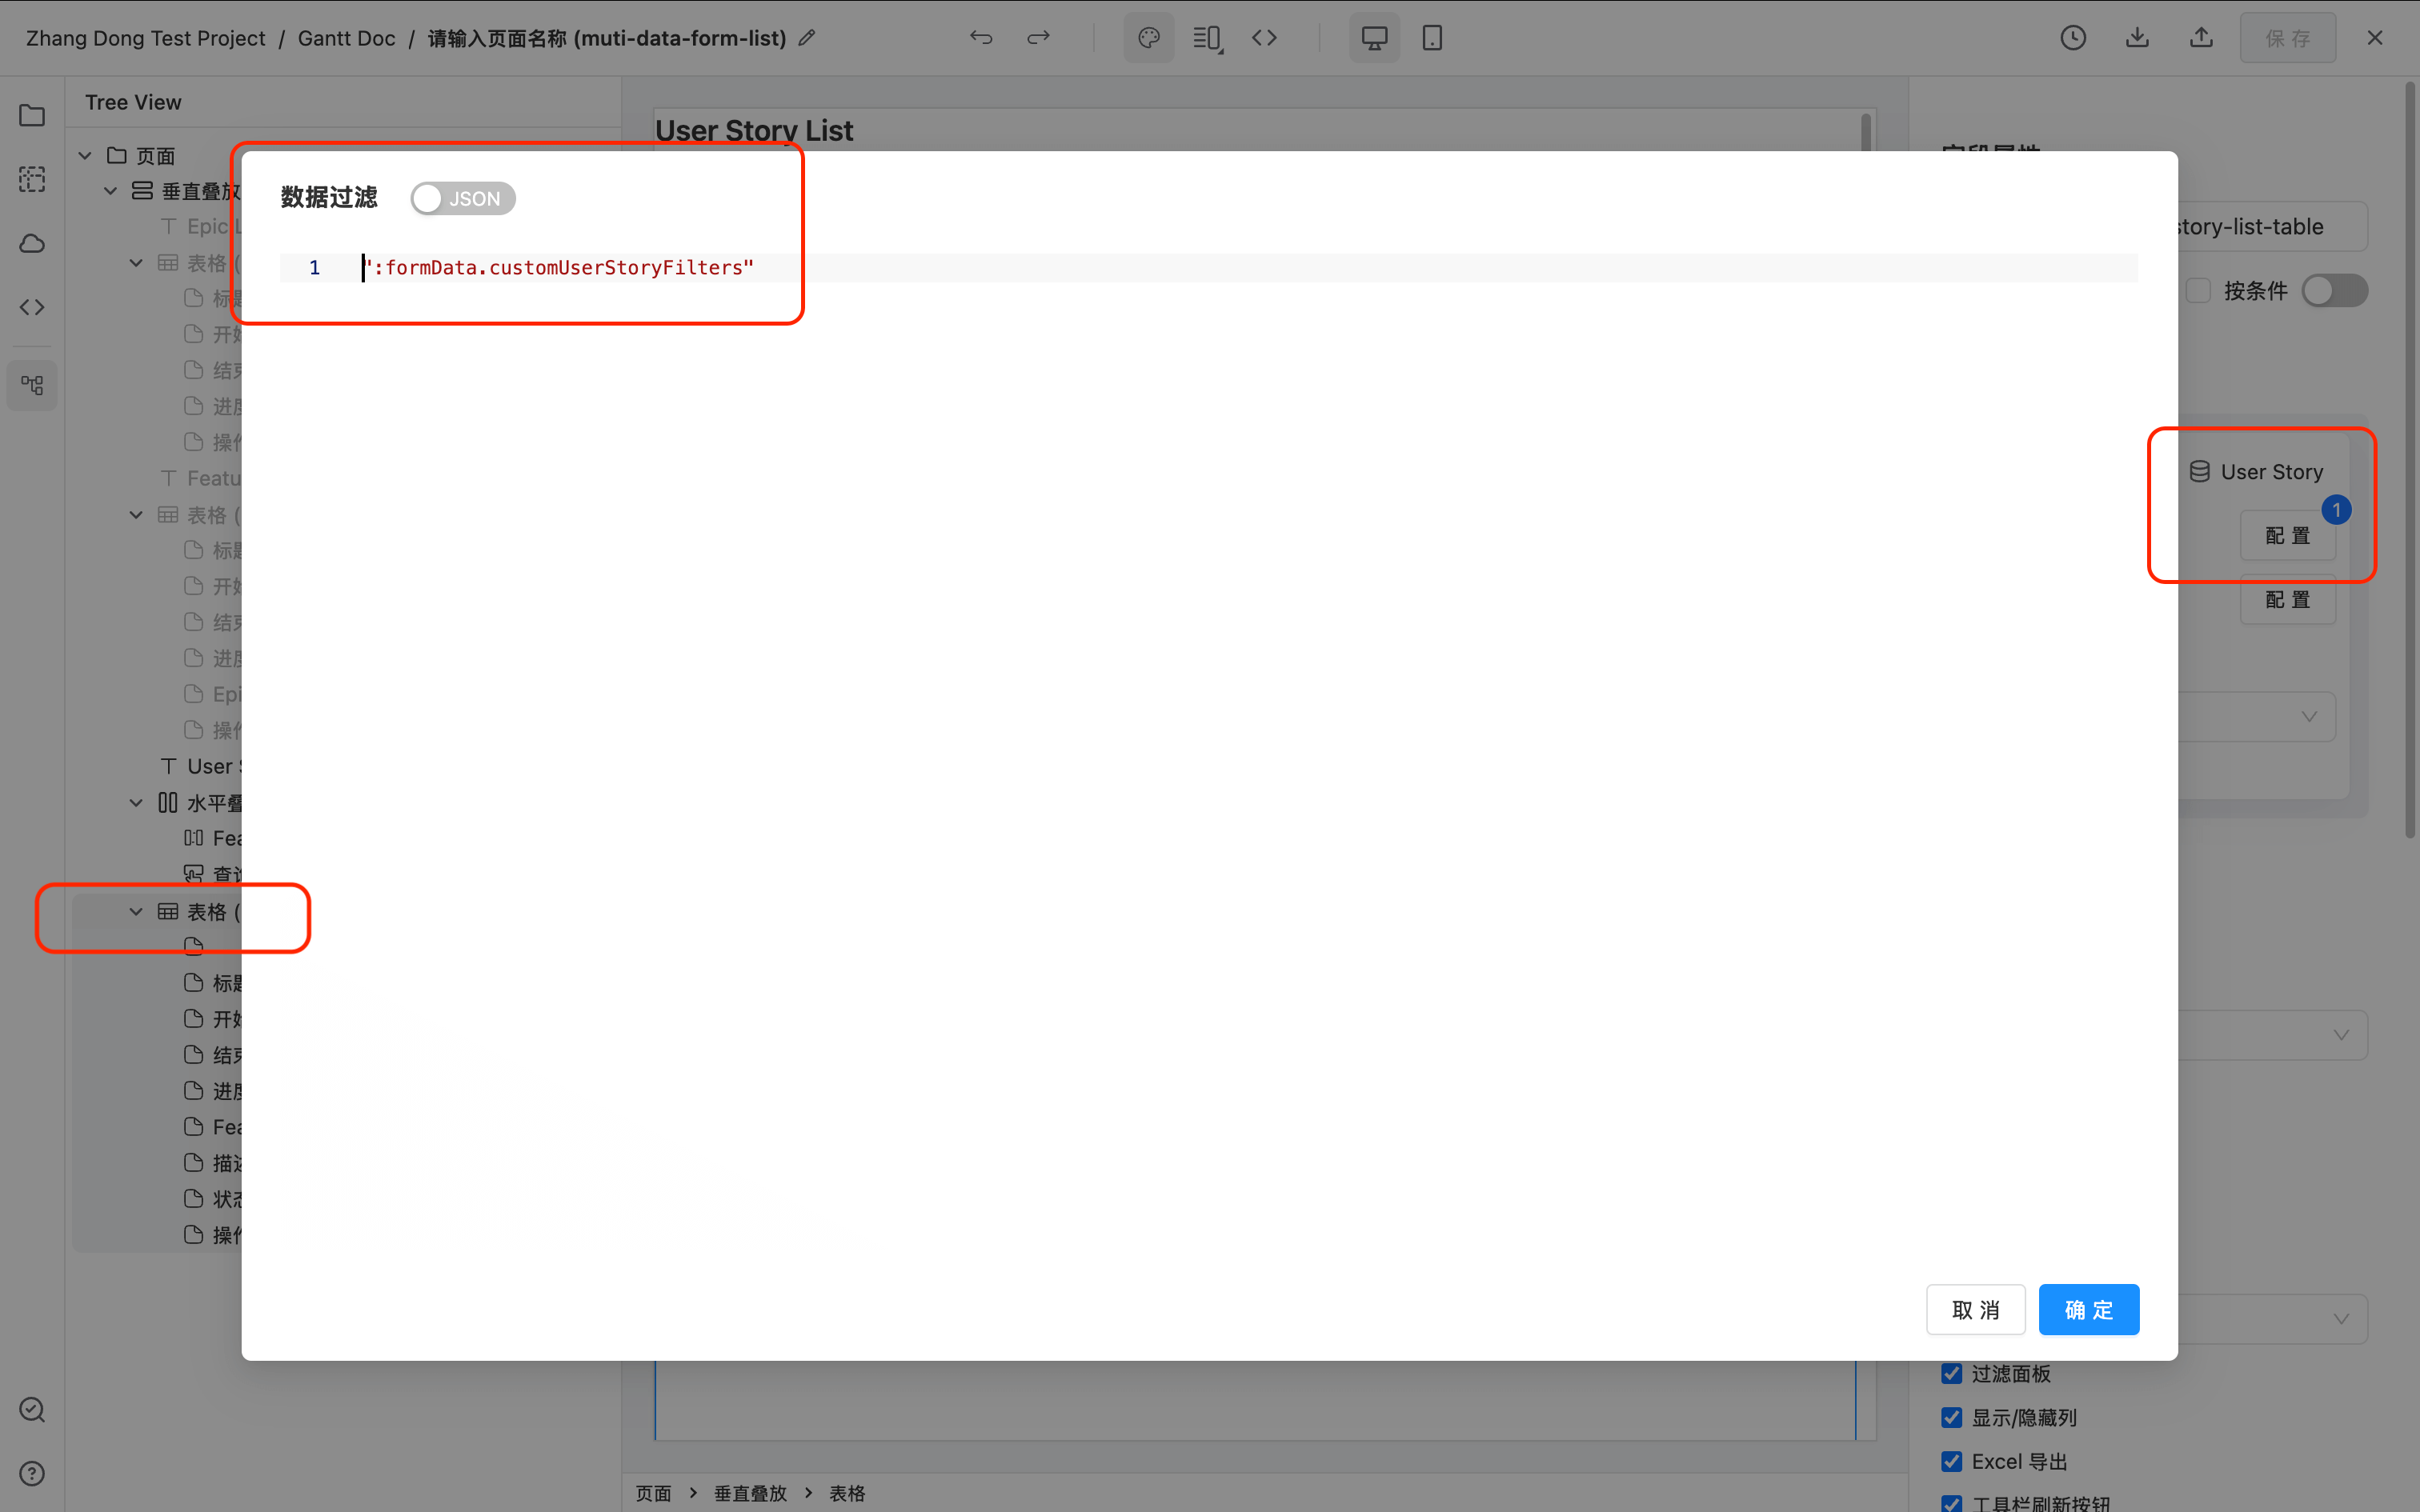
然后,配置 table 数据源的数据过滤,关联到一个动态变化的表单数据。此例中改表单数据叫 :formData.customUserStoryFilters,
其中 customUserStoryFilters 可以随意修改为自己喜欢的名字,只要和下面 JS 代码中的 key 匹配得上就行。
使用方法 formApi.on('fieldValueChange', (id, newValue) => {}) 监听外部自定义字段值发生改变。
当外部自定义字段值发生改变的时候调用方法 formApi.setValue('customUserStoryFilters', dataFilters); 设置给表格绑定的数据过滤 customUserStoryFilters。
通过 JS 实现将外部过滤条件存储到 table 的状态里
通过表格接口 tableApi.setTableState() 将外部过滤条件保存到 table 的状态里。
然后可以通过表格事件 onSwitchFavoriteView 监听 table toolbar 右上角切换视图操作,获取上一步保存下来的 customUserStoryFilters。
两个步骤完整的 JS 代码如下。
function customFilterModelToApiDataFilters(customFilterModel) {
  if (!customFilterModel) return null;
  return customFilterModel.map((item) => {
    if (item.filterType === 'set') {
      return {
        ...item,
        // 后端 api 接口是按照 label 进行过滤的,所以发送出去 label
        values: item.values.map((v) => v.label),
      };
    }
    return item;
  });
}

function setCustomFilterToTable(customFilterModel) {
  // 转换成 api 要求的 filter 格式
  const dataFilters = customFilterModelToApiDataFilters(customFilterModel);
  // 设置给表格的 componentProps.dataFilters 依赖的 userStoryFilters,表格就会自动刷新数据请求。
  formApi.setValue('customUserStoryFilters', dataFilters);
}

function restoreCustomFilter(customFilterModel) {
  // 按需设置,有多少字段设多少,字段太多可以使用 formApi.setData() 批量设置
  const feature = (customFilterModel || []).find((item) => item.colId === 'feature');
  if (feature) {
    formApi.setValue('feature', feature.values);
  } else {
    formApi.setValue('feature', null);
  }

  setCustomFilterToTable(customFilterModel);
}

function initialCustomFilter() {
  const tableApi = formApi.getFieldApi('user-story-list-table');

  // 如果你的 table 在页面一加载的时候就有,那直接通过 tableApi 获取上一次离开页面存下来的 customFilterModel 就行。
  const customFilterModel = tableApi.getTableState().customFilterModel;
  // 如果你的 table 在页面一加载的时候是隐藏的,那就自己去自己存的 localStorage 里的
  // 代码类似: const customFilterModel = JSON.parse(localStorage.getItem(customFilterKey));

  restoreCustomFilter(customFilterModel);
}

formApi.setFieldComponentProps('user-story-list-table', {
  // 监听表格的切换视图功能,去除自定义的 customFilterModel 使用
  onSwitchFavoriteView: (view) => {
    restoreCustomFilter(view.customFilterModel);
  },
});

formApi.on('ready', function () {
  // 上一次离开页面有存 customFilterModel,取出来重新设置给自定义 filter 条件字段以及表格的 dataFilters 属性
  initialCustomFilter();
});

formApi.registerMethod('doFilter', () => {
  const formData = formApi.getData();
  const { feature } = formData;

  const customFilterModel = [];
  if (feature?.length) {
    customFilterModel.push({
      colId: 'feature',
      filterType: 'set',
      // 需要保存完整的 value label 数组,以用于刷新页面的时候重新赋值给 acl 显示
      values: feature,
    });
  }

  setCustomFilterToTable(customFilterModel);

  // 将自定义 filter 存到 tableState 里去,可以在 table 保存视图的时候一起保存,
  // 下次刷新页面的时候可以通过 tableApi.getTableState() 获取回来,切换视图的时候通过 onFavoriveViewChange 接口取出来。
  const tableApi = formApi.getFieldApi('user-story-list-table');
  tableApi.setTableState({
    // 名字随意起就行,我这里叫 customFilterModel
    customFilterModel: customFilterModel,
  });

  // 对应上面的 table 一开始不存在的情况,如果有需求,自己在 localStore 里存一份自己用。
  // 注意!! key 一定要 by user 存区分用户,否则每个用户看到都是一样的。
  // 可以仿照 table 默认的 localStorage key,可以通过如下代码获取 username 和 pbc token
  // const { pbcToken, userProfile } = formApi.getContext();
  // const customFilterKey = ['table', pbcToken, '如果要区分表单和布局,这里还可以填 formEntityToken layoutToken,不需要则删除这句话', '改成你的 table 的 id', userProfile.username].join('.');
  // localStorage.setItem(customFilterKey, JSON.stringify(customFilterModel));
});
API
完整的 Table API 参考在此处 Table