Using Table
Configuring Avatar Columns
Simple Column Displaying Avatar Alone
If the Table's data source form has an upload field, simply set the Table column type to "Avatar". The configuration and result are shown below:
The form upload avatar field ID can be anything — it doesn't have to be avatar. Set it as needed.
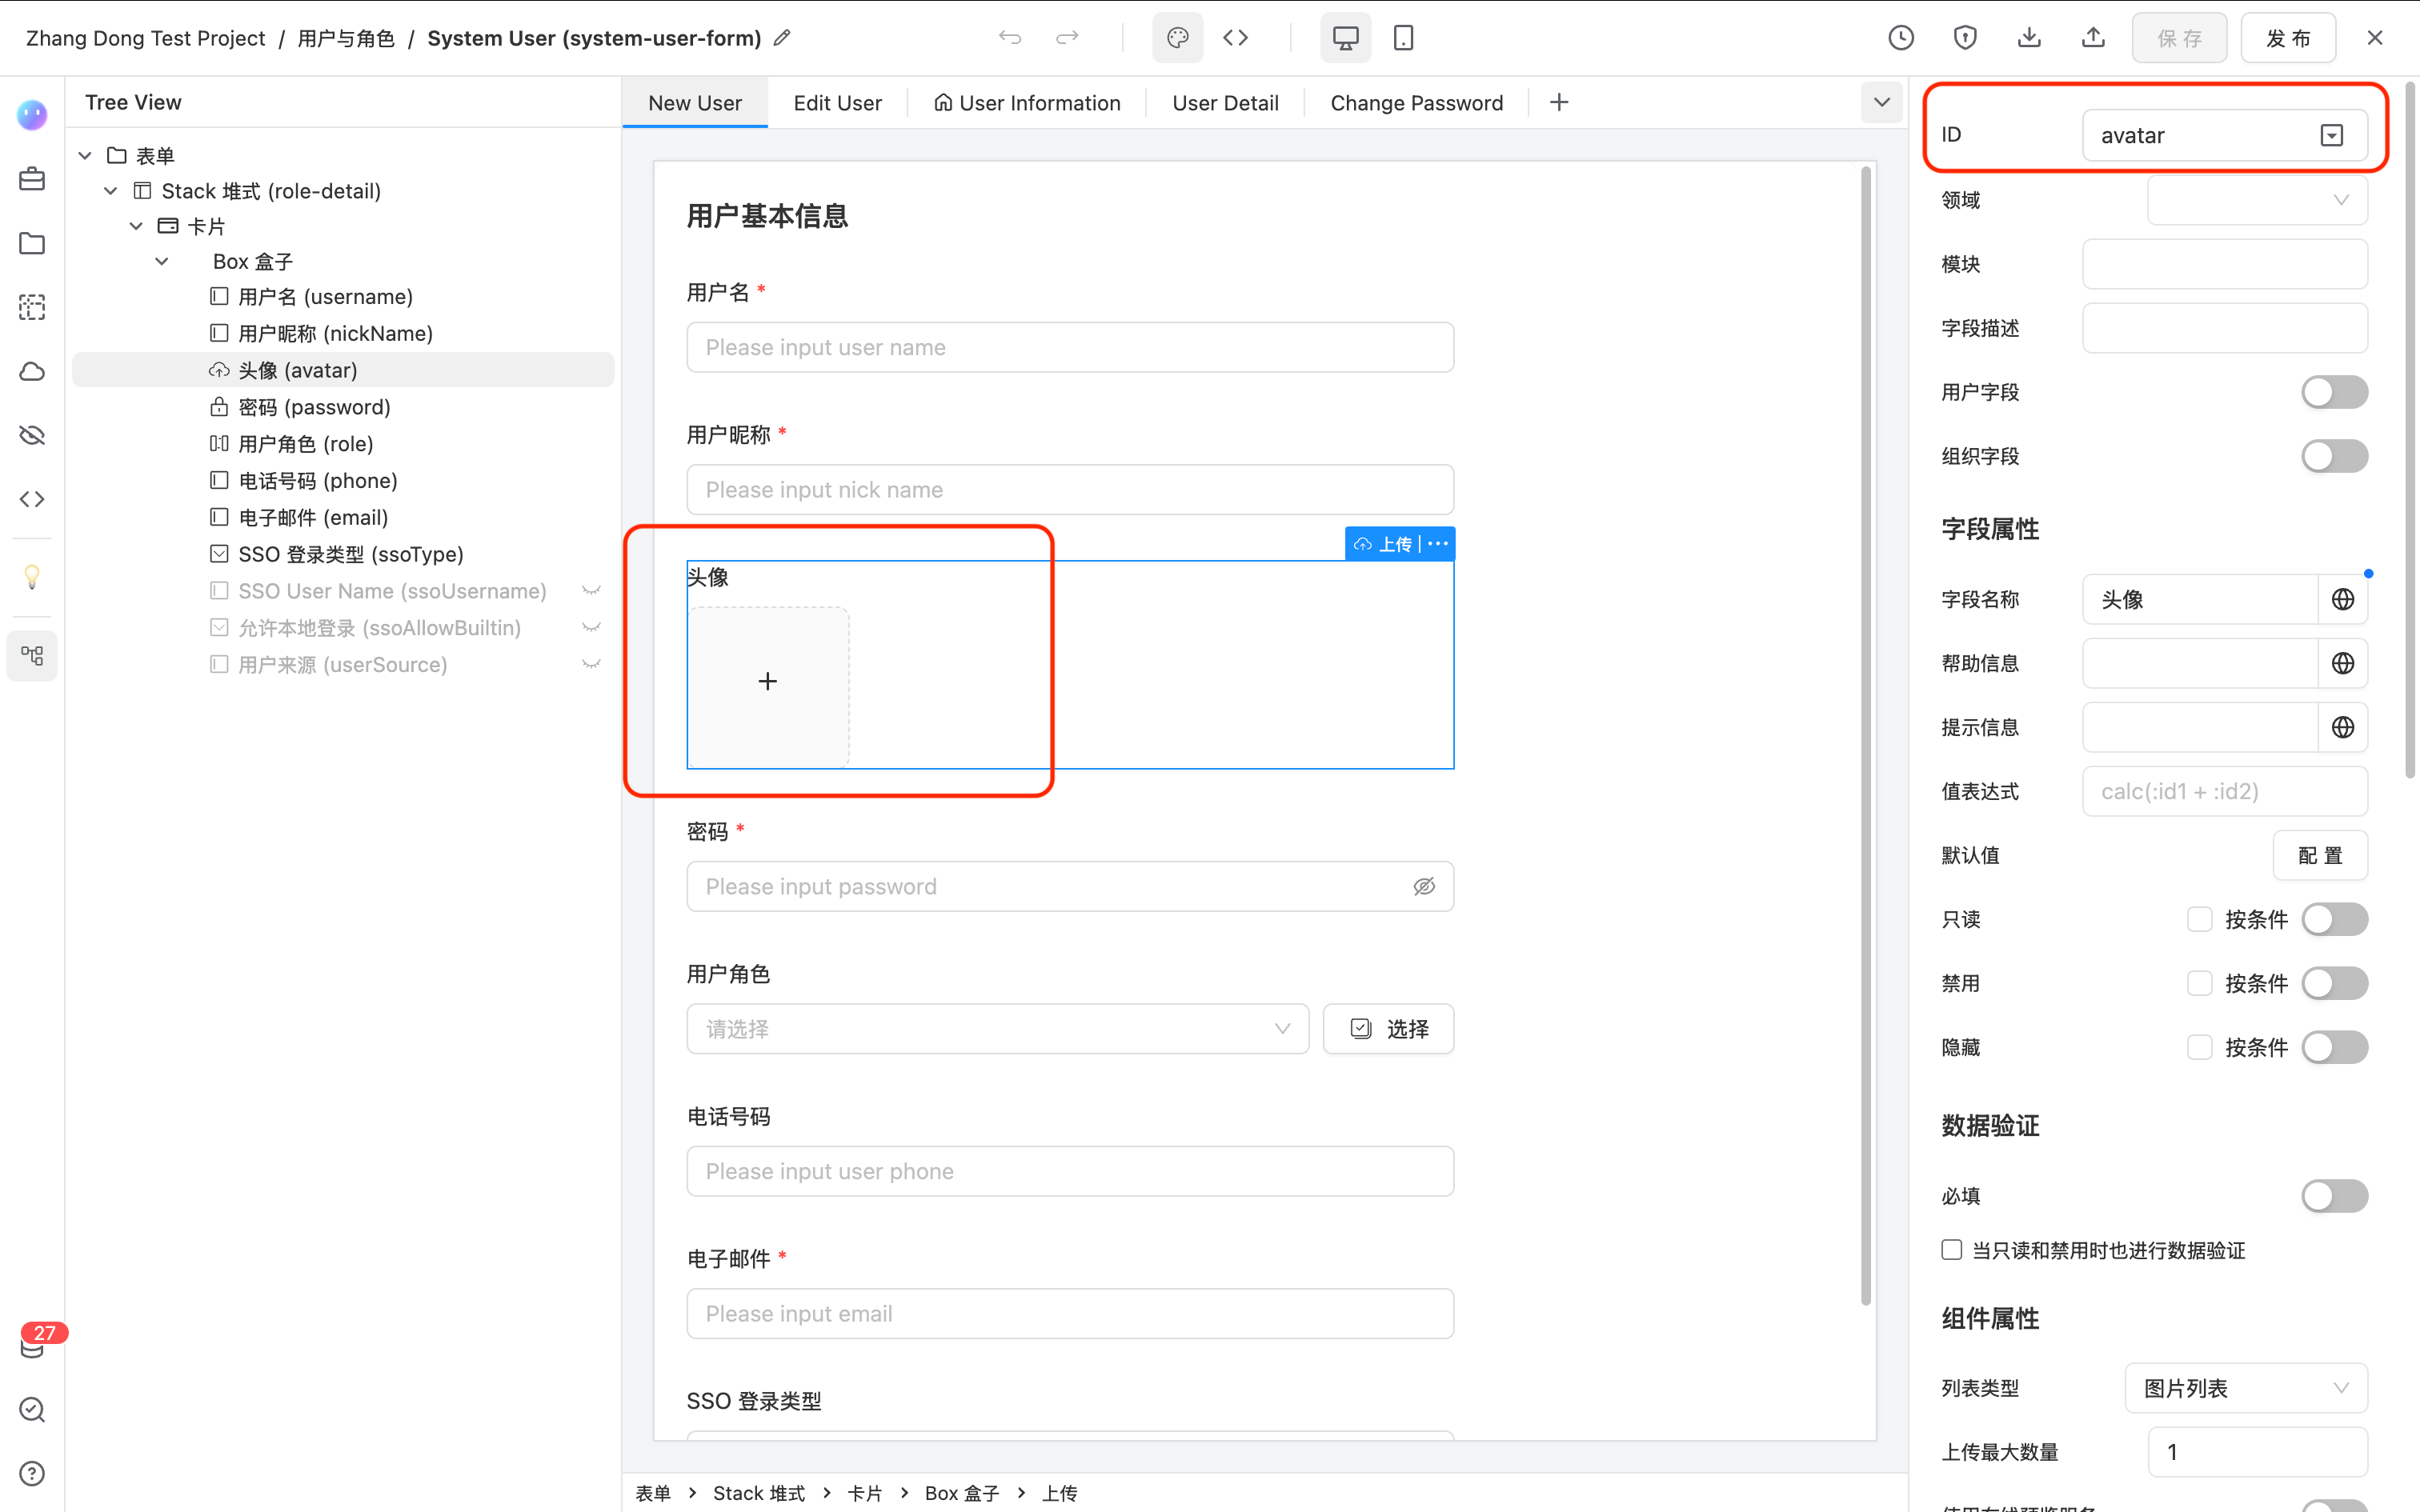
Table column settings
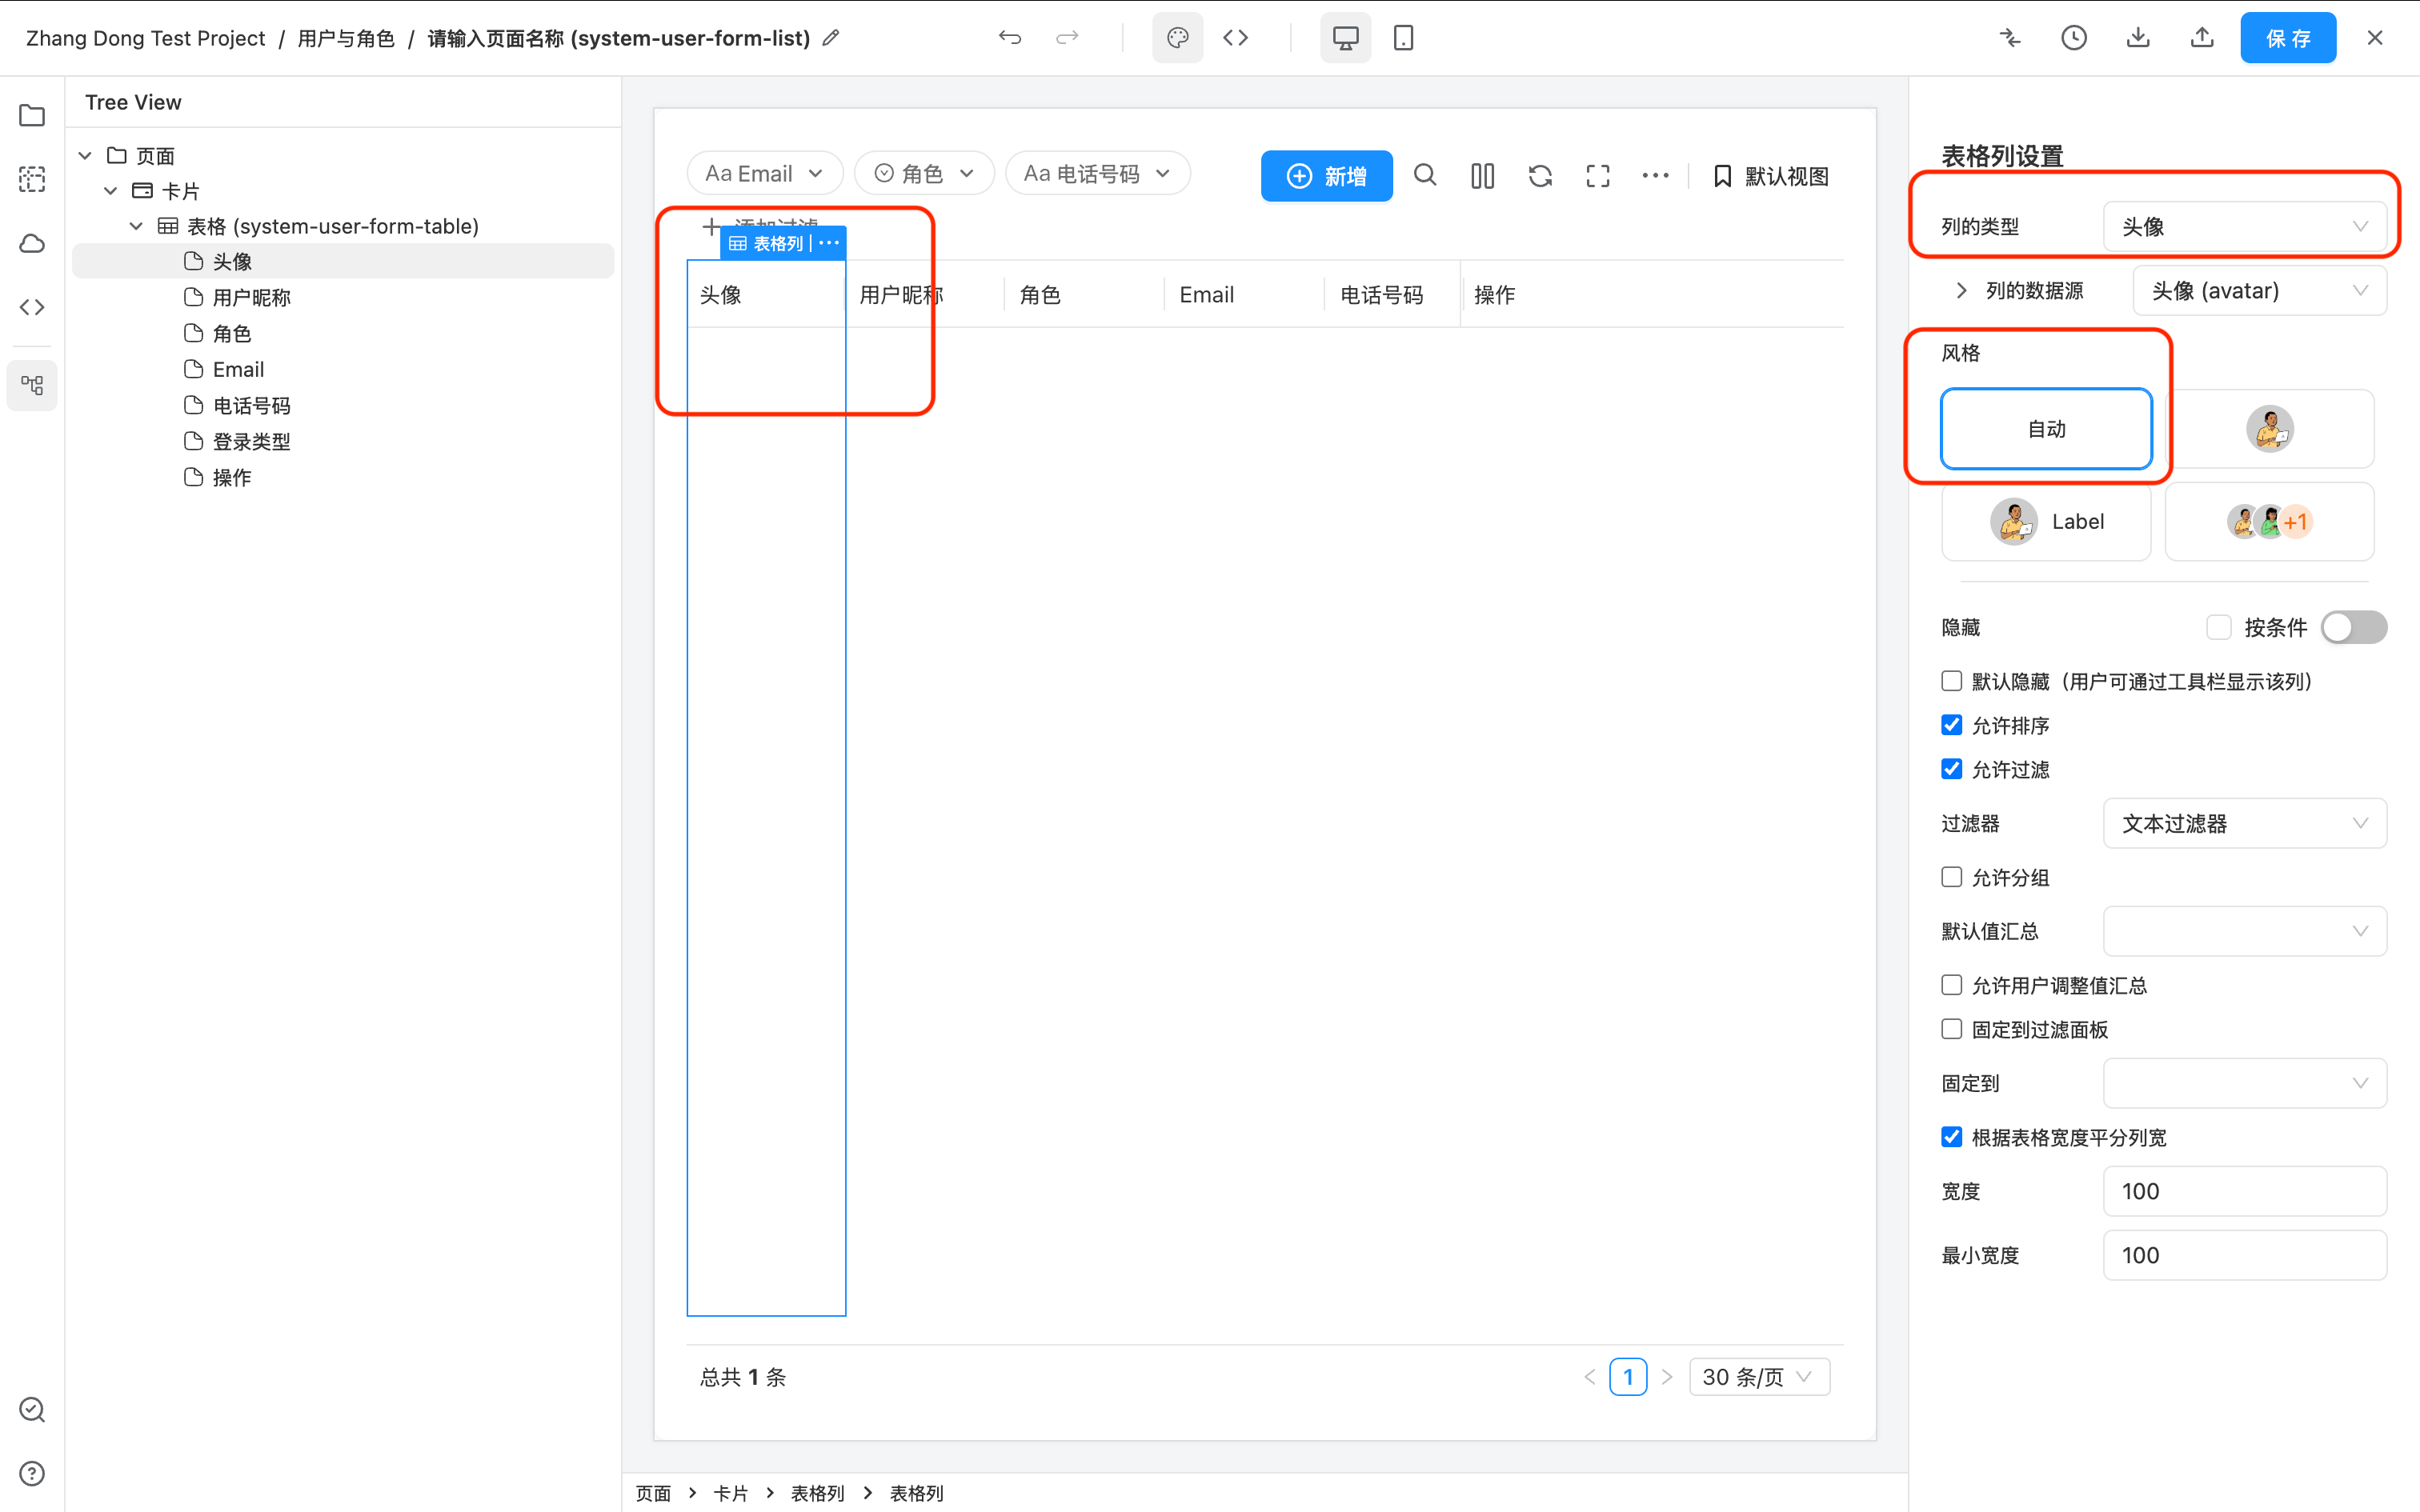
Runtime result
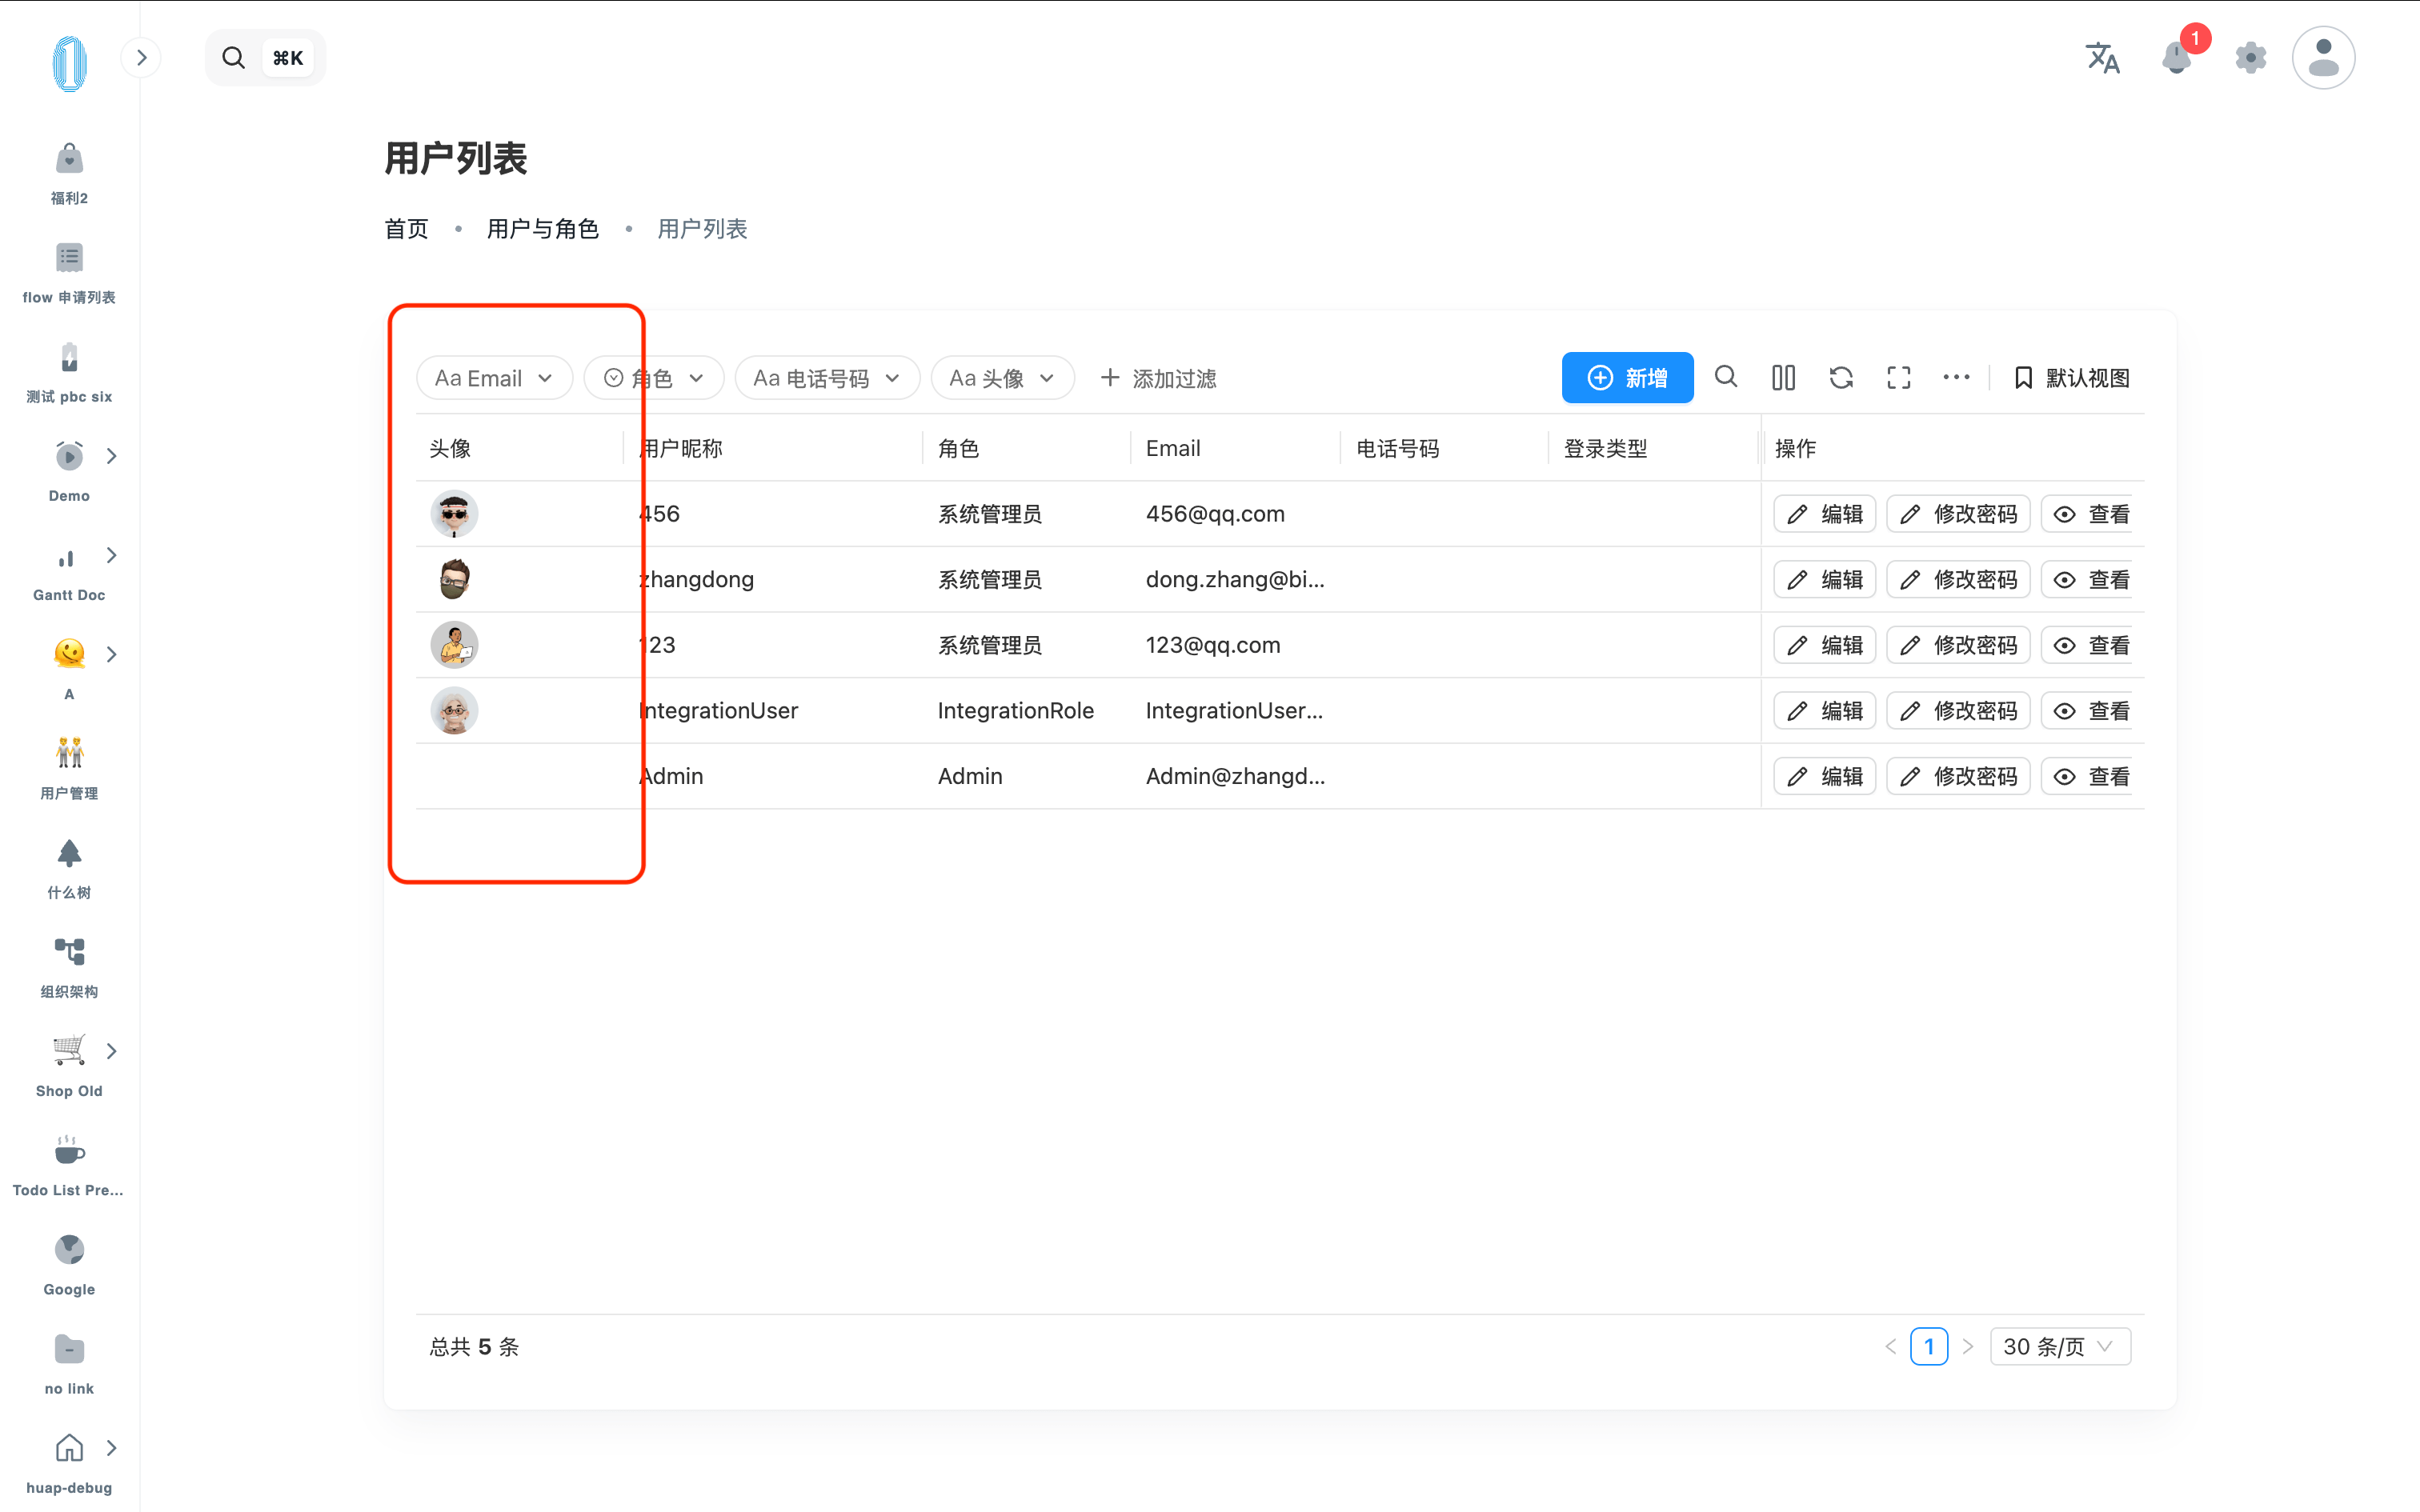
Merging Avatar and Name into One Column
In most cases, the avatar is not displayed as a standalone column. Instead, it looks like the following:
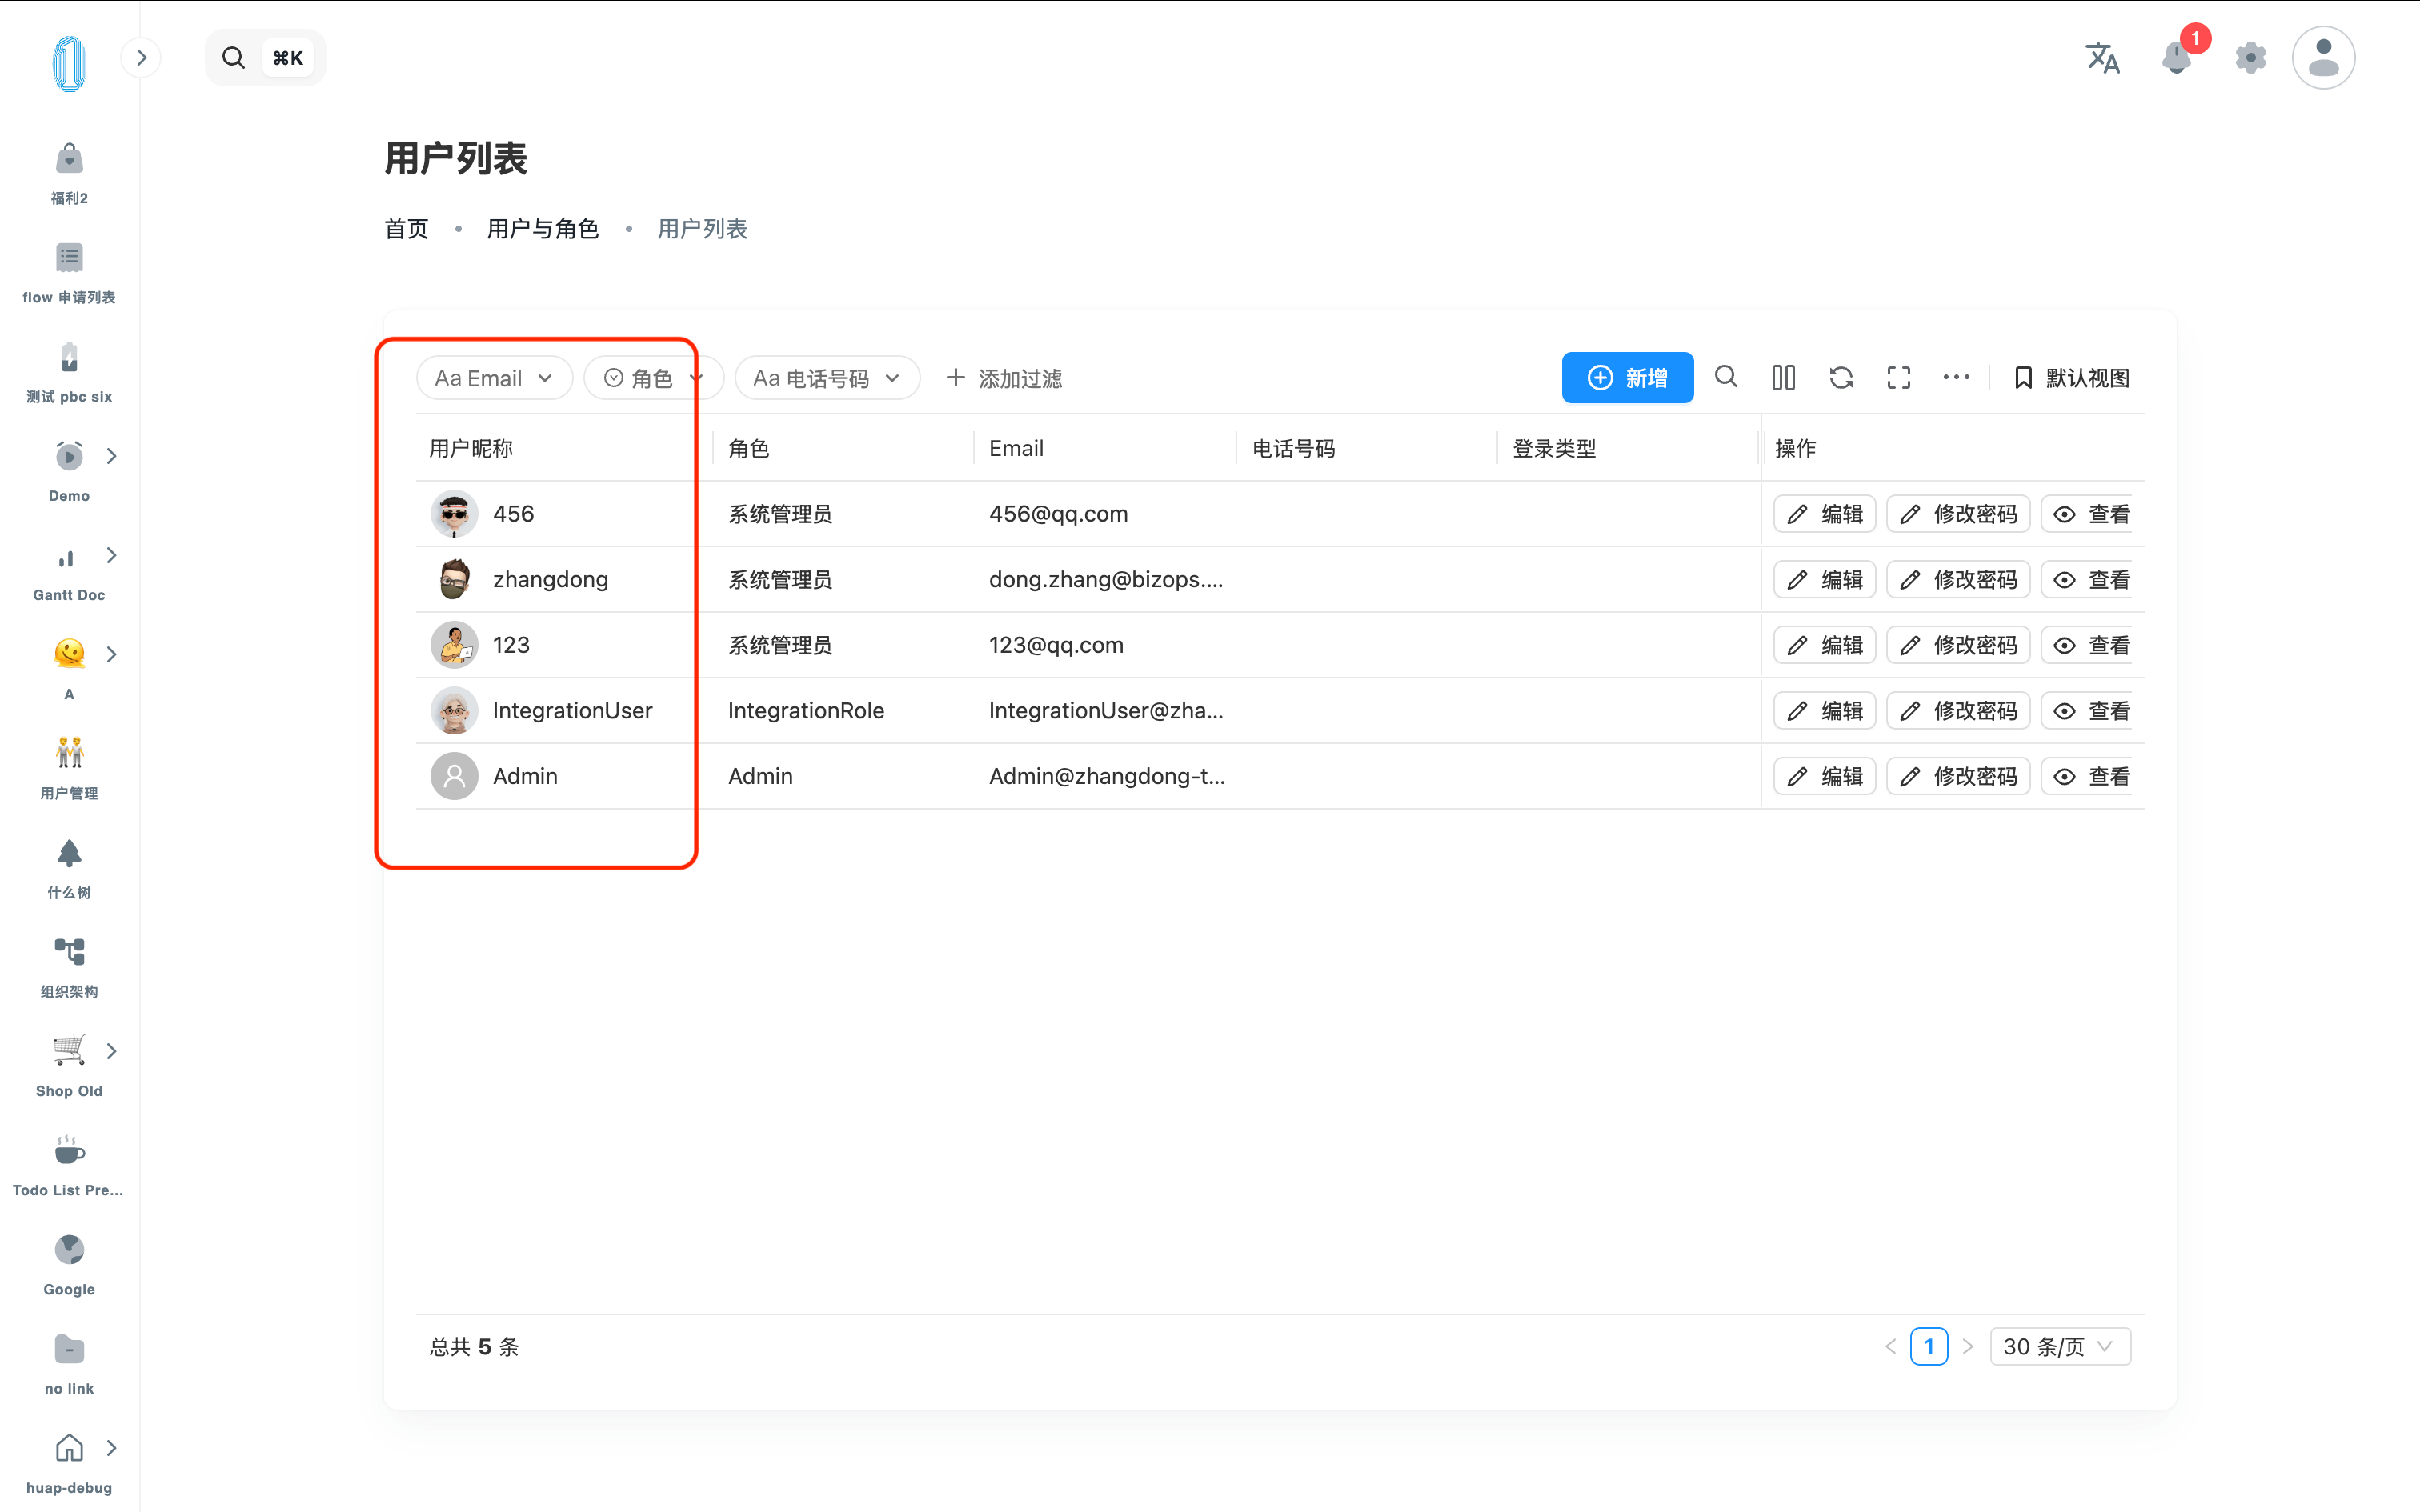
To achieve this, a data transformation is required. The Avatar column expects data in the following format:
{
  "avatar": "image URL",
  "label": "display label"
}
For example, the data transformation configuration for the above result is:
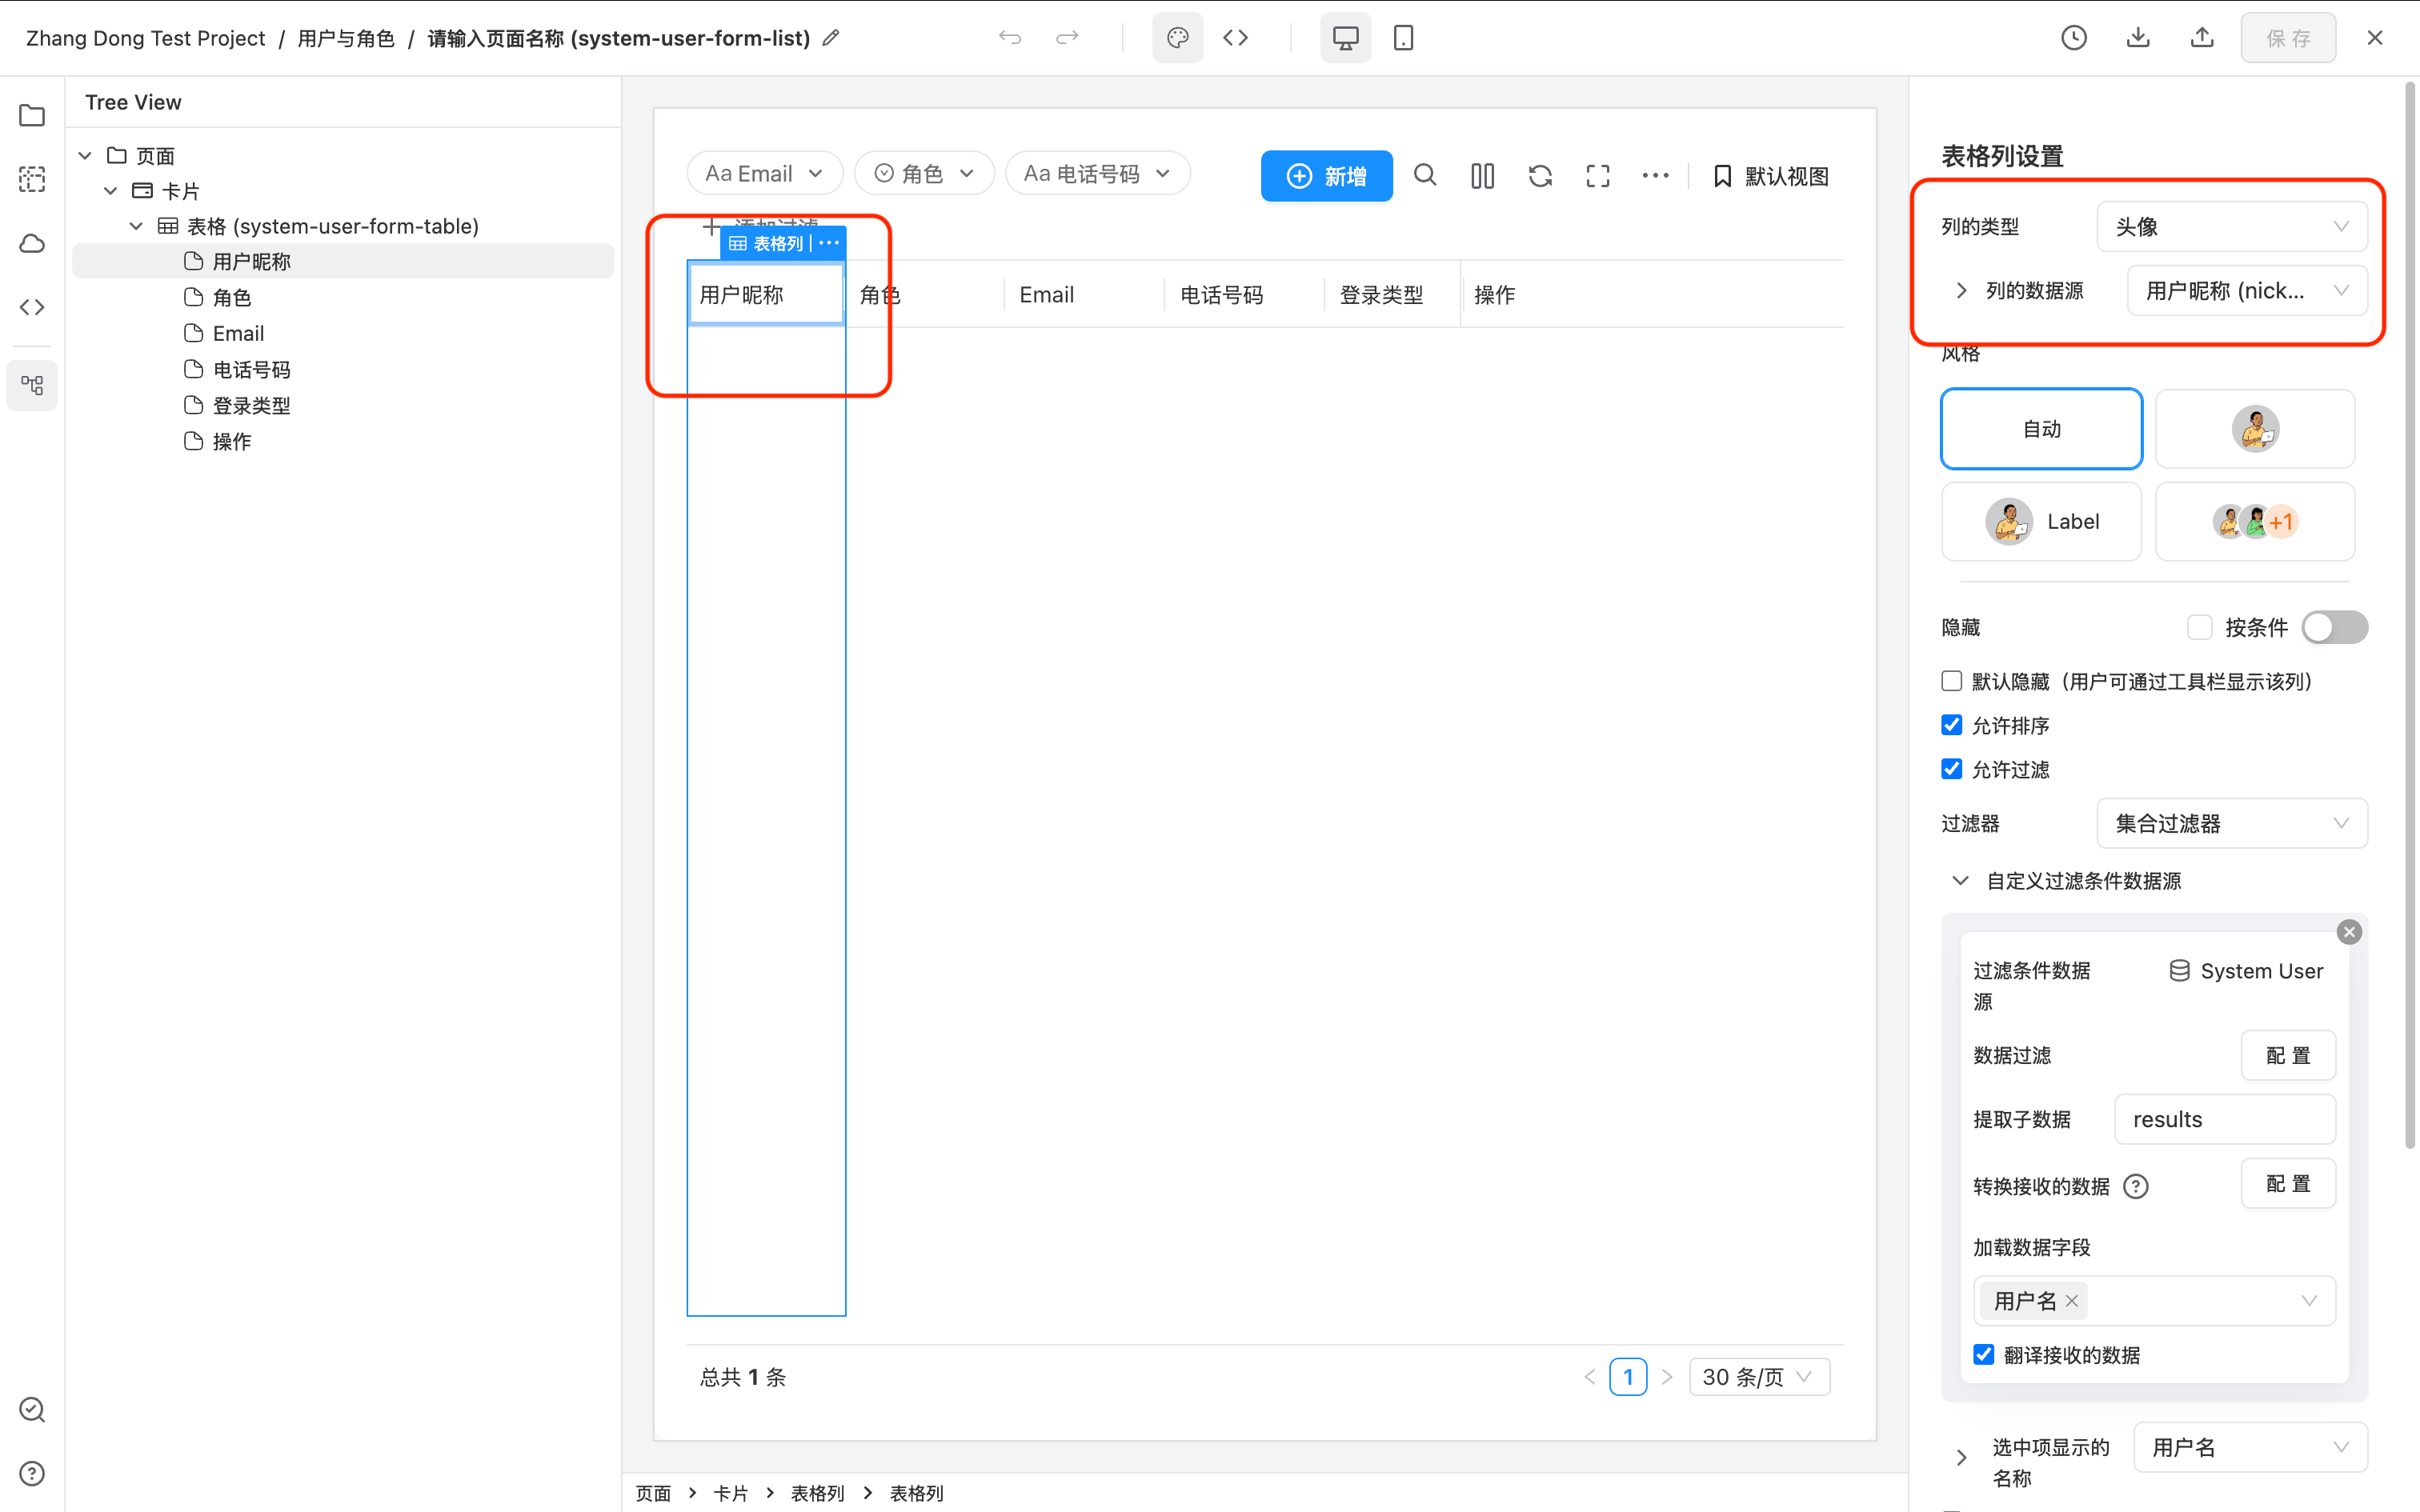
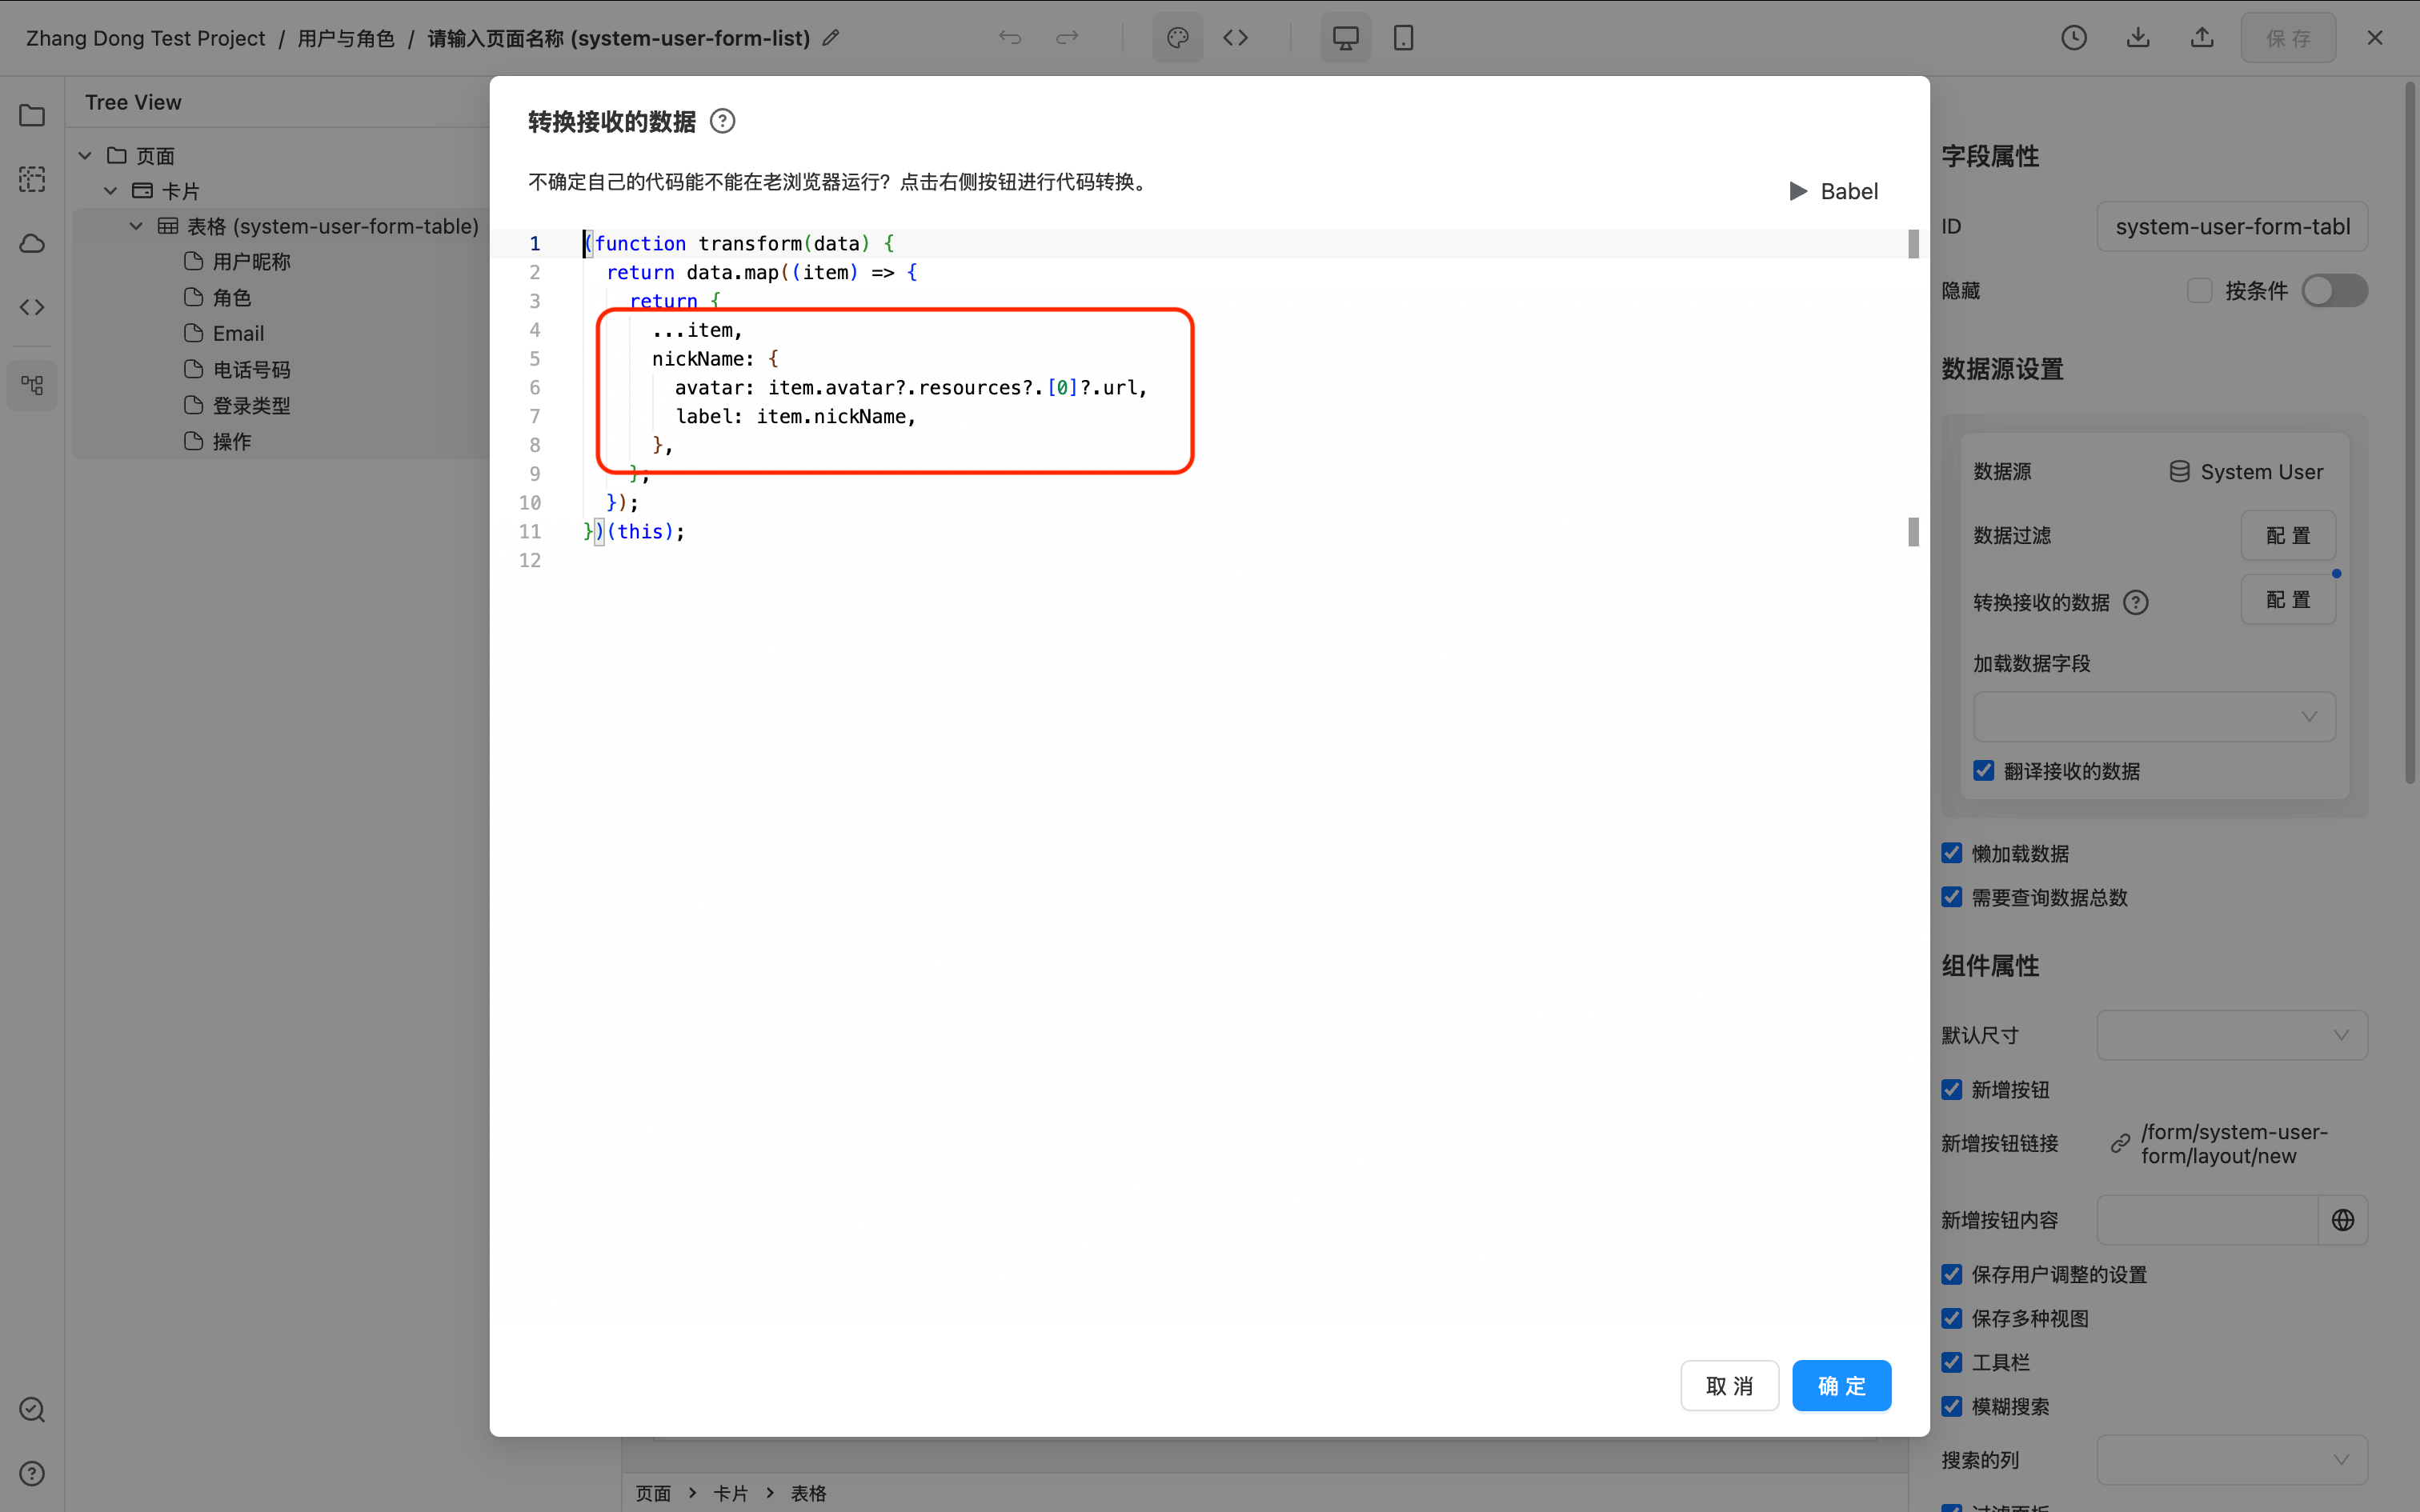
The JS data transformation code is as follows:
(function transform(data) {
  return data.map((item) => {
    return {
      ...item,
      nickName: {
        avatar: item.avatar?.resources?.[0]?.url,
        label: item.nickName,
      },
    };
  });
})(this);
Multi-Select Avatar Group
When there are multiple avatars, you can use the group display format. In this case, the Avatar column expects data in array format:
[
  {
    "avatar": "image URL",
    "label": "display label"
  },
  {
    "avatar": "image URL",
    "label": "display label"
  }
]
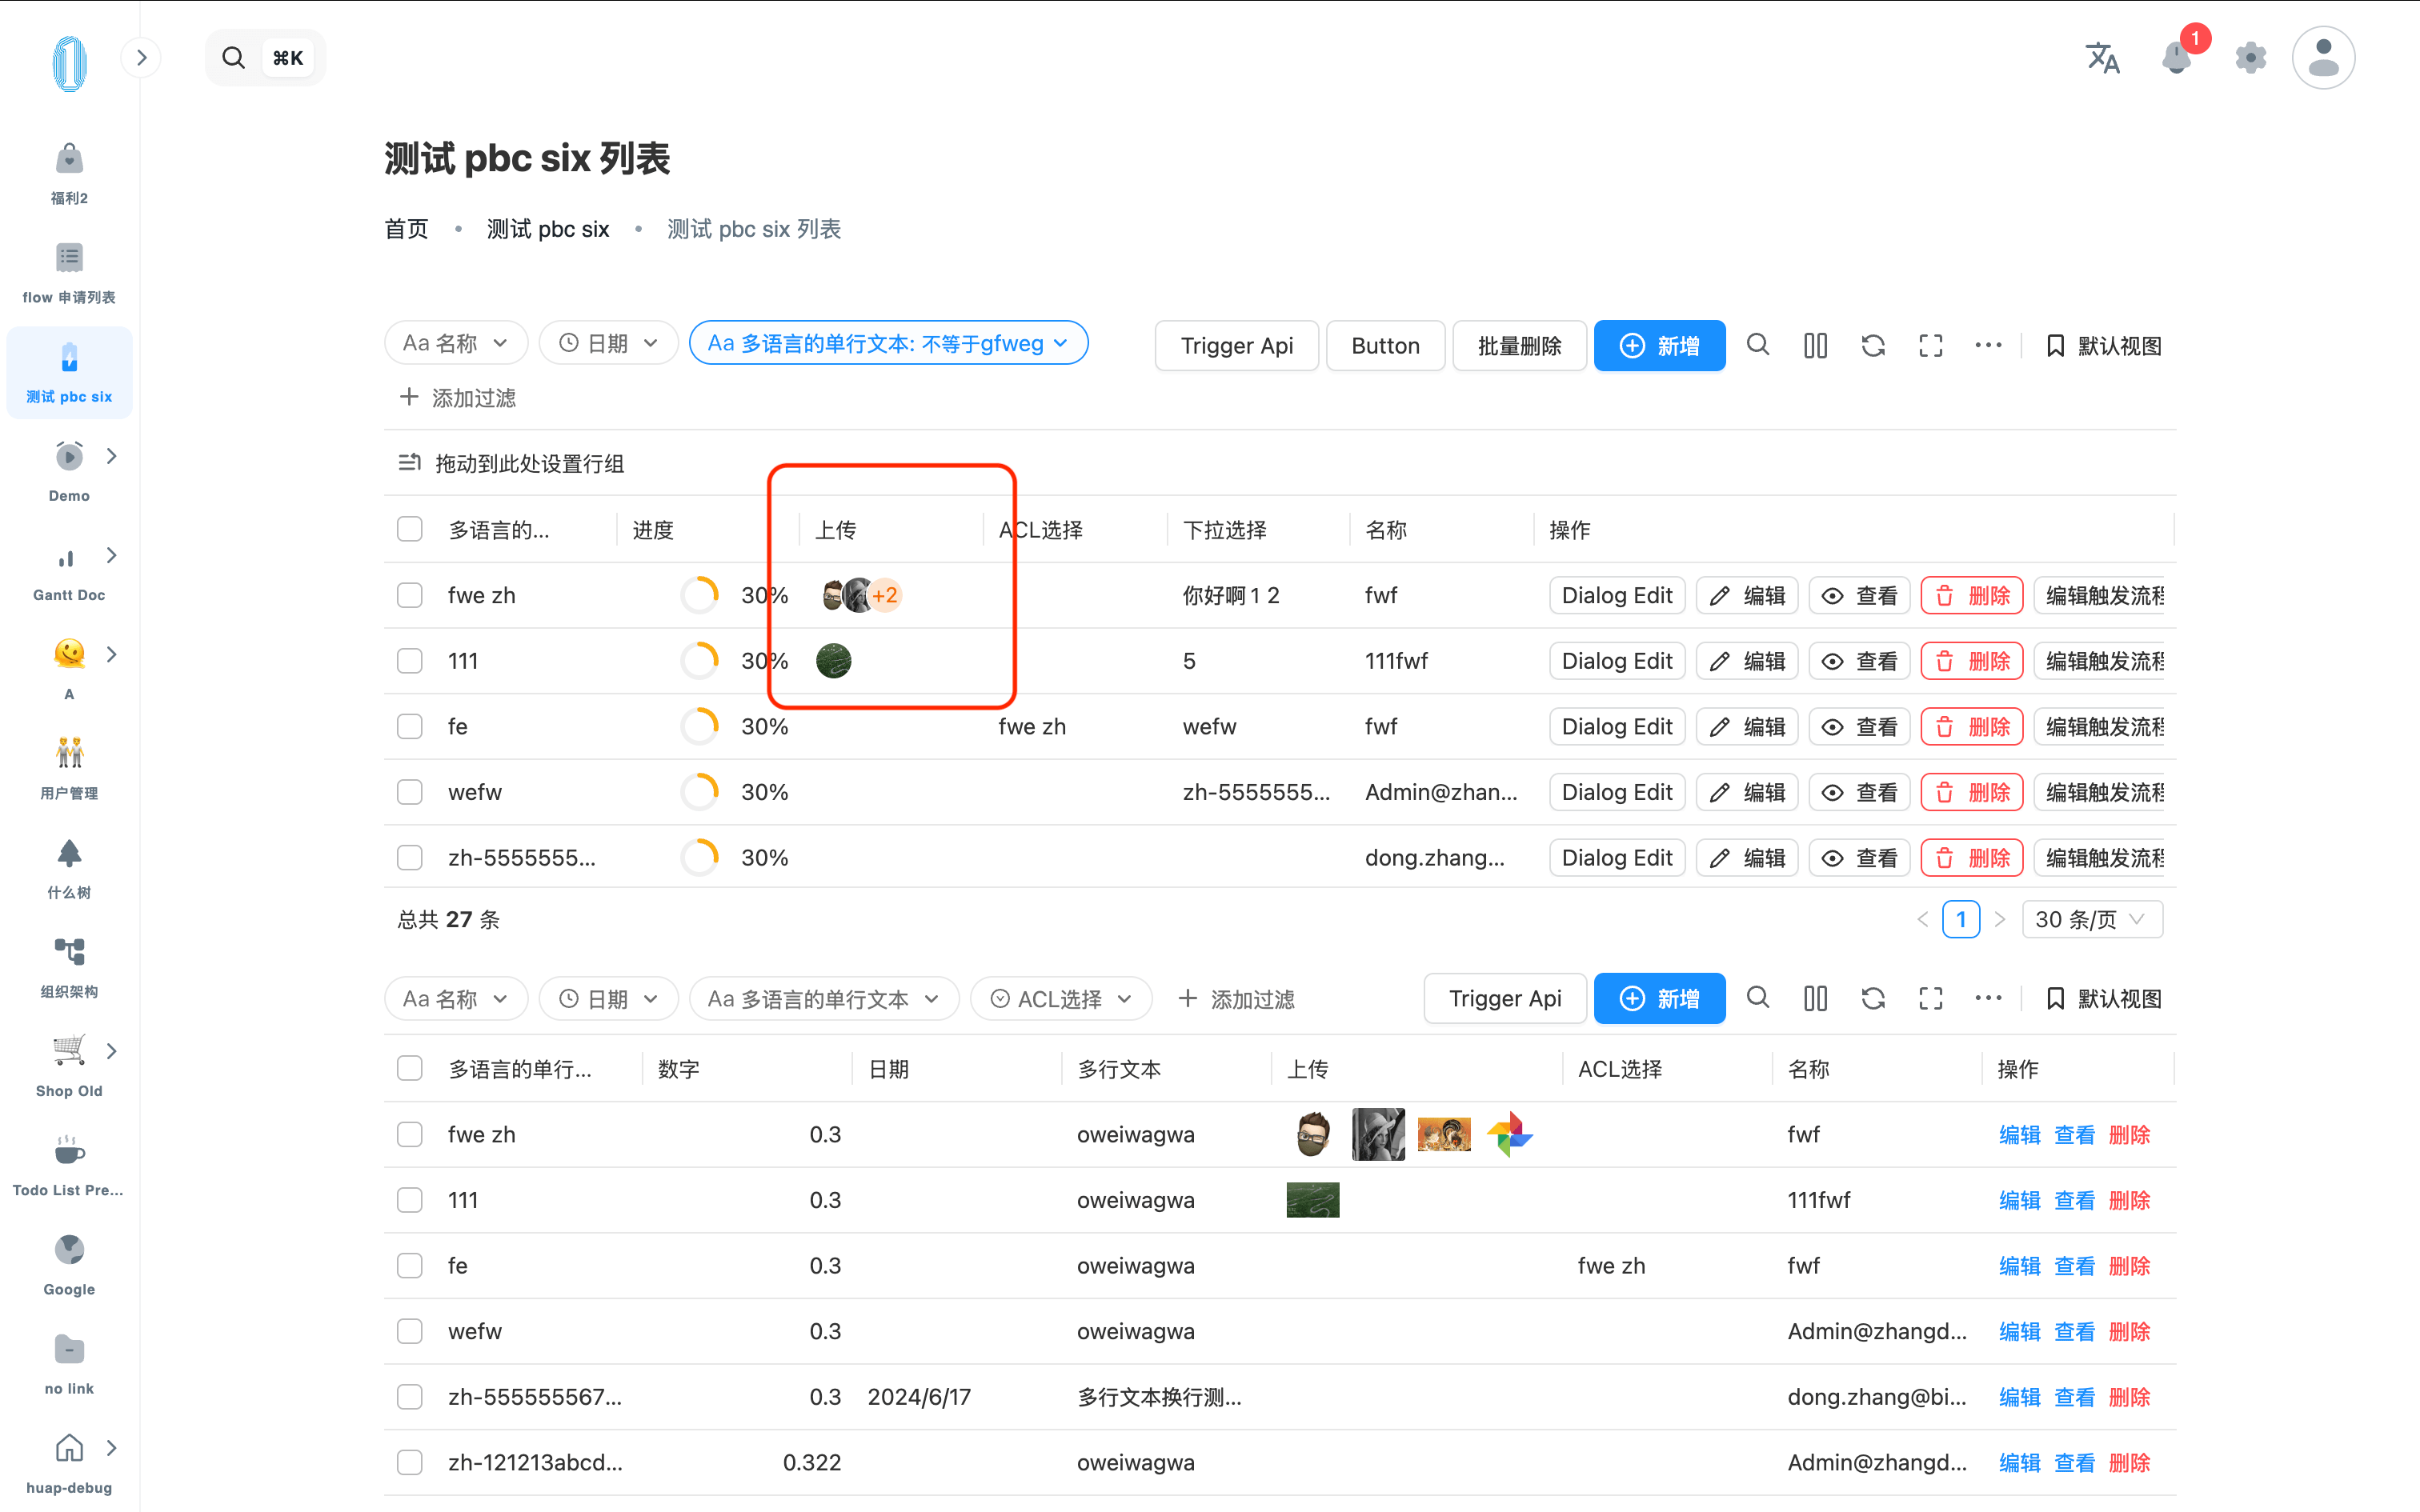
For example, here is a multi-select upload component where multiple images are displayed as multiple avatars. The configuration and runtime result are shown below:
Table column settings
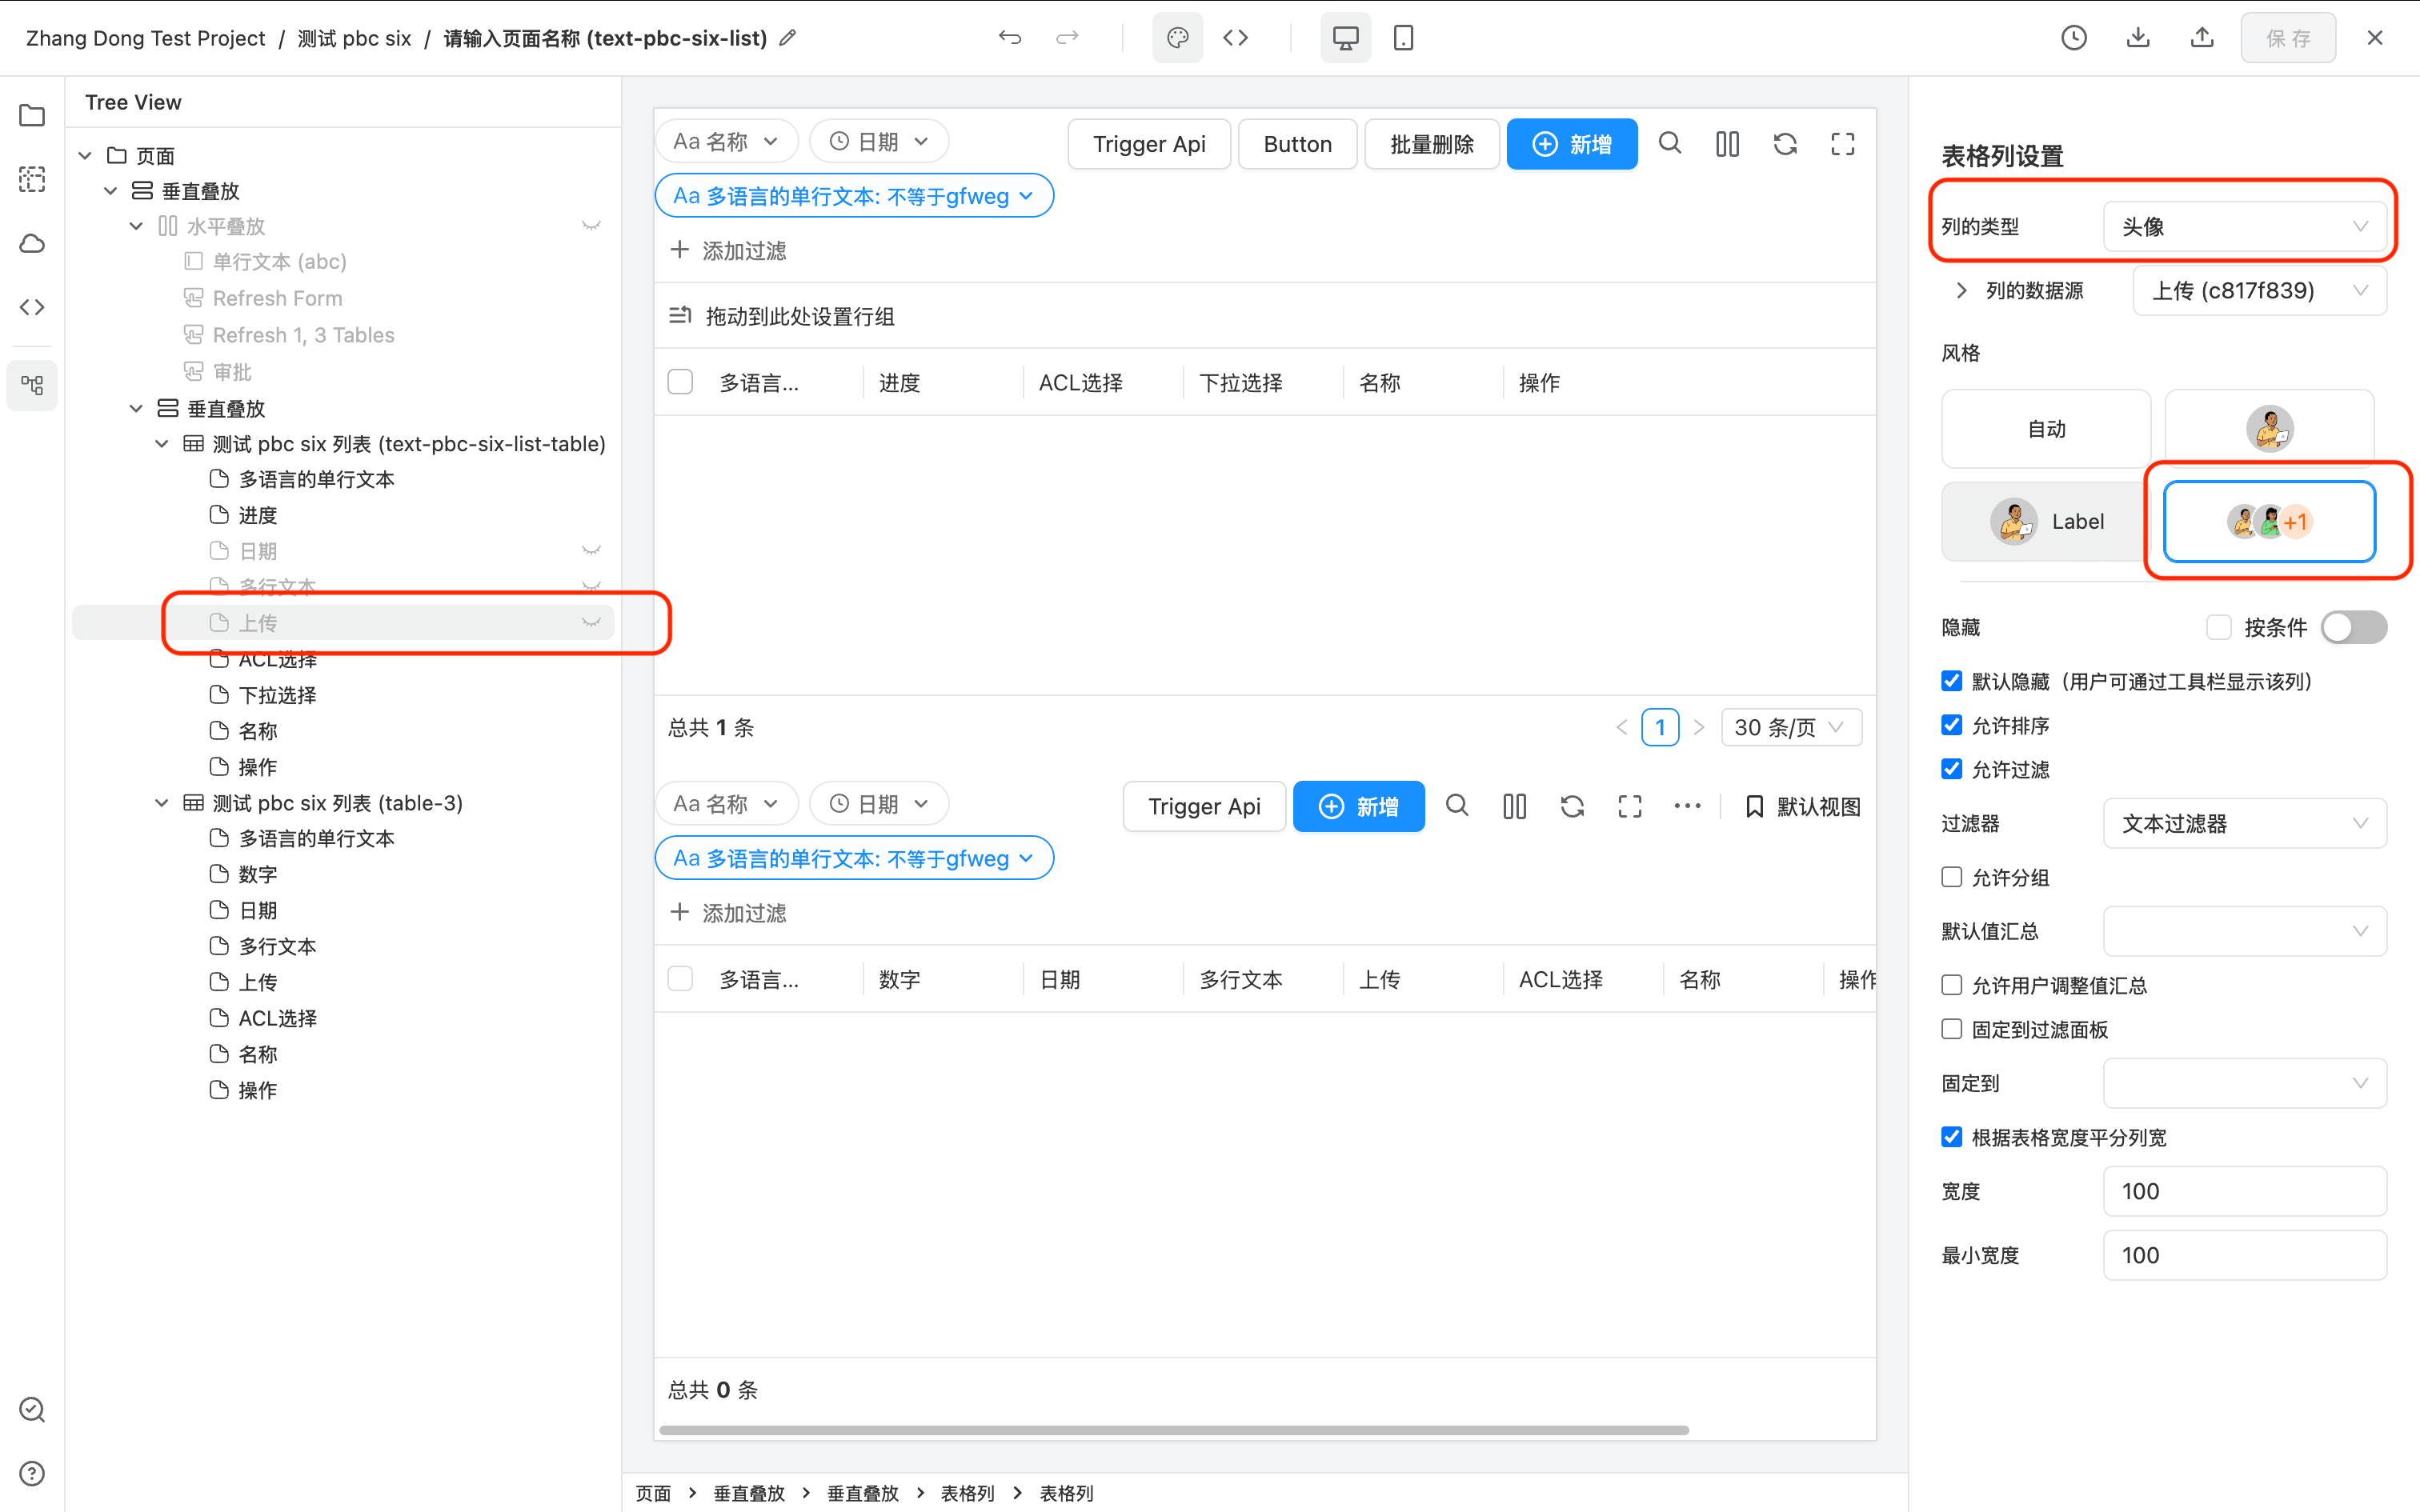
Data transformation
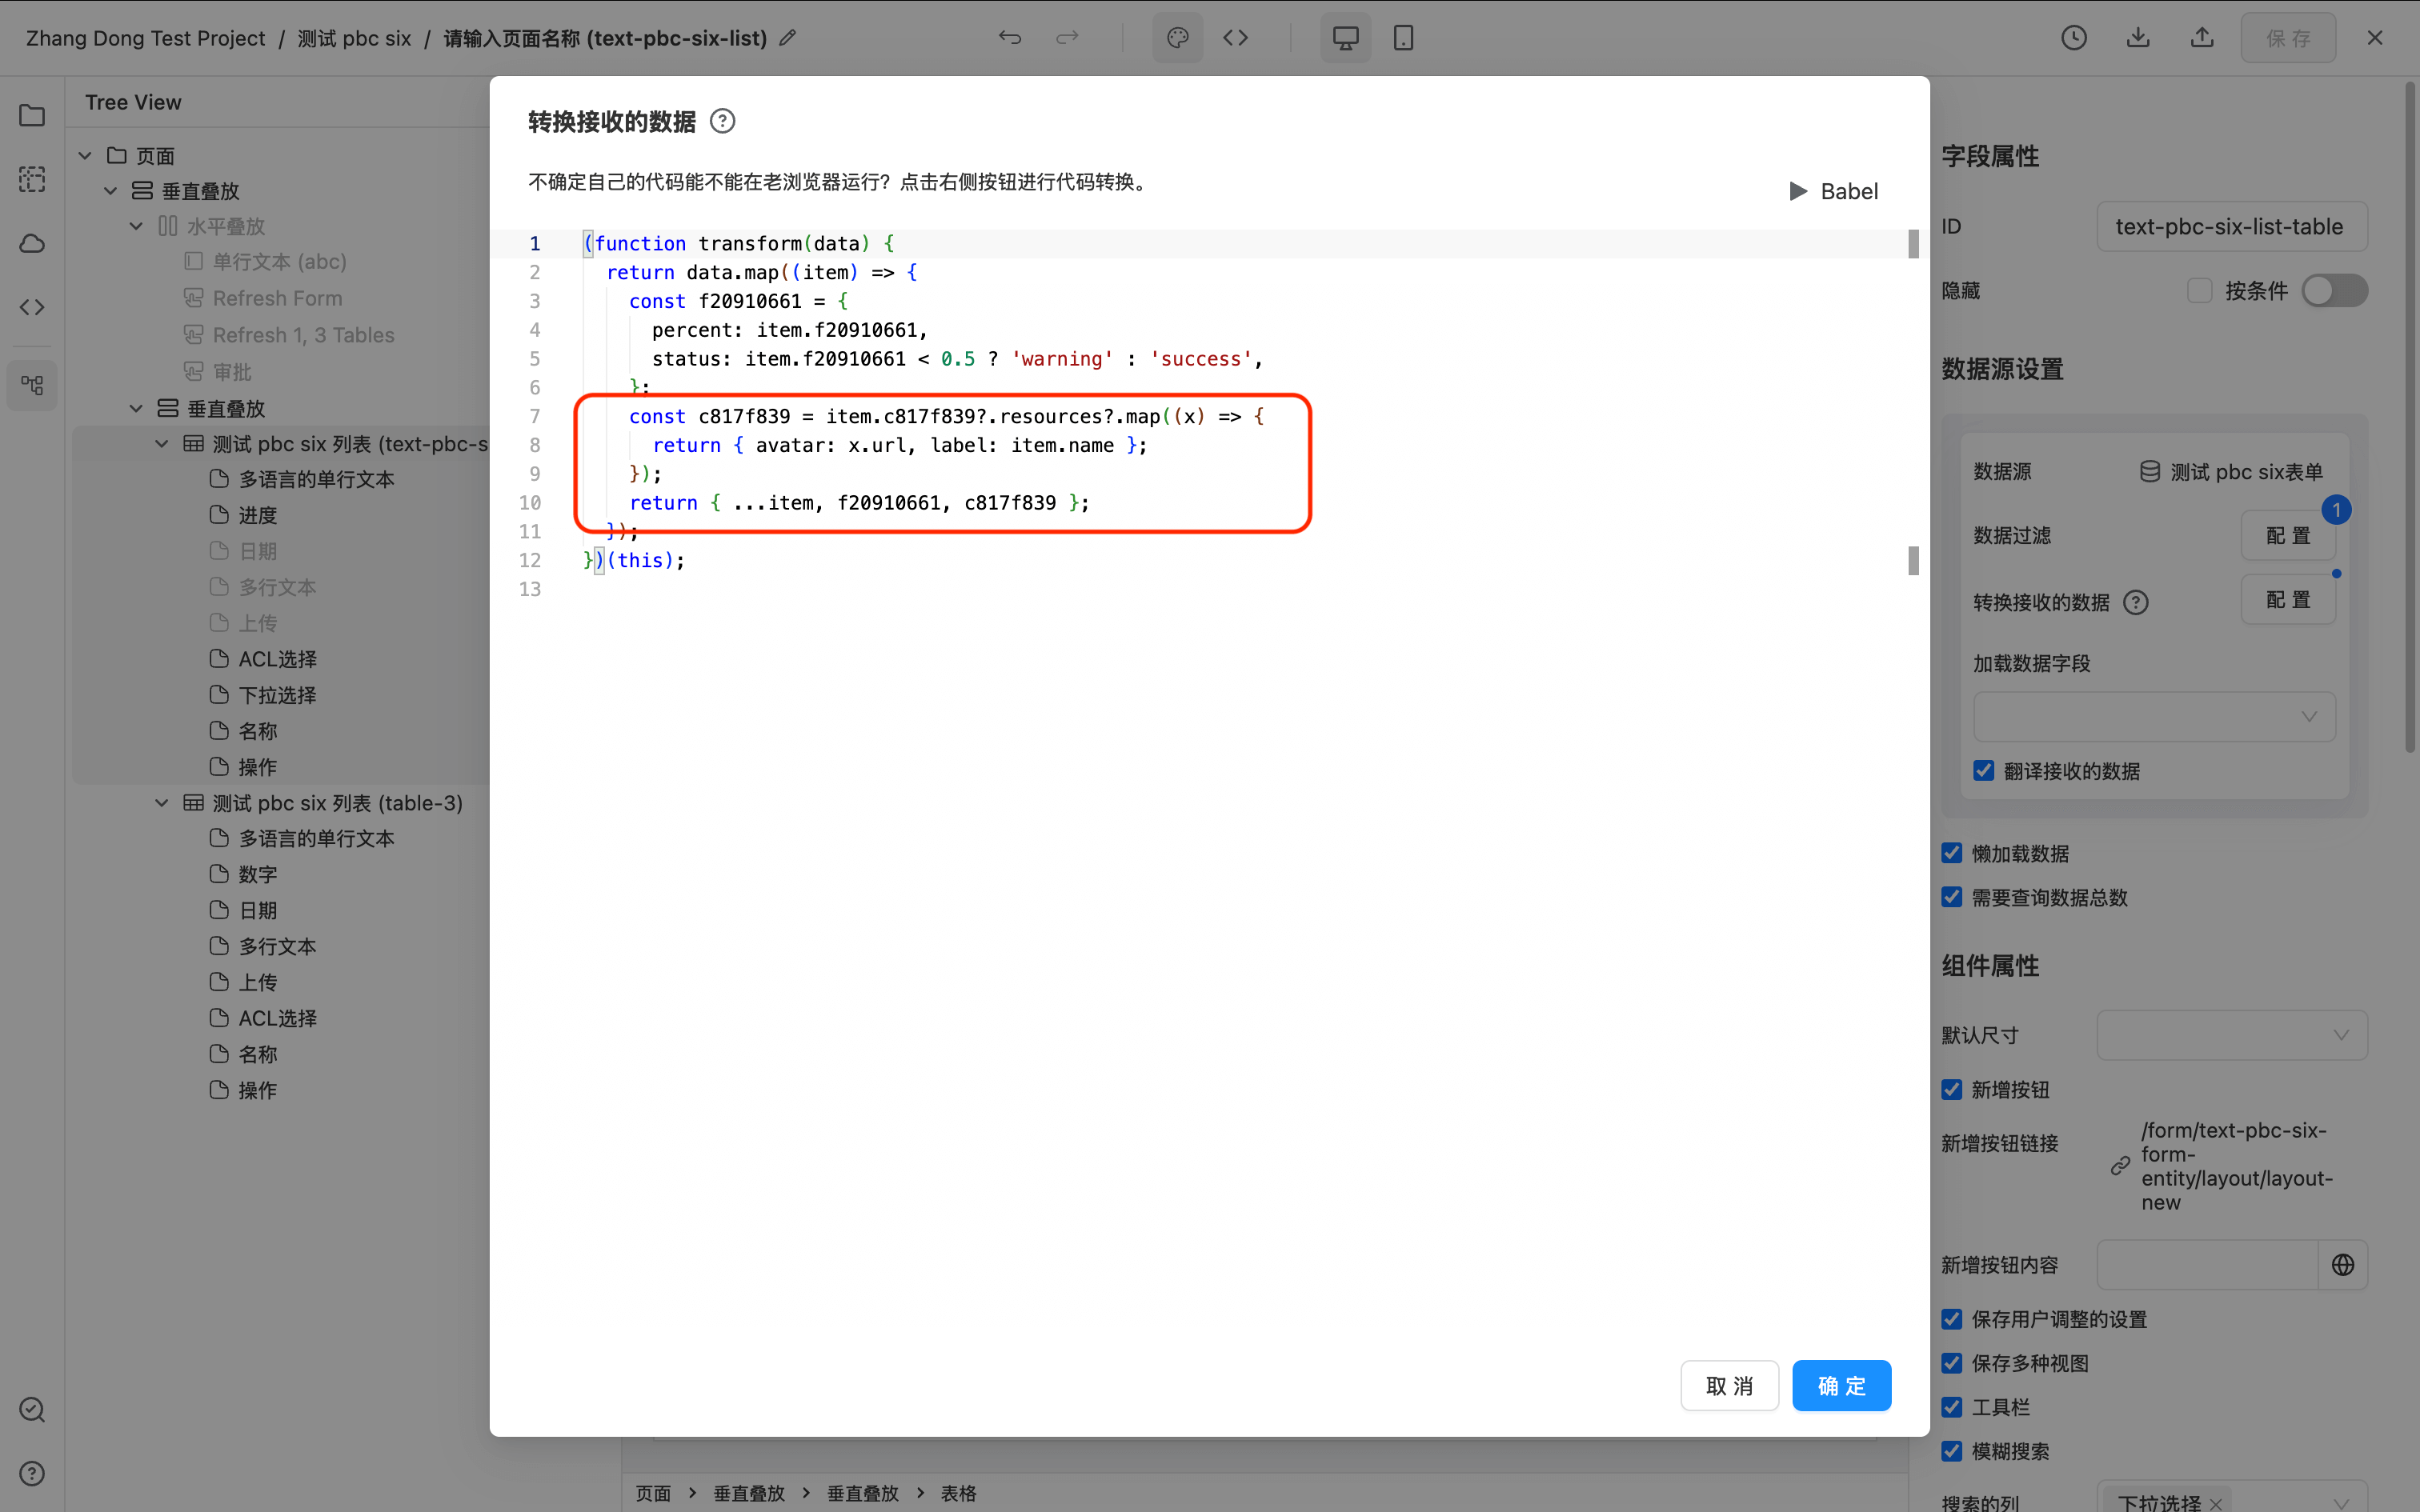
The JS data transformation code is as follows:
(function transform(data) {
  return data.map((item) => {
    const c817f839 = item.c817f839?.resources?.map((x) => {
      return { avatar: x.url, label: item.name };
    });
    return { ...item, c817f839 };
  });
})(this);
Runtime result
Merged Row Selection Column (GROUP_SELECT_COLUMN)
GROUP_SELECT_COLUMN is similar to AG Grid's native Row Grouping feature, but they are not the same and cannot be used together. When the merged row selection column is enabled, AG Grid's row grouping functionality is automatically disabled.
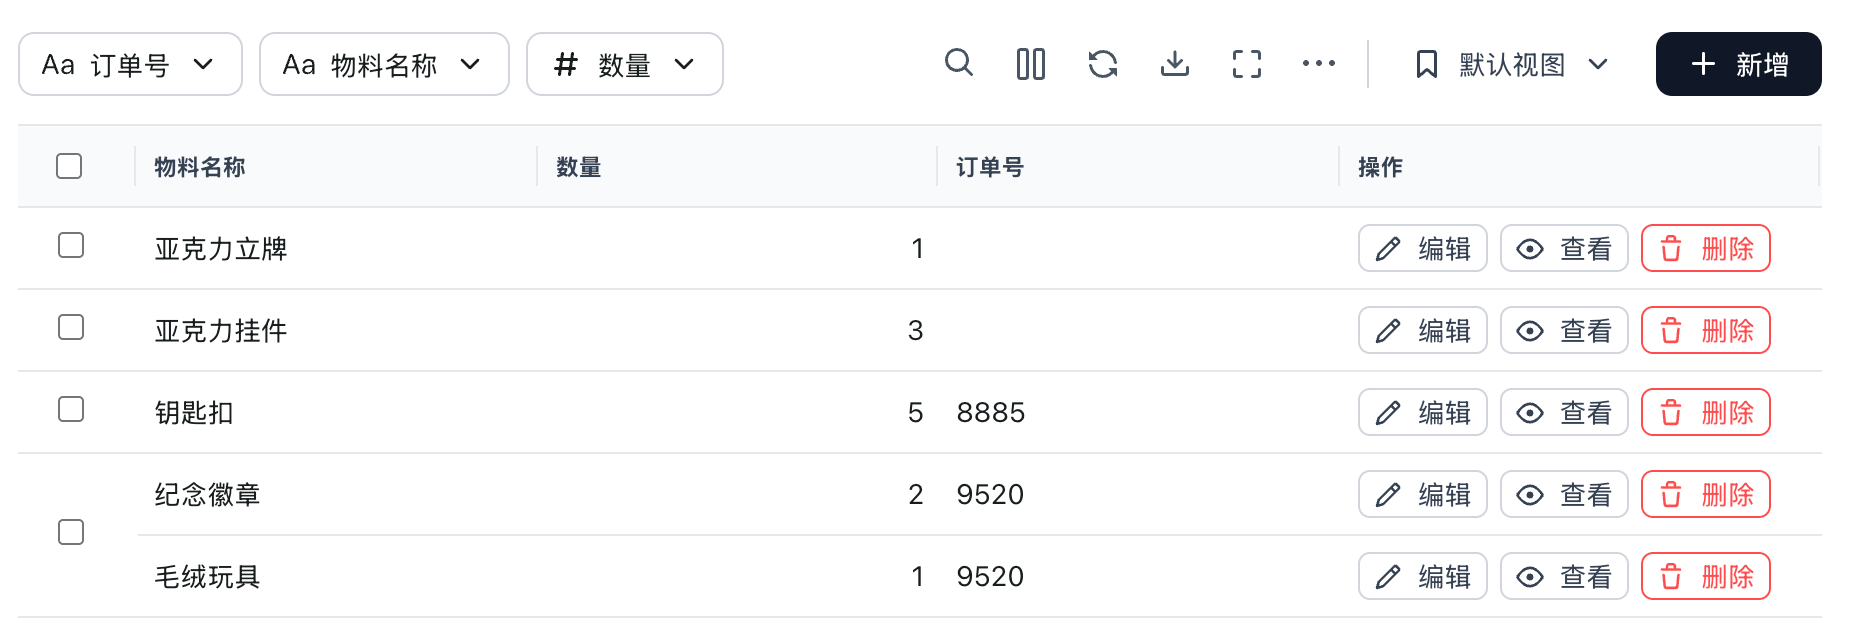
GROUP_SELECT_COLUMN is a special table column type that merges adjacent rows with identical values into a single cell, displaying a checkbox in the merged cell to enable "select entire group" interaction.
Typical use case: A field in the data (such as order number or batch number) corresponds to multiple detail rows, and users need to batch select/deselect these rows by group.
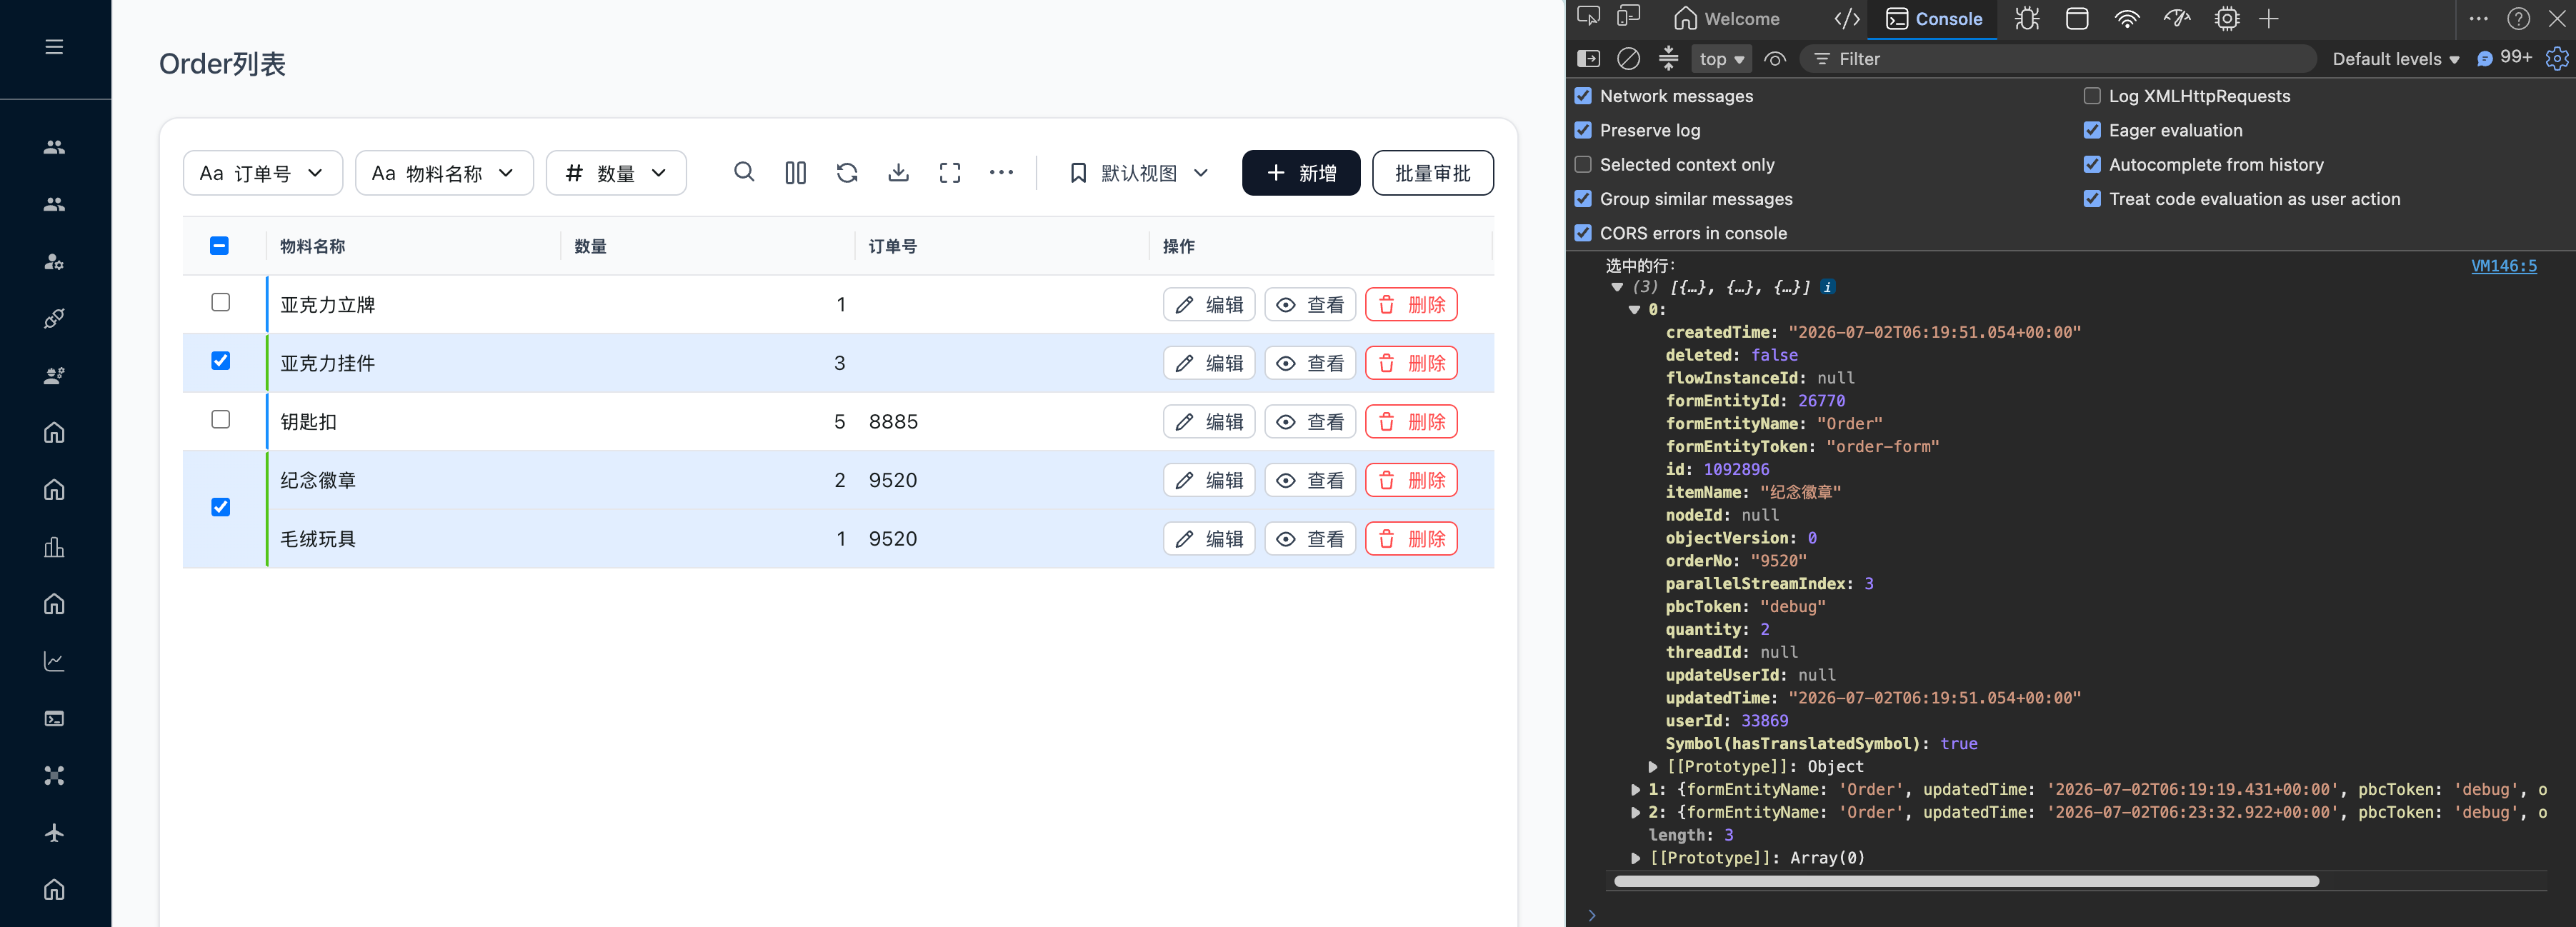
The runtime effect is shown below — multiple rows are merged and share a single checkbox:
Quick Start
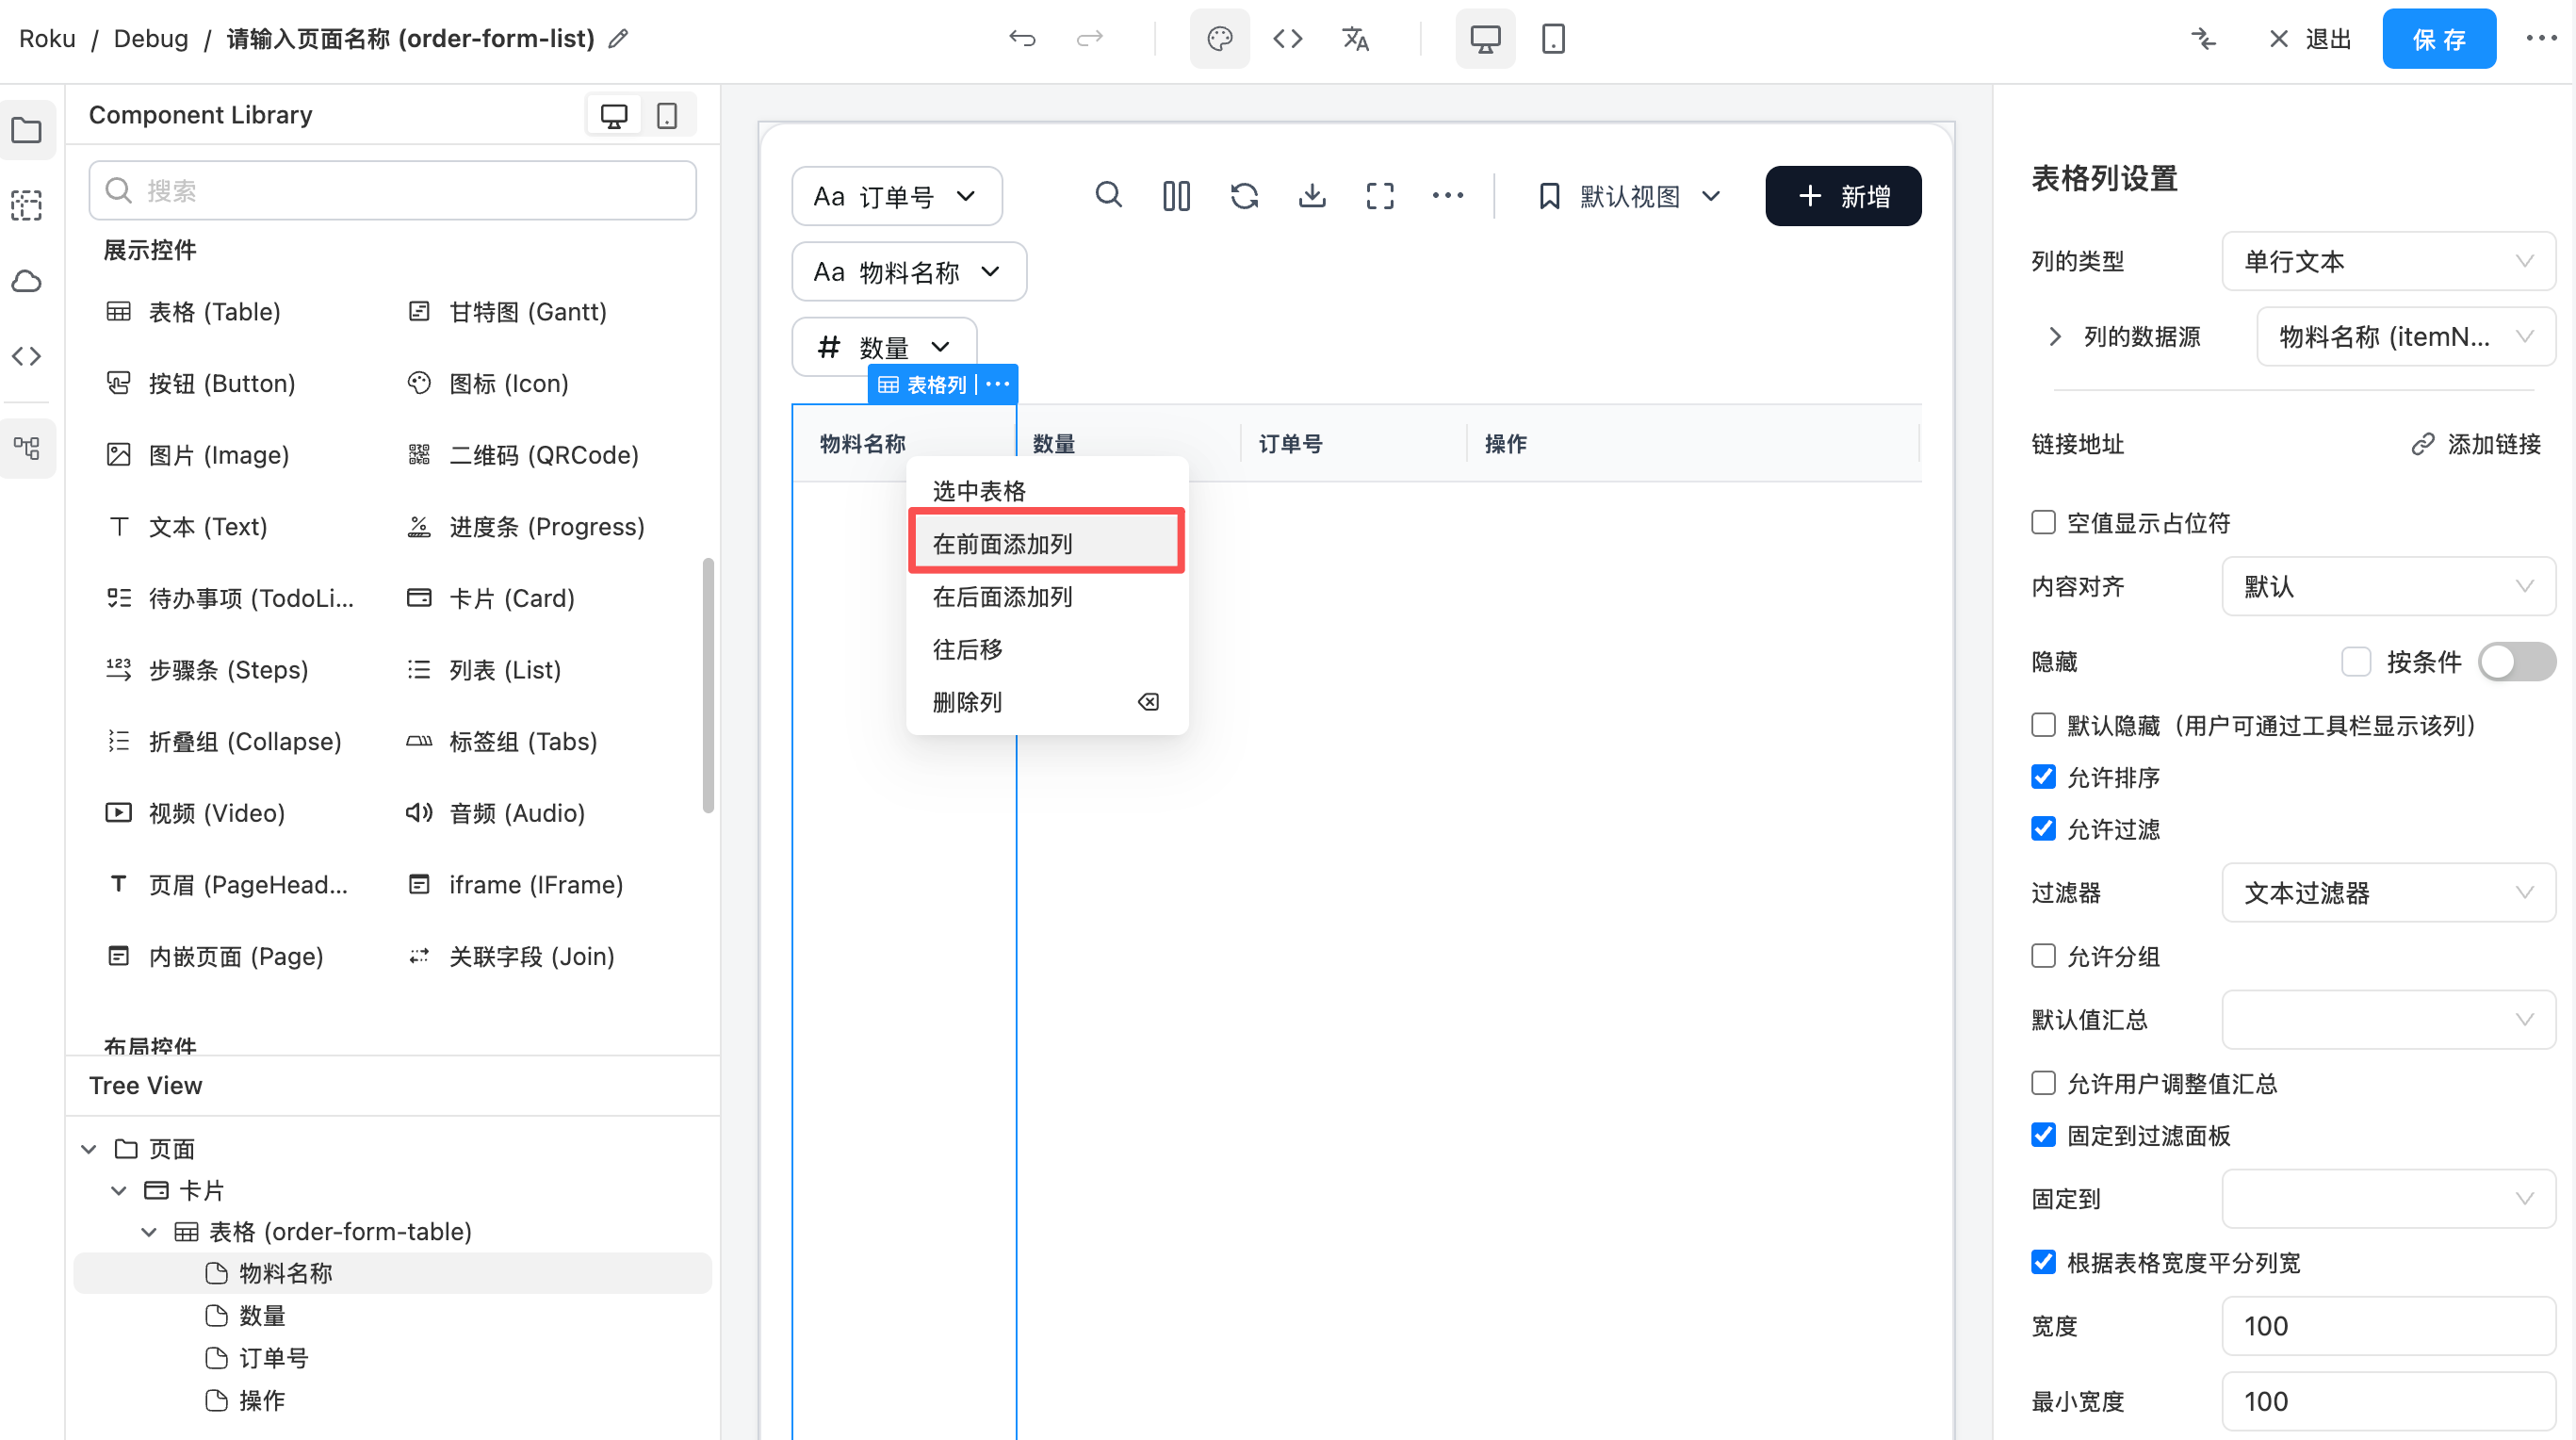
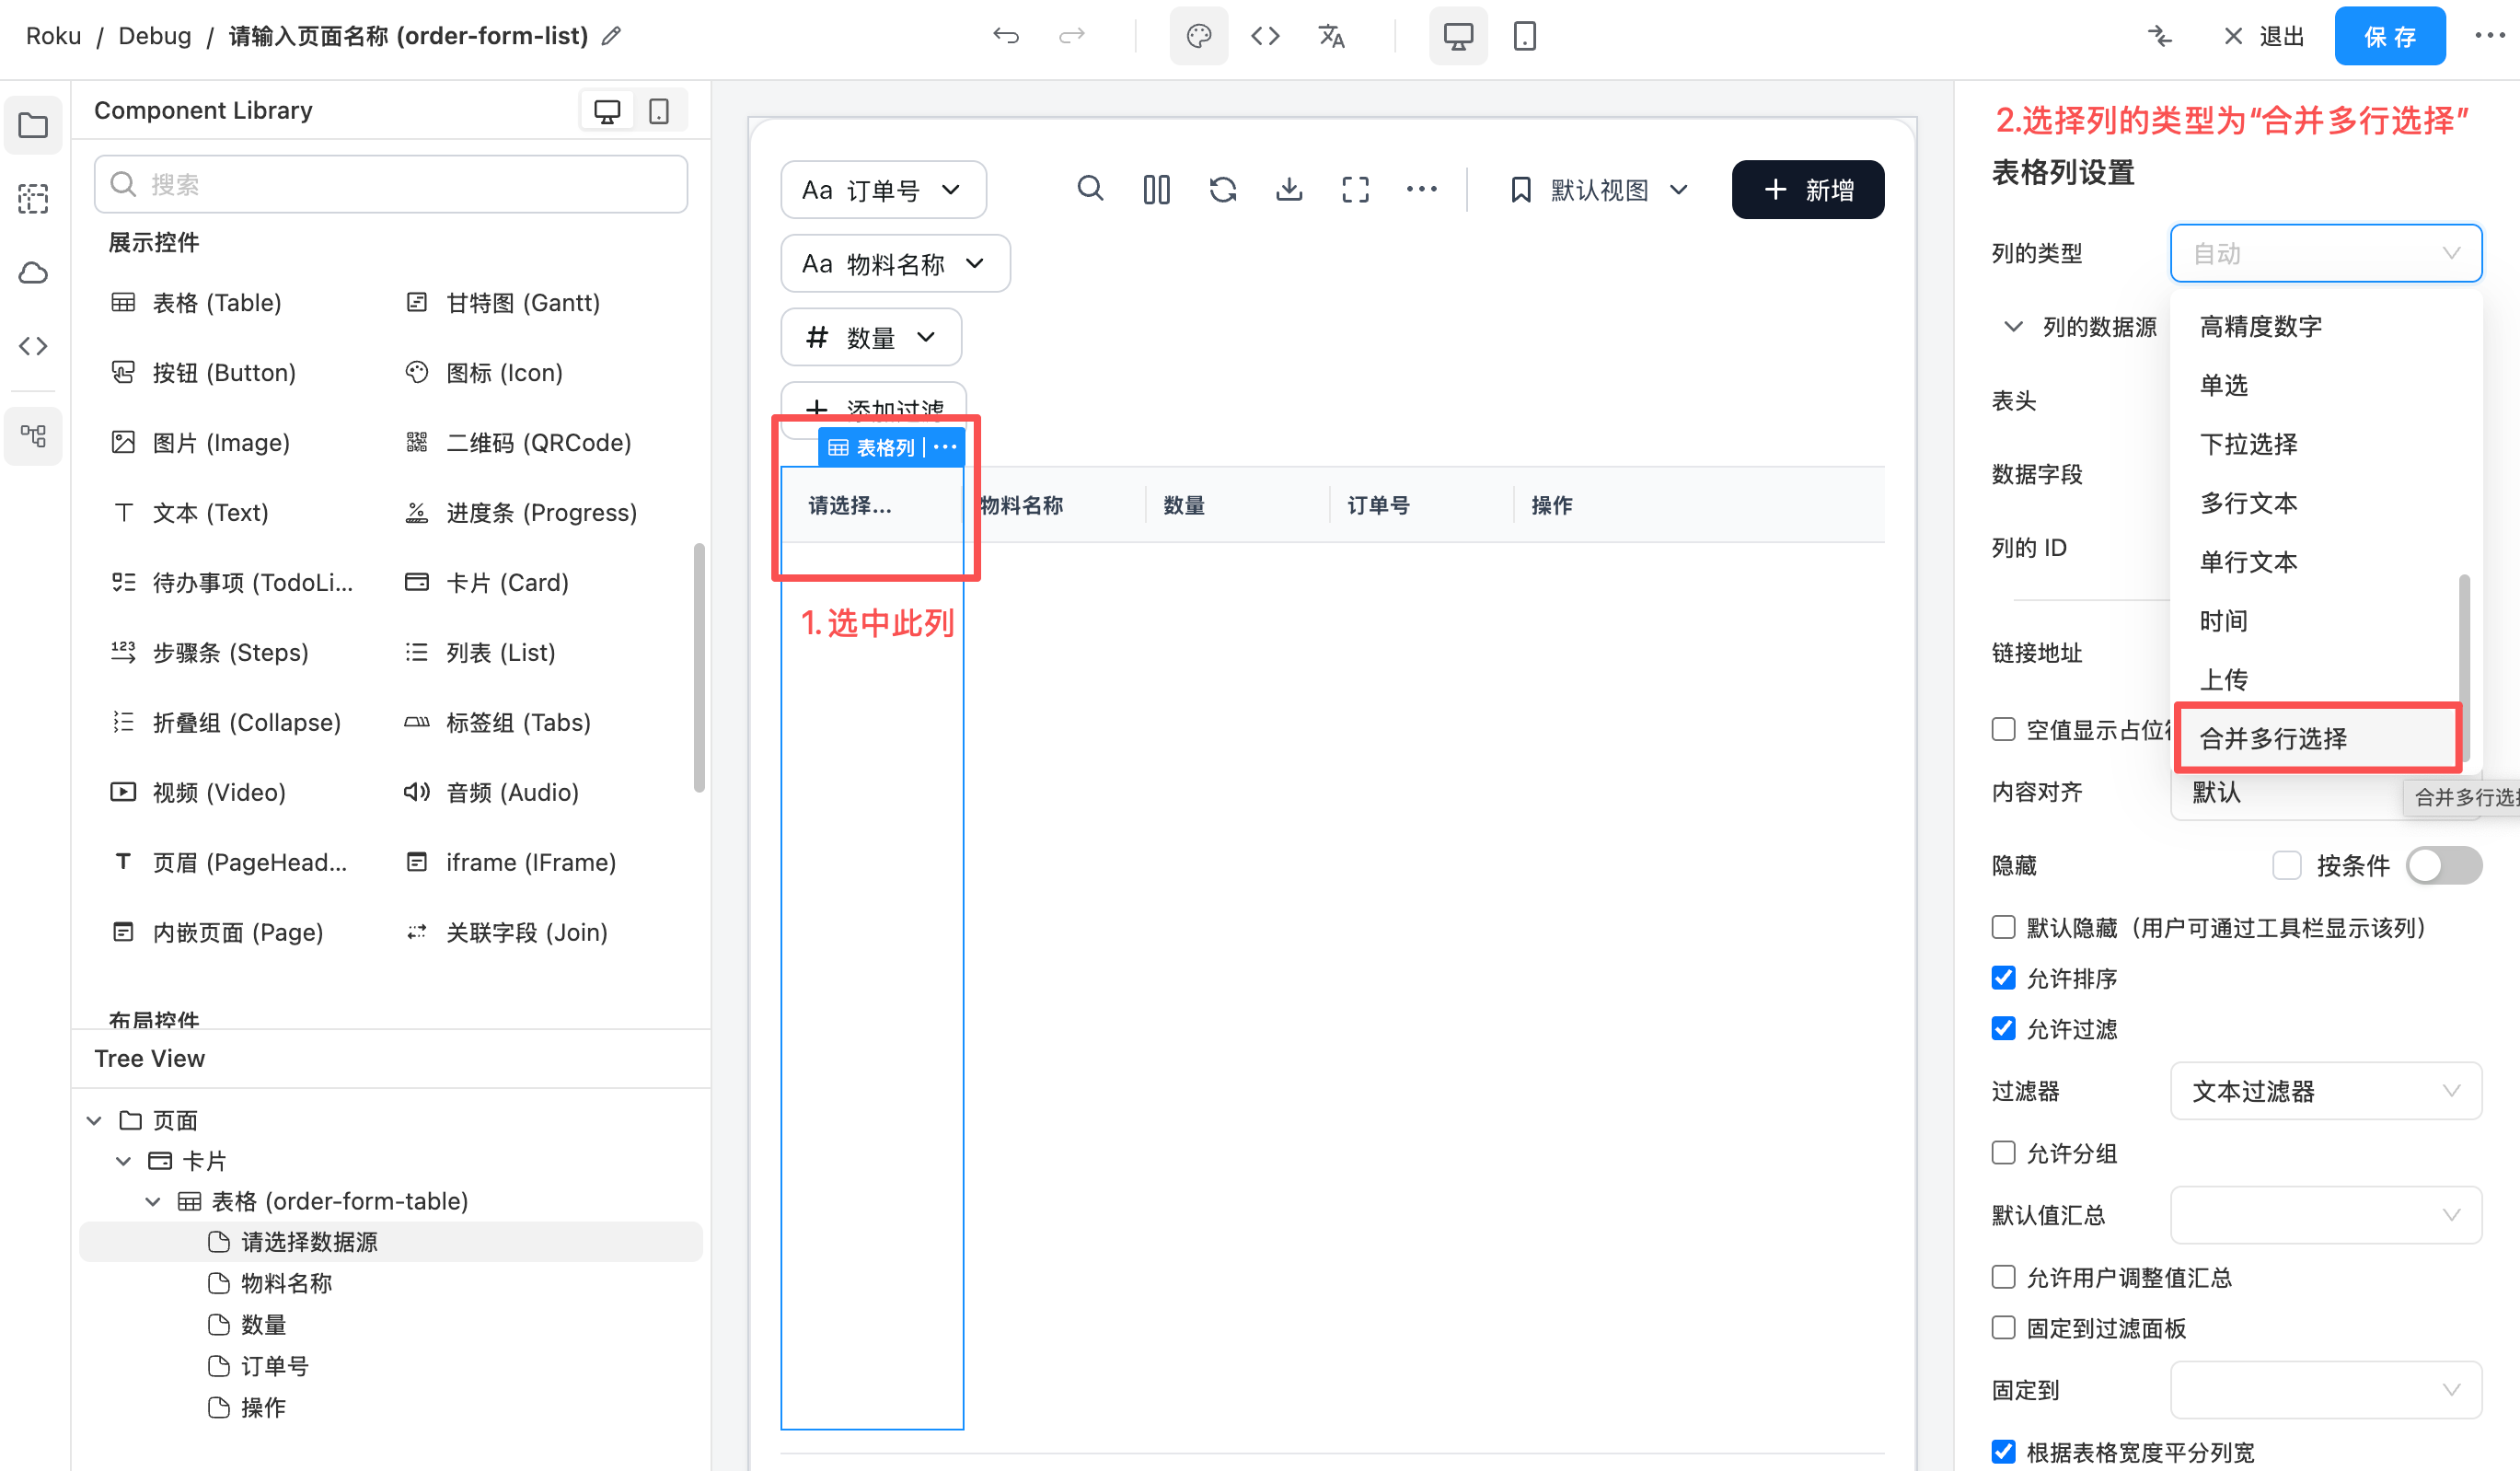
In the form designer, select a table column and switch the column type to "Merged Row Selection". The designer will automatically complete the following configurations:
- Switch the table to
clientSide(full data load) mode - Enable cell merging
- Disable pagination
- Hide the grouping panel
- Configure multi-select behavior (hide AG Grid's built-in checkbox column, with this column taking over selection logic)
Users only need to configure the grouping field to start using it.
Add a new column in the designer, select "Merged Row Selection", then configure the data field:
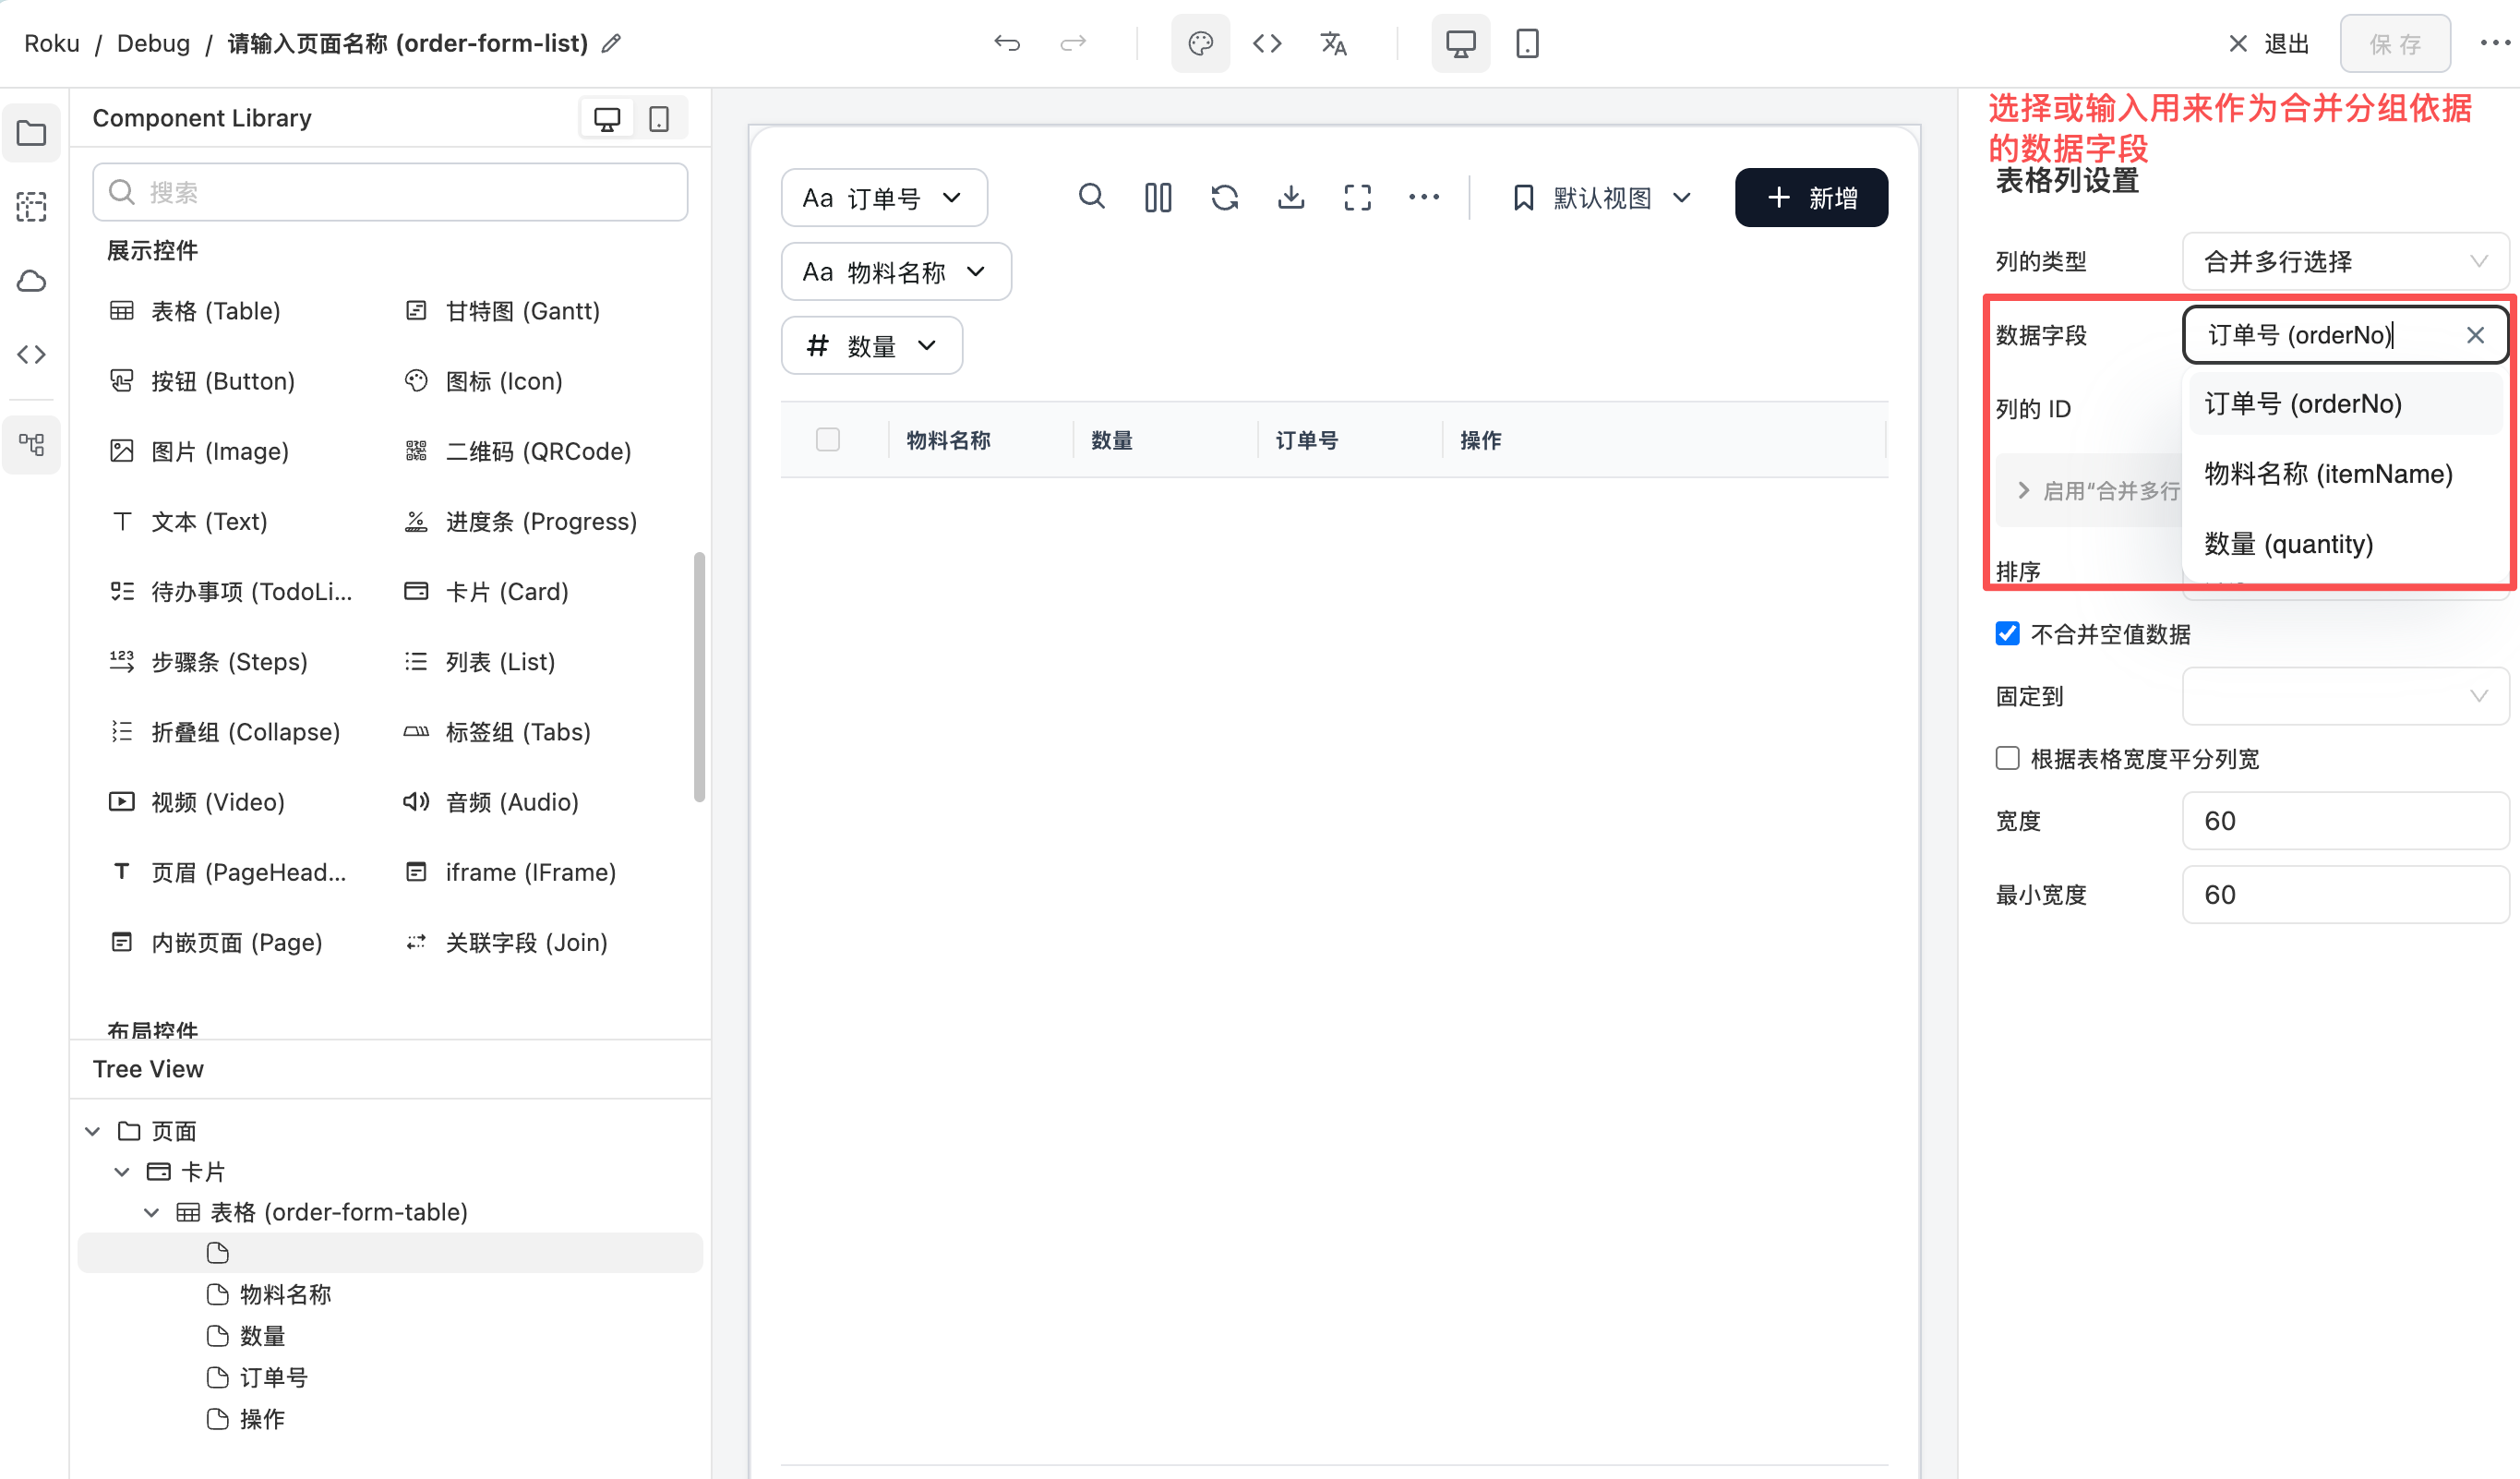
Configuration Options
| Option | Description | Default |
|---|---|---|
Grouping Field (field) | Adjacent rows with the same value will be merged into a group sharing a single checkbox. Supports selecting from the current data source's field list or manually entering any field path. | — |
Column ID (colId) | Unique identifier for the column. | 'group-selection' |
Sort (sort) | Sort direction to ensure grouped data is adjacent, which is required for merging to work correctly. | Ascending |
Don't Merge Empty Values (notMergeEmptyValue) | When checked (default): empty values remain independent and won't be merged with other empty value rows. When unchecked: empty values will also be merged into a group. | Checked (empty values not merged) |
Runtime Behavior
Grouping and Merging Logic
- After the table loads data, it sorts by the grouping field in the configured sort direction to ensure grouped data is adjacent.
- Adjacent rows with the same grouping field value are merged into a single cell. Rows with
null/undefined/''(empty values) remain independent by default, unless "Don't Merge Empty Values" is unchecked.
Checkbox Selection Logic
- Cell checkbox: Checking/unchecking selects or deselects all selectable rows within that group.
- Header checkbox: Selects/deselects all selectable rows after filtering (regardless of grouping).
- Indeterminate state: When only some rows in a group are selected, the cell checkbox displays an indeterminate state.
JSON Configuration Example
Below is a complete column configuration example (columnDefs section):
{
  "columnDefs": [
    {
      "type": "GROUP_SELECT_COLUMN",
      "colId": "group-selection",
      "field": "orderNo",
      "sort": "asc",
      "width": 60,
      "minWidth": 60,
      "flex": null
    },
    {
      "field": "orderNo",
      "headerName": "Order No"
    },
    {
      "field": "itemName",
      "headerName": "Item Name"
    },
    {
      "field": "quantity",
      "headerName": "Quantity"
    }
  ]
}
When switching column type via the designer, table-level configurations (clientSide mode, disabled pagination, etc.) are set automatically — no manual configuration needed. If writing JSON manually, you also need to configure rowModelType: "clientSide", enableCellSpan: true, pagination: false, rowGroupPanelShow: "never", and rowSelection in the table's componentProps.
Getting Selected Row Data
Used with a button to retrieve user-selected row data for further operations (such as batch approval).
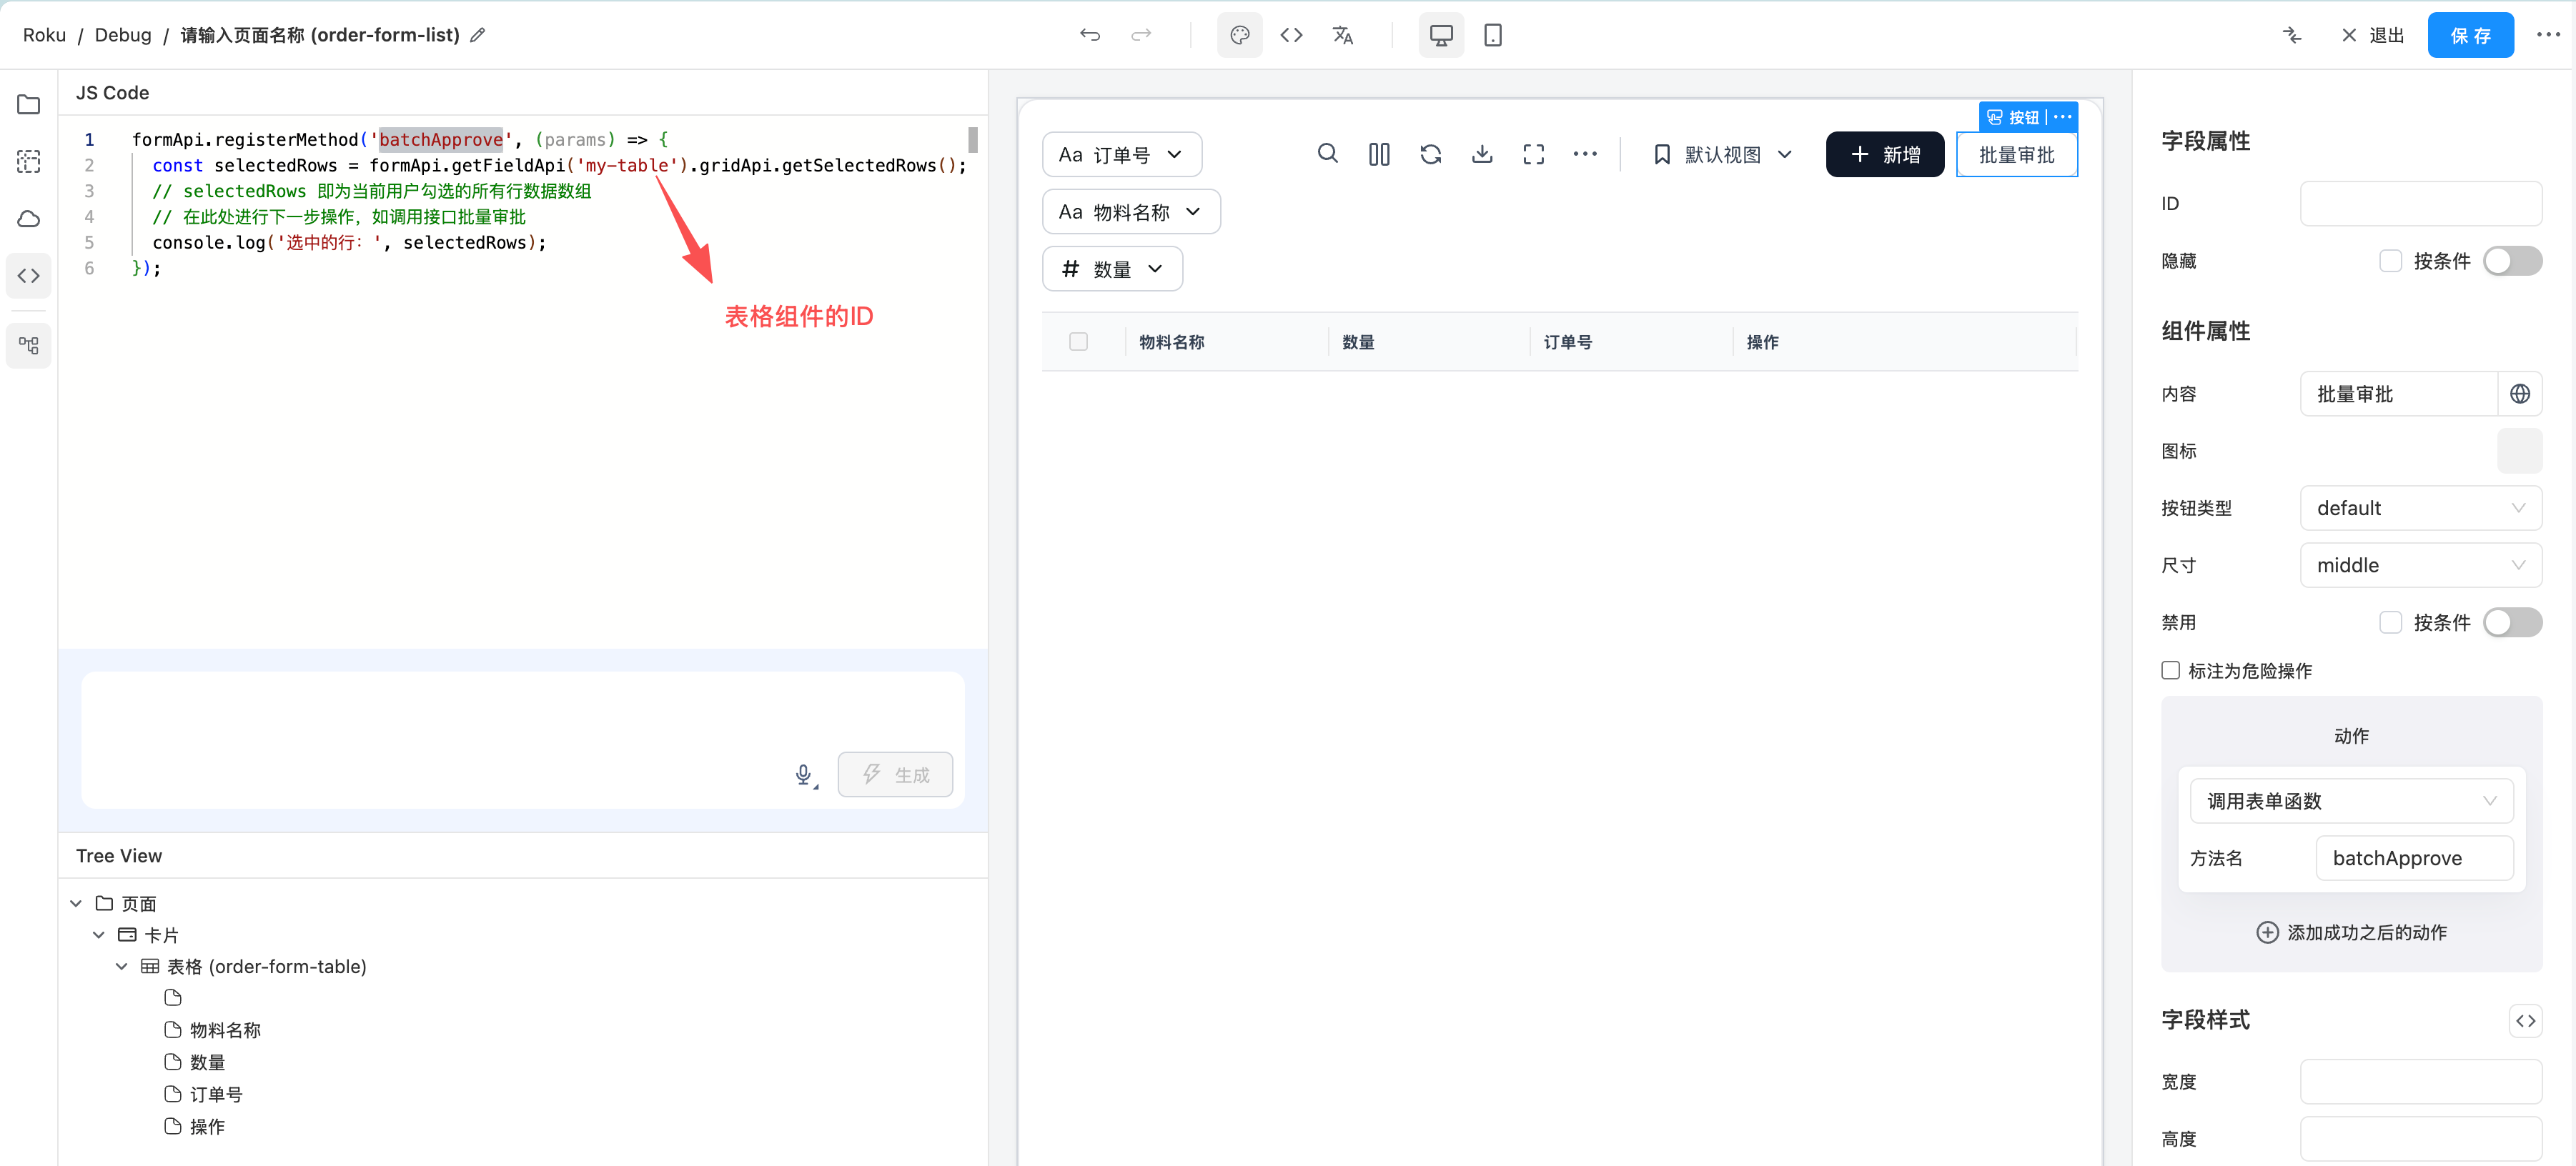
Implementation steps:
- Set an ID for the table (e.g.,
my-table), which will be used in JS to access the table API. - Add a button next to the table and set the button's action to call a custom method (e.g.,
approve). - In JS, register the method via
formApi.registerMethod. Inside the method, useformApi.getFieldApito get the table's AG Grid API, then callgetSelectedRows()to get the selected rows.
Button configuration in the designer for calling a custom method:
formApi.registerMethod('batchApprove', (params) => {
  const selectedRows = formApi.getFieldApi('my-table').gridApi.getSelectedRows();
  // selectedRows is an array of all currently selected row data
  // Perform next steps here, such as calling an API for batch approval
  console.log('Selected rows:', selectedRows);
});
Runtime effect after clicking the button to get selected row data:
CSS Style Customization
The component dynamically adds CSS classes to merged cells at runtime for easy style customization:
Available Classes
| Class Name | Applied When | Description |
|---|---|---|
icp-group-select-cell-selected | Any row in the group is selected | Controls the selected background color of merged cells |
icp-group-select-even | Group index is even (0, 2, 4...) | Used to visually distinguish adjacent groups |
icp-group-select-odd | Group index is odd (1, 3, 5...) | Used to visually distinguish adjacent groups |
Custom Even/Odd Group Styles Example
Use icp-group-select-even / icp-group-select-odd to add different visual distinctions between adjacent groups, such as different colored right borders:
/* Even groups: blue right border */
.icp-group-select-even {
  border-right: 3px solid #1890ff !important;
}

/* Odd groups: green right border */
.icp-group-select-odd {
  border-right: 3px solid #52c41a !important;
}
Customizing via columnDef cellClass
If you only want to customize styles for a specific table's grouped selection column, you can use cellClass in the column configuration JSON:
{
  "type": "GROUP_SELECT_COLUMN",
  "colId": "group-selection",
  "field": "orderNo",
  "cellClass": "my-custom-group-cell"
}
Combined with even/odd group classes to write corresponding CSS styles:
/* Even groups: blue right border */
.my-custom-group-cell.icp-group-select-even {
  border-right: 3px solid #1890ff !important;
}

/* Odd groups: green right border */
.my-custom-group-cell.icp-group-select-odd {
  border-right: 3px solid #52c41a !important;
}
Where to Configure CSS
The custom CSS above can be configured in the frontend appearance settings. For detailed instructions, please refer to: Appearance - CSS Customization.
Notes and Limitations
-
Only supports full data load (clientSide) mode
Merged Row Selection relies on client-side APIs for header select-all and continuous group detection. It does not support serverSide (server-side pagination/sorting) mode. When switching to this column type, the table automatically switches from serverSide to clientSide. -
Pagination must be disabled
Pagination splits data across pages, which may cause rows in the same group to be on different pages, making cross-page merging impossible. -
Sorting and grouping of other columns are disabled
Manual sorting or grouping of other columns breaks the sort continuity of the grouping field, causing merging to fail. Therefore, when this column is enabled, sorting and grouping for other columns are automatically disabled. -
Performance considerations
Since clientSide mode must be used with pagination disabled, all data is loaded to the frontend at once. This may affect performance with large datasets (e.g., tens of thousands of rows). Please evaluate based on your actual data volume. -
Empty value handling
By default, rows with empty grouping field values (null/undefined/'') remain independent and are not merged. To allow empty value rows to participate in merging, uncheck "Don't Merge Empty Values". -
Sort direction purpose
The sort configuration (ascending/descending) primarily ensures grouped data is adjacent. Choose ascending or descending based on which groups you want to appear first.
Complex Table Column Definitions (CUSTOM_COLUMN)
Do not overuse CUSTOM_COLUMN. Since each custom column requires recursive rendering of a low-code component tree, excessive usage may cause performance issues. Only use CUSTOM_COLUMN when none of the other built-in column types (such as TEXT_COLUMN, SELECT_COLUMN, AVATAR_COLUMN, etc.) can meet your requirements.
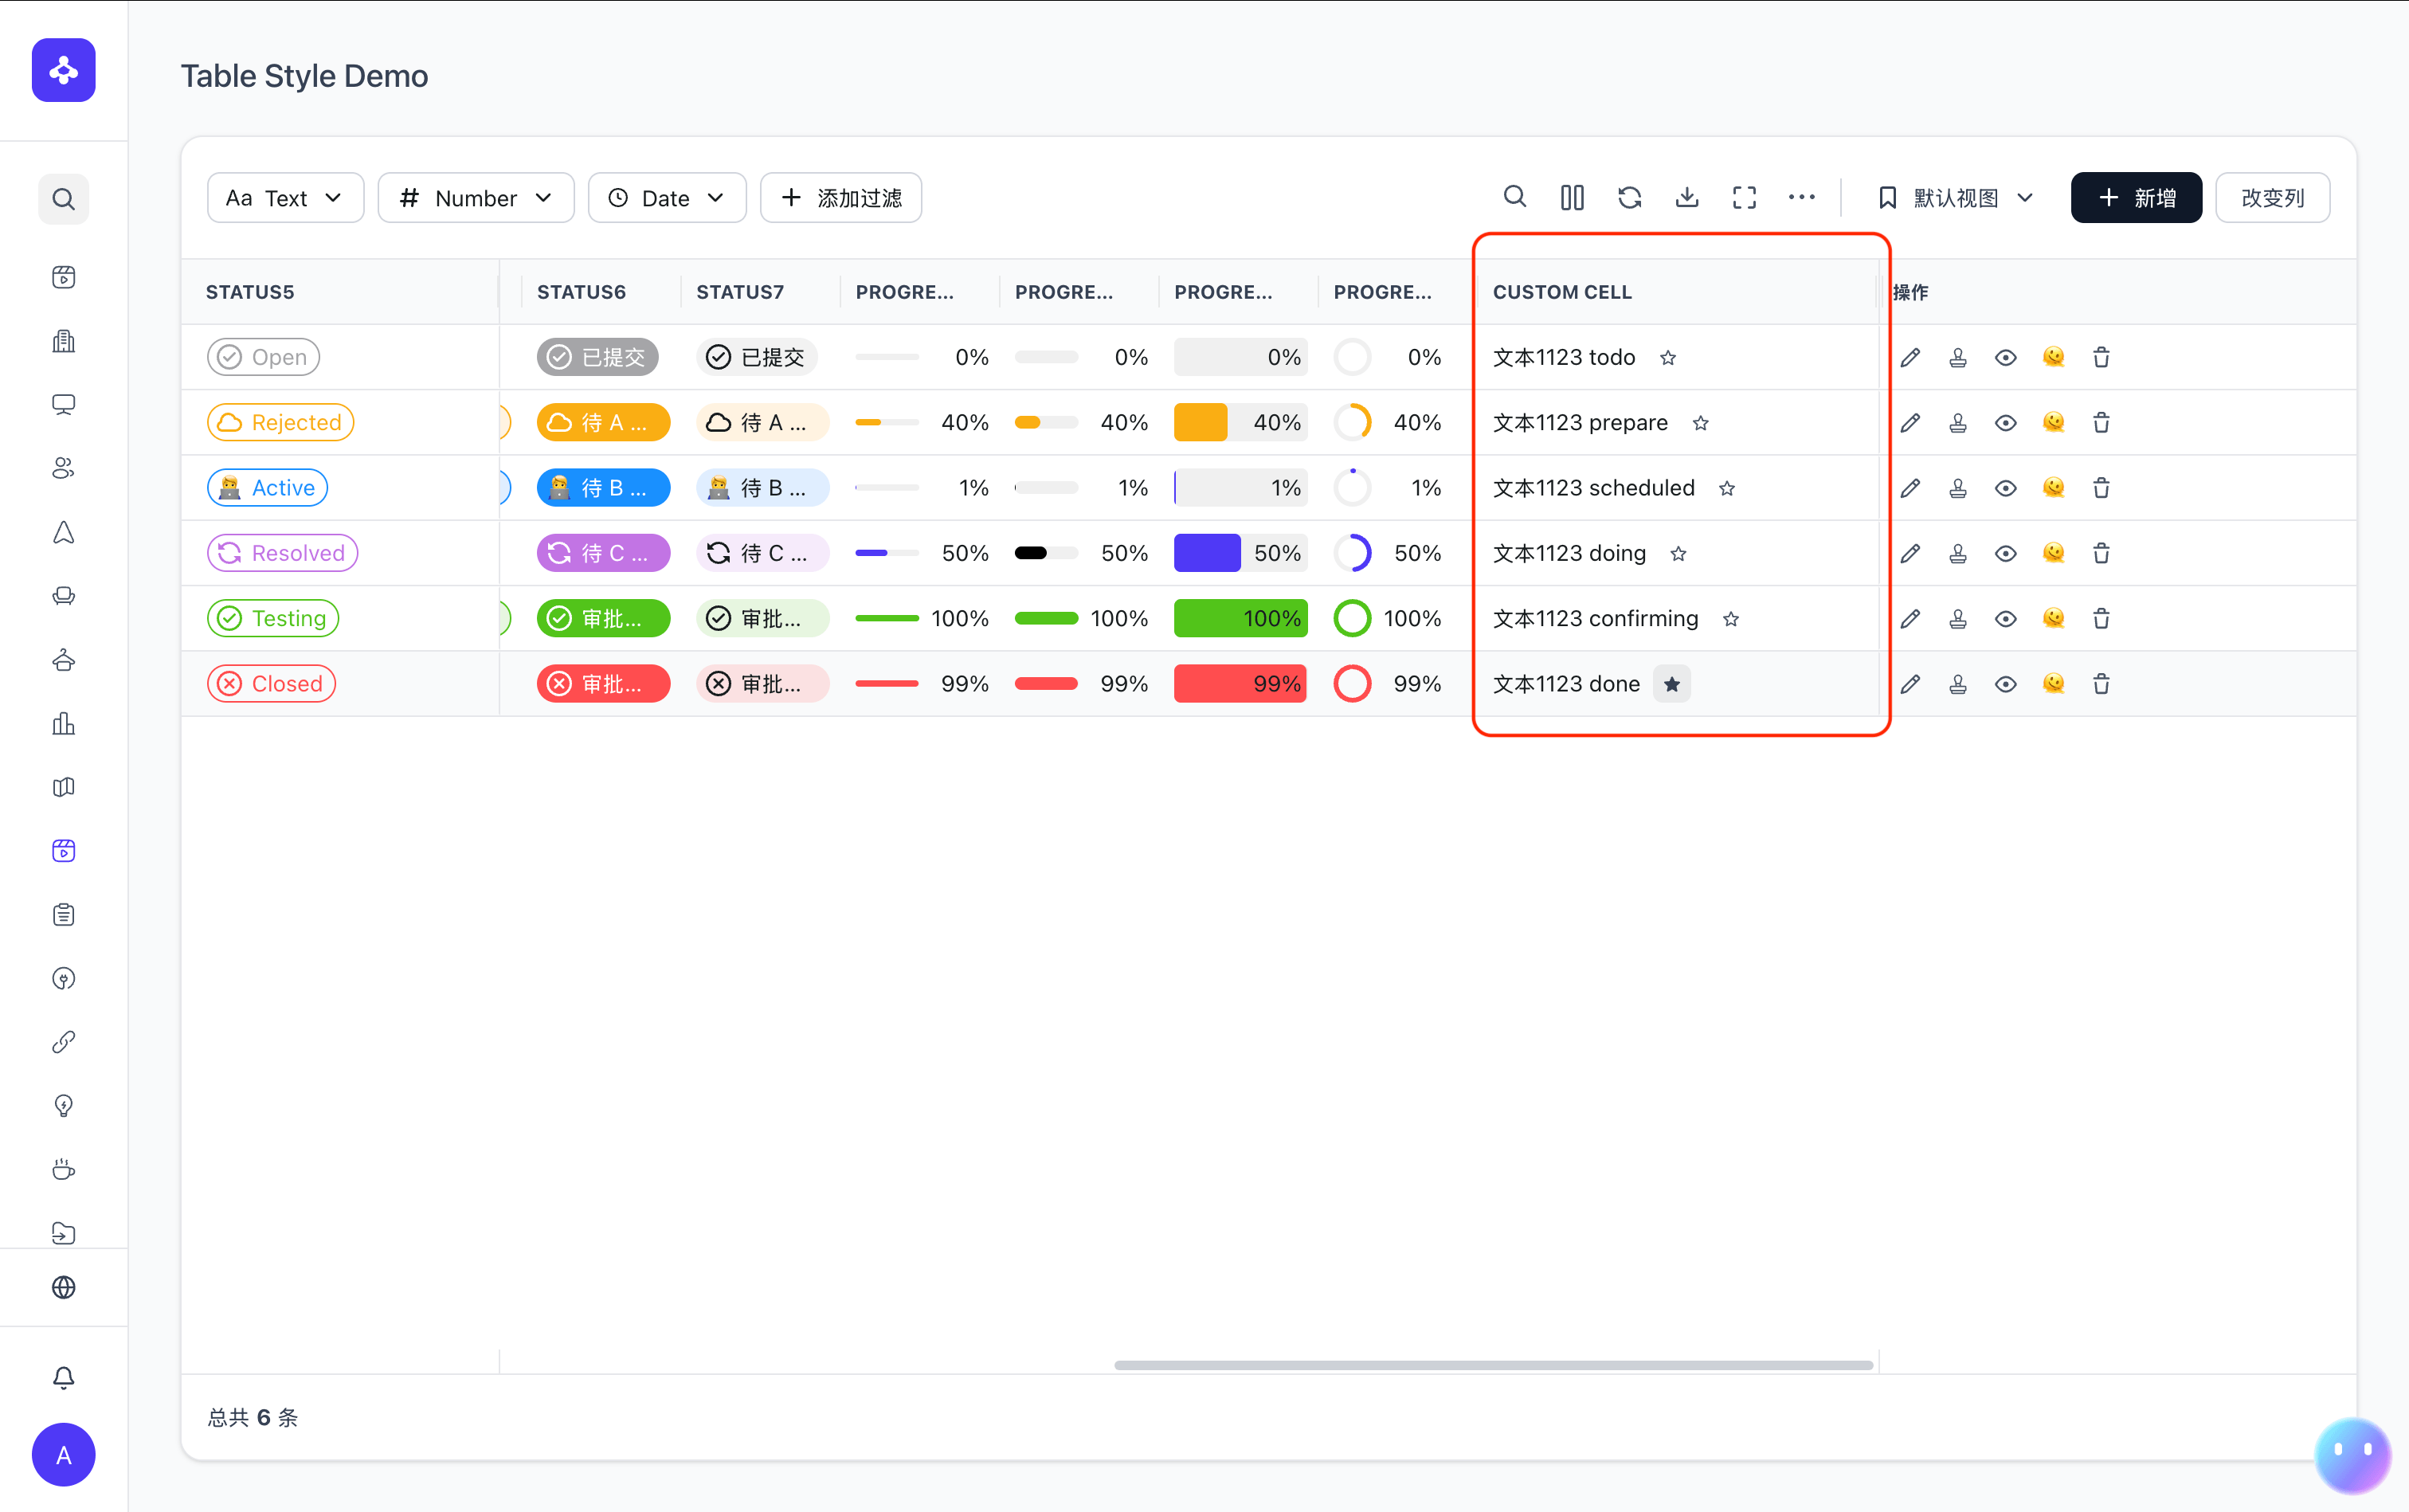
When built-in column types cannot meet your requirements, you can use the CUSTOM_COLUMN type to customize table column rendering. CUSTOM_COLUMN allows you to describe the cell rendering structure directly using low-code JSON configuration within the column definition, without writing any JS code.
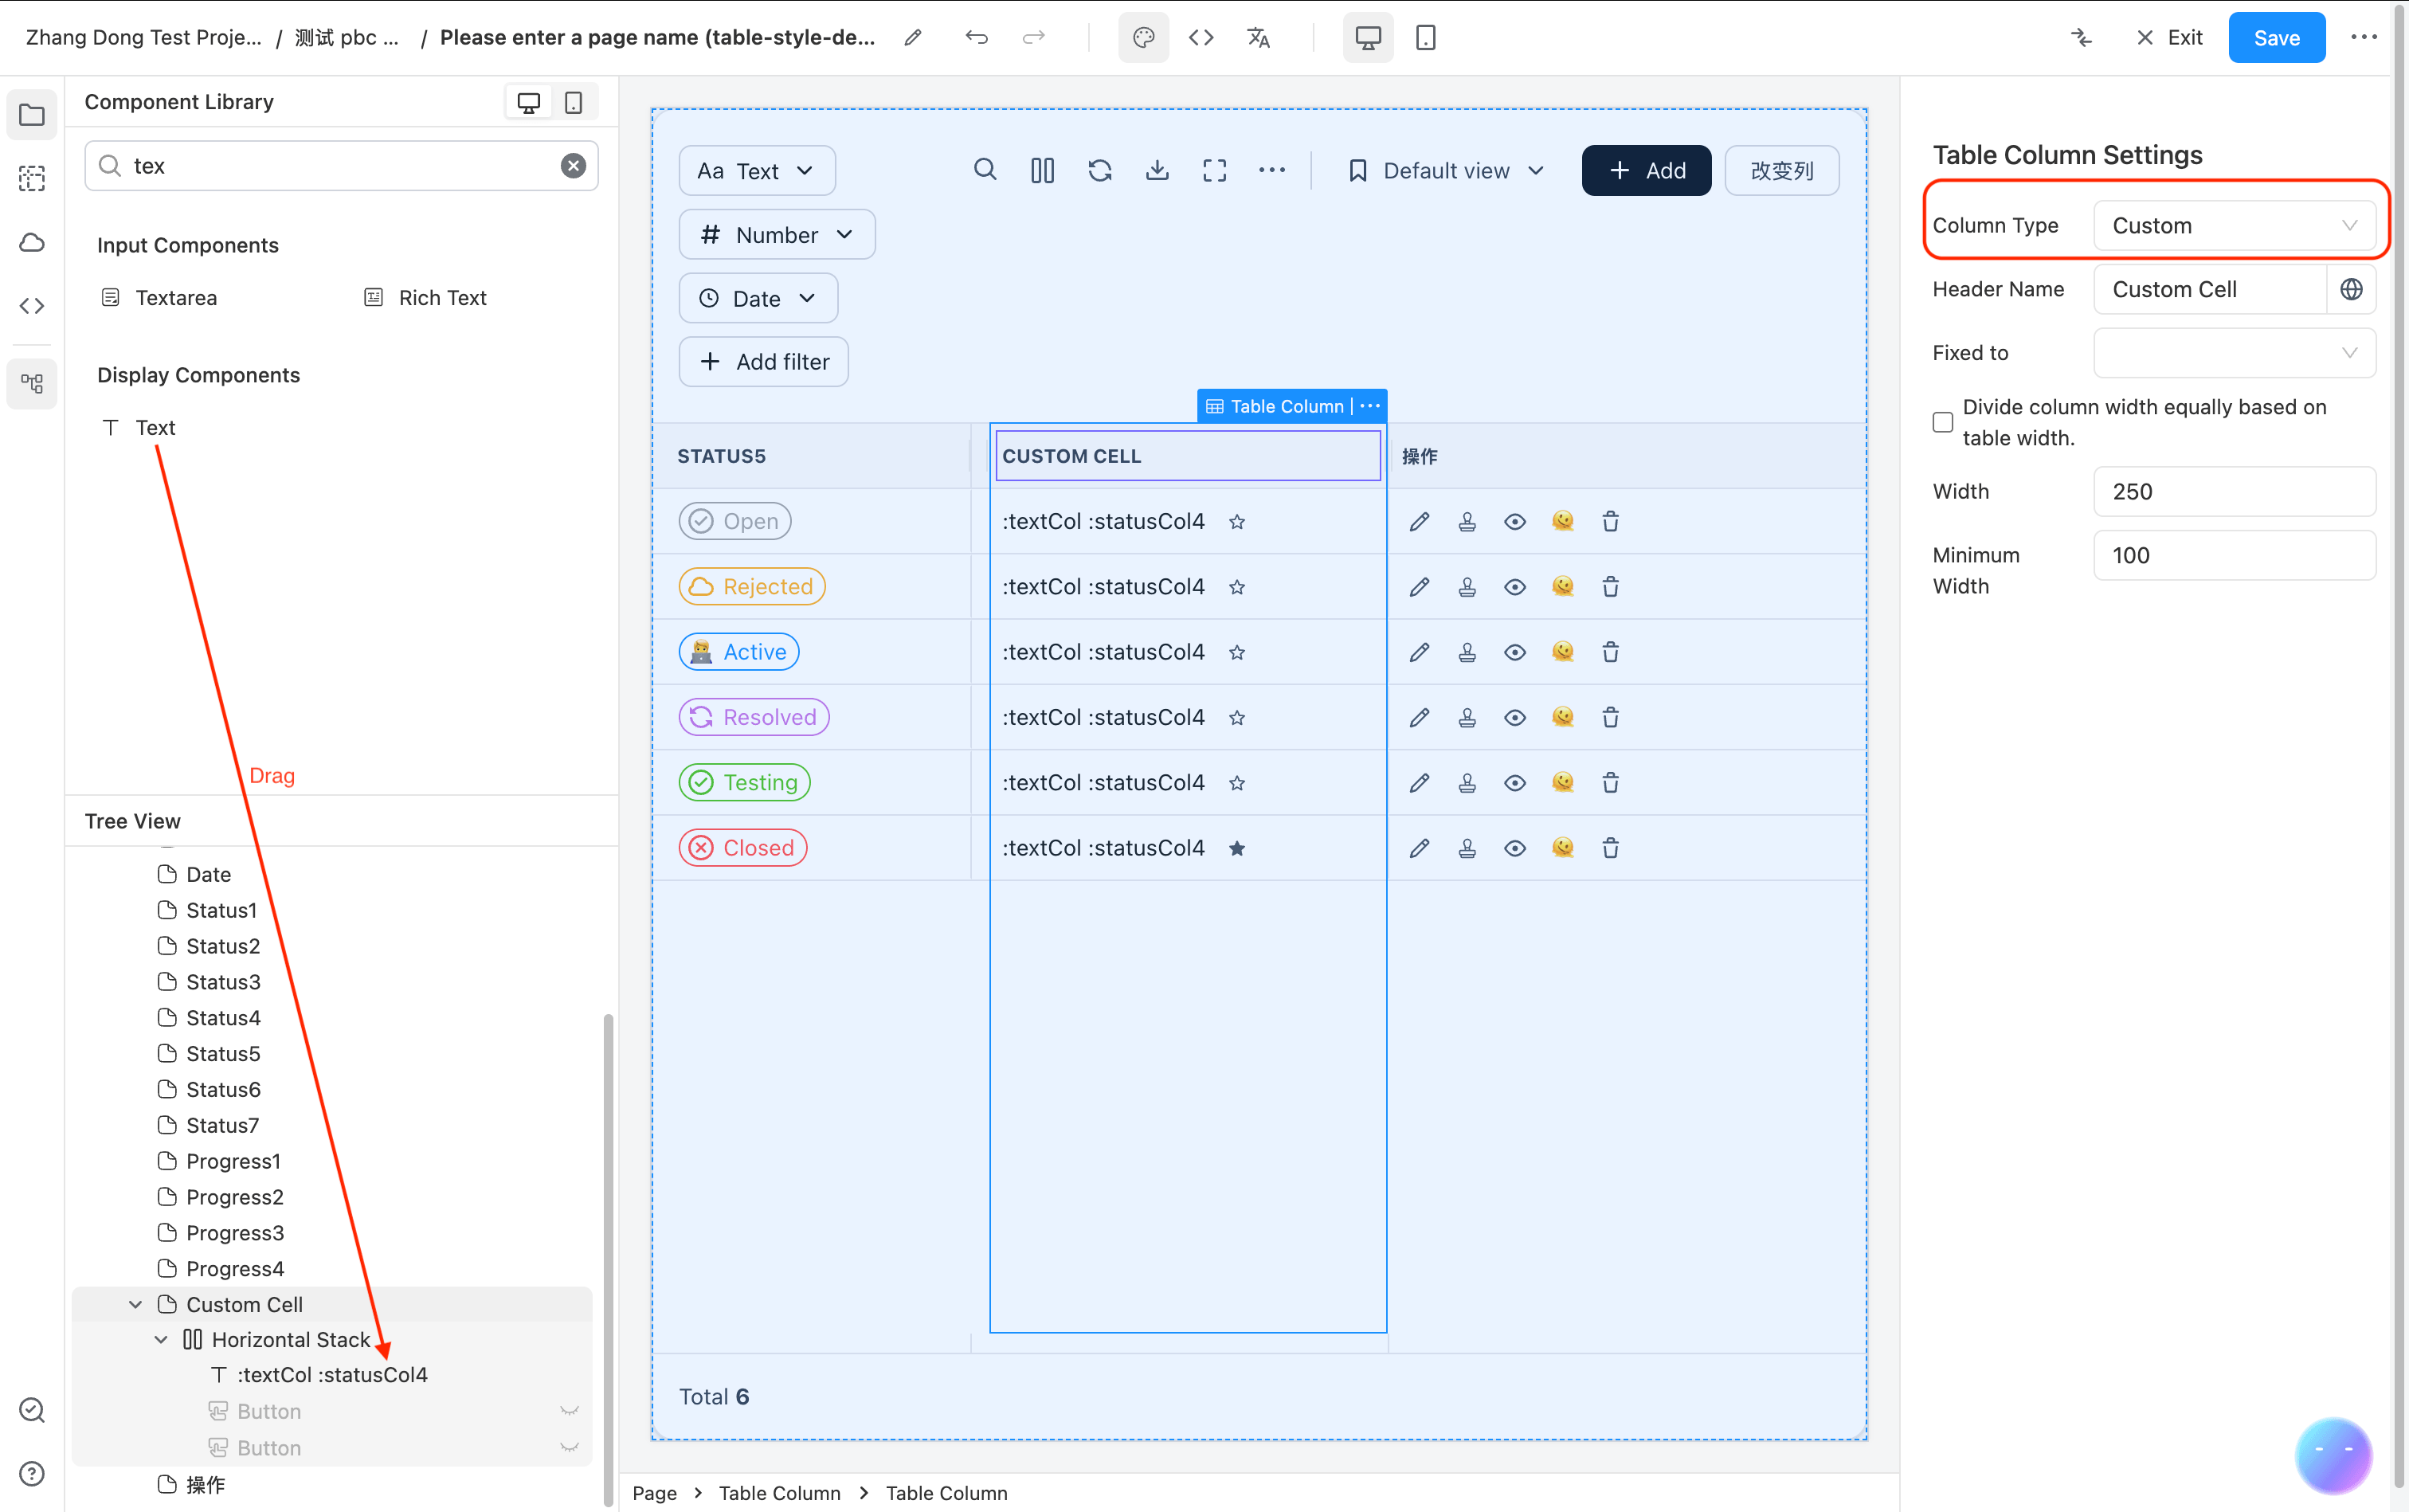
For example, the red-outlined area in the image below shows 2 Text components concatenated + 1 Button action.
Configuration Example
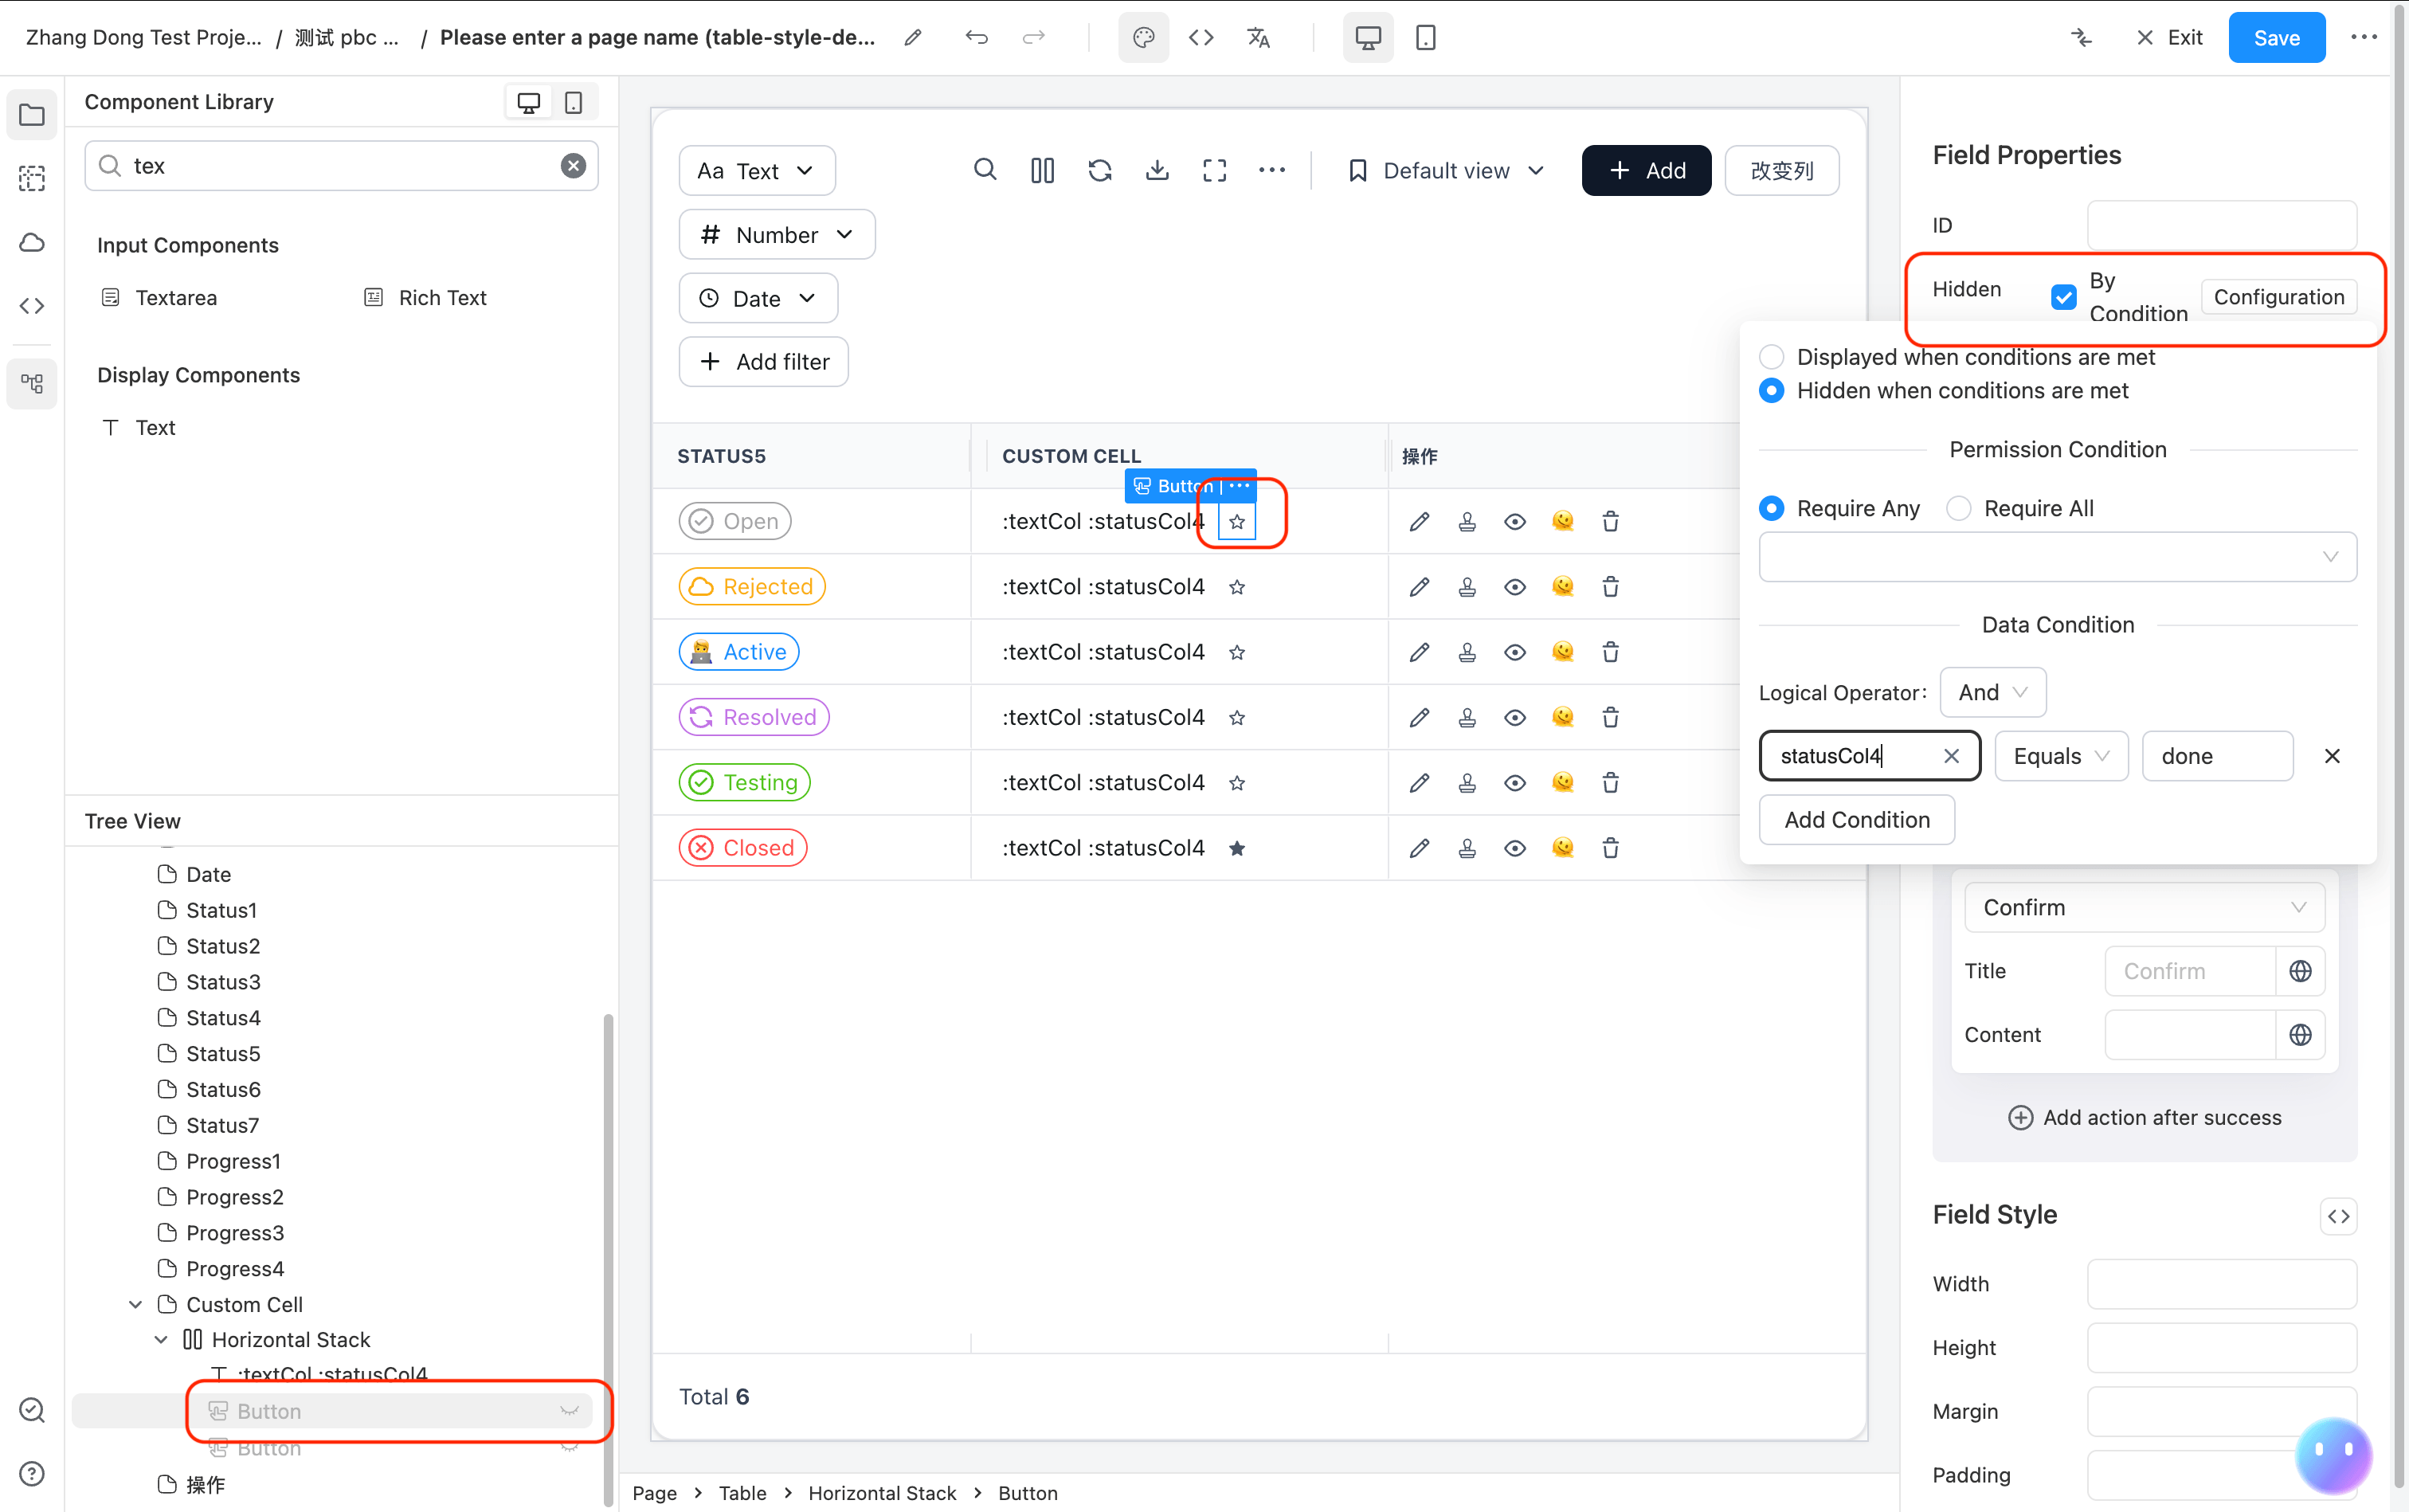
The following example demonstrates a custom column that displays text and conditionally shows different icon buttons based on row data:
{
  "type": "CUSTOM_COLUMN",
  "colId": "customCol",
  "headerName": "Custom Cell",
  "width": 250,
  "flex": null,
  "cellRendererParams": {
    "fields": [
      {
        "component": "Stack",
        "componentProps": {
          "flexDirection": "row",
          "alignItems": "center"
        },
        "fields": [
          {
            "component": "Text",
            "componentProps": {
              "content": ":textCol :statusCol4"
            }
          },
          {
            "component": "Button",
            "componentProps": {
              "icon": "material:star-border-rounded",
              "action": {
                "type": "confirm"
              },
              "type": "text",
              "size": "small"
            },
            "hidden": {
              "dataPredicate": {
                "operator": "AND",
                "conditions": [
                  {
                    "condition": "equals",
                    "value": "done",
                    "dataField": "statusCol4"
                  }
                ]
              }
            }
          },
          {
            "component": "Button",
            "componentProps": {
              "icon": "material:star-rounded",
              "action": {
                "type": "confirm"
              },
              "type": "text",
              "size": "small"
            },
            "hidden": {
              "dataPredicate": {
                "operator": "AND",
                "conditions": [
                  {
                    "condition": "equals",
                    "value": "done",
                    "dataField": "statusCol4"
                  }
                ]
              },
              "valueIfPositive": false,
              "valueIfNegative": true
            }
          }
        ]
      }
    ]
  }
}
The example above produces the following behavior:
- Displays concatenated text from the current row's
textColandstatusCol4fields - When
statusCol4is not equal to"done", shows an outlined star button (star-border) - When
statusCol4equals"done", shows a filled star button (star)
How It Works
The CUSTOM_COLUMN column accepts a set of low-code component JSON configurations via cellRendererParams.fields, and renders them recursively using RecursionRenderer. During rendering, the current row data is injected into the context, allowing child components to reference current row field values using the :fieldName variable syntax.
JSON Configuration
In the table column definition, set type to CUSTOM_COLUMN and define the component structure to render in cellRendererParams.fields:
{
  "type": "CUSTOM_COLUMN",
  "colId": "customCol",
  "headerName": "Custom Column",
  "width": 250,
  "cellRendererParams": {
    "fields": [
      // Low-code component JSON configuration
    ]
  }
}
Key Properties:
| Property | Description |
|---|---|
type | Fixed value "CUSTOM_COLUMN" |
colId | Unique identifier for the column |
headerName | Column header title |
cellRendererParams.fields | Low-code component JSON array defining cell render content |
CUSTOM_COLUMN defaults to sortable: false and filter: false, since custom-rendered columns typically do not support sorting and filtering.
Referencing Current Row Data
In the fields configuration, you can reference current row field values using the :fieldName syntax. For example, if the current row data is { "textCol": "Hello", "statusCol4": "done" }:
:textColresolves to"Hello":statusCol4resolves to"done"- Concatenation is also supported, e.g.,
":textCol :statusCol4"resolves to"Hello done"
Use Cases
CUSTOM_COLUMN is suitable for the following scenarios:
- Combining multiple components in a cell (e.g., text + button + icon)
- Conditionally rendering different content based on row data (via
hidden+dataPredicate) - Placing interactive components in cells (e.g., buttons triggering actions)
- Customizing cell layout (via layout components like Stack)
CUSTOM_COLUMN also applies to the EditableTable component.
Dynamically Modifying Table Columns
The Table API provides the updateComponentProps method, which can be used to modify any table properties, including the column definitions (columnDefs).
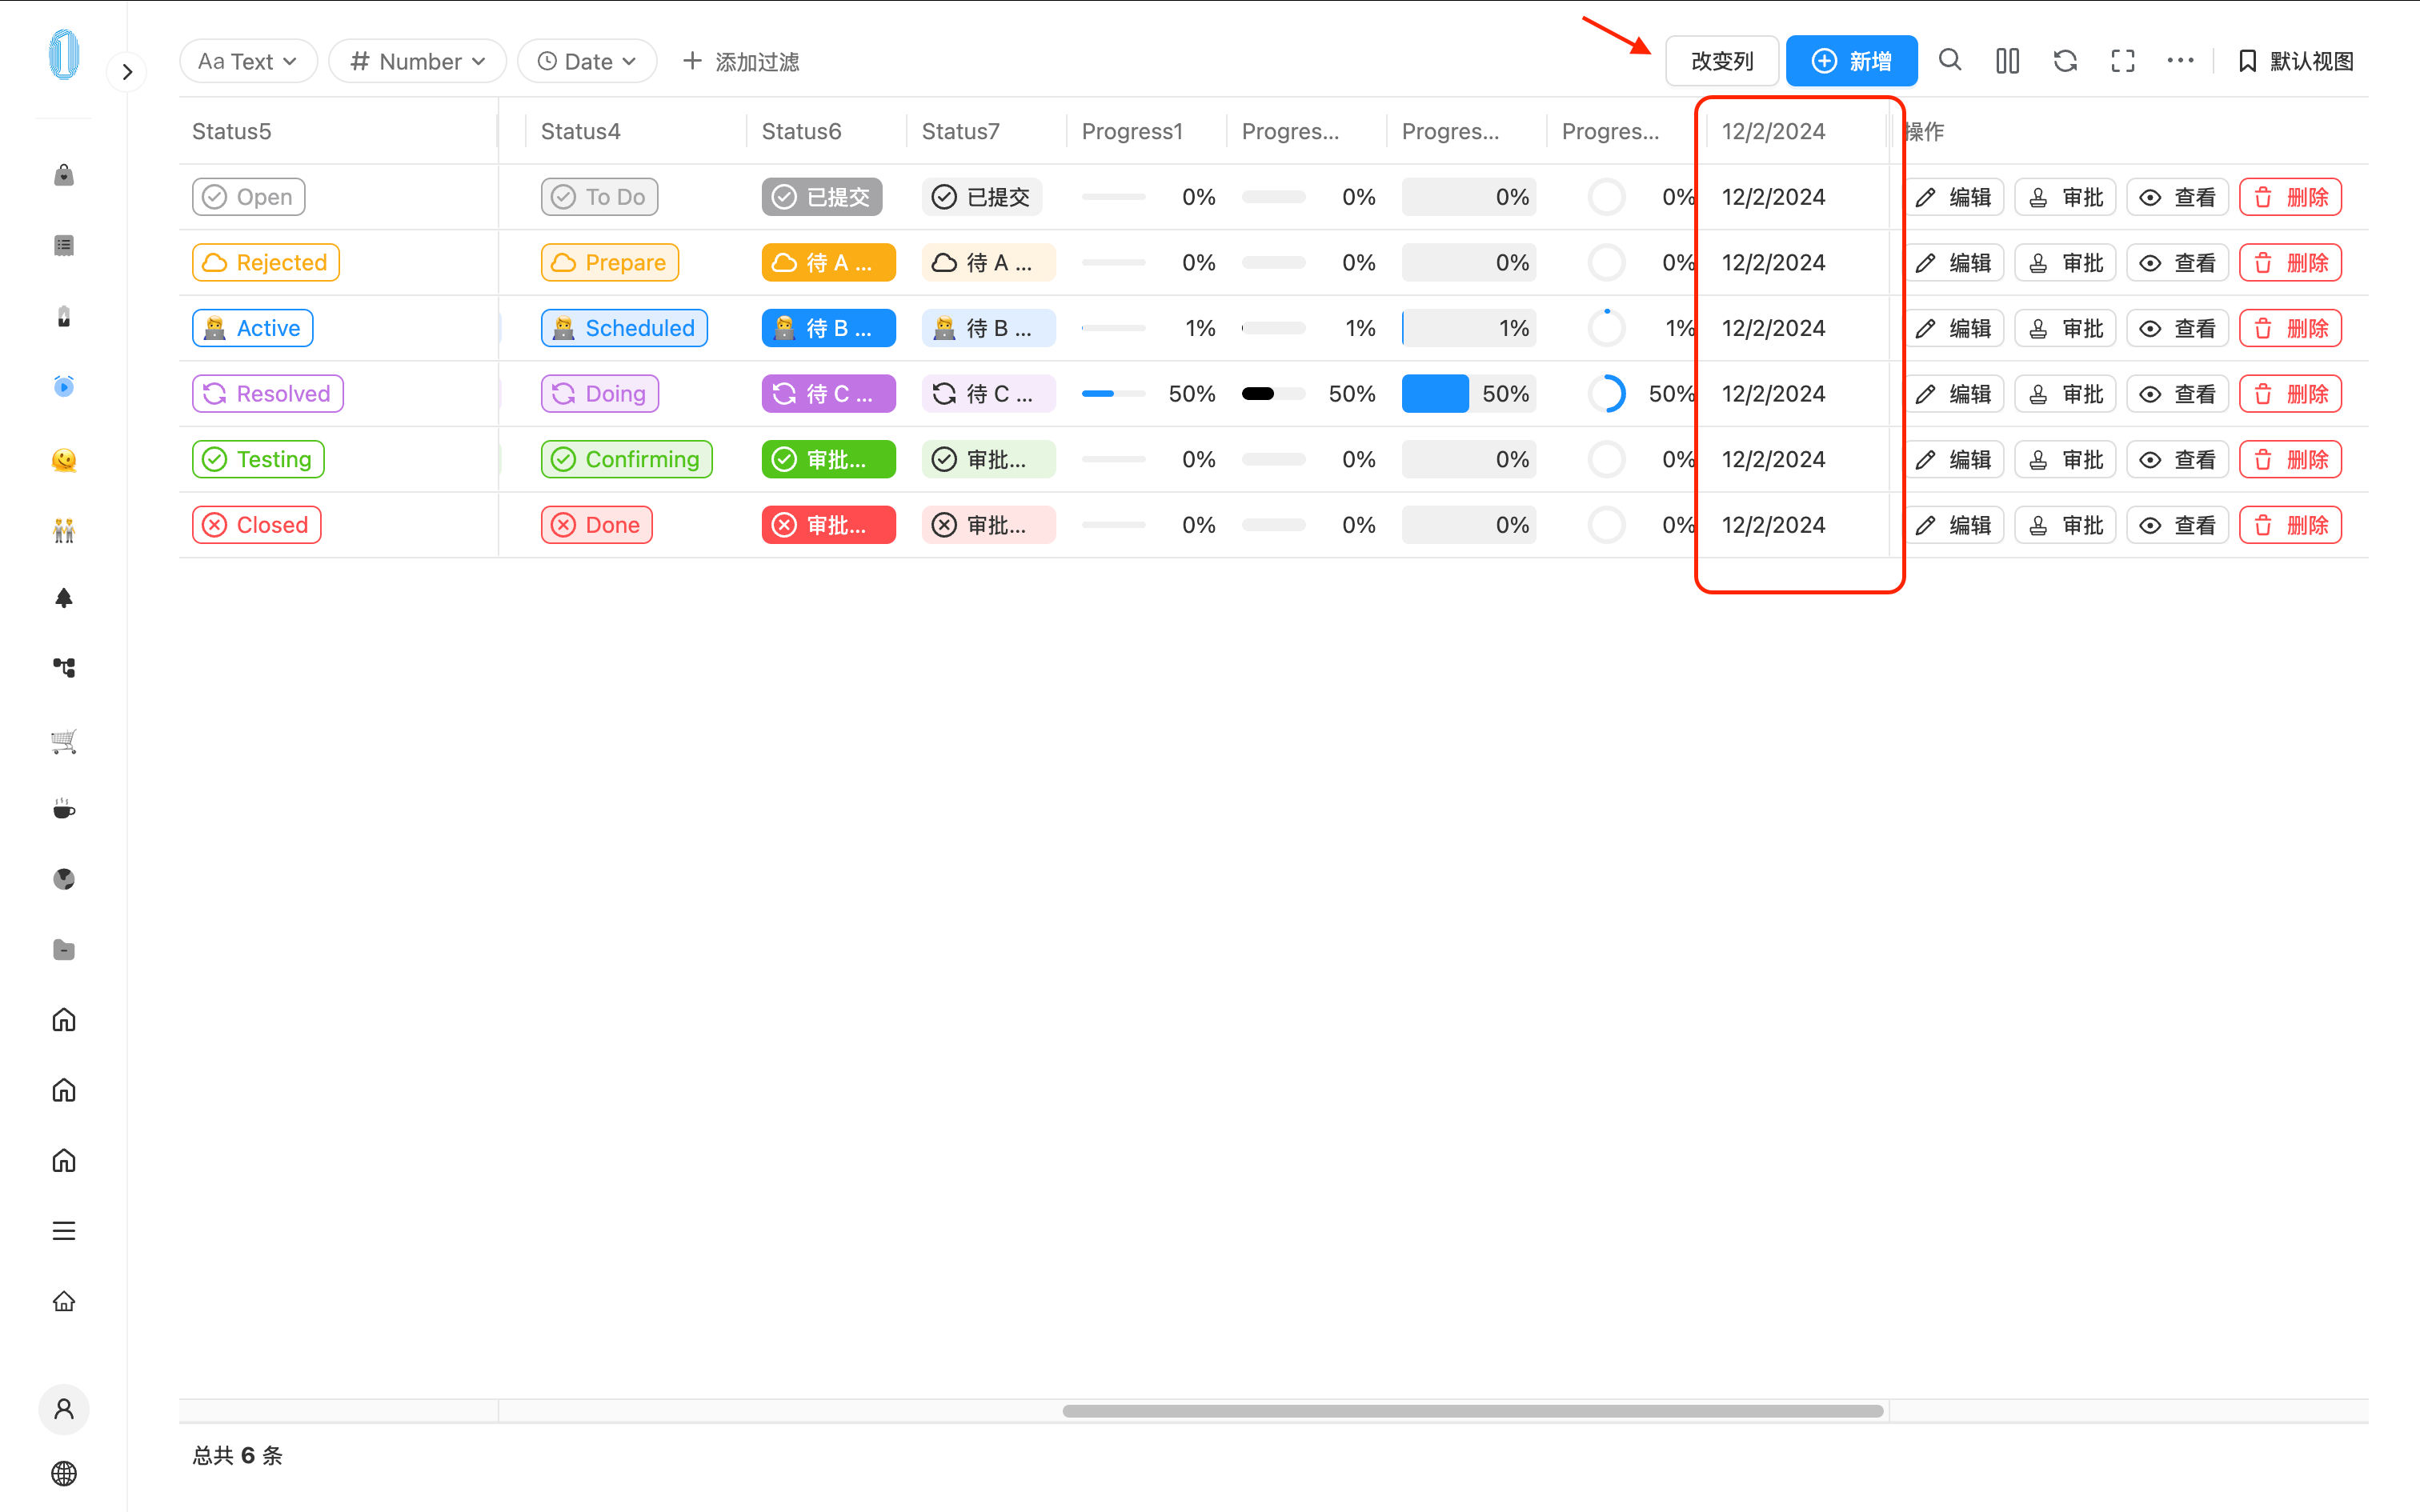
As shown in the example below, after the table is rendered, clicking the "Add Column" button dynamically appends a new column 12/2/2024 to the table.
The configuration in the designer is as follows:
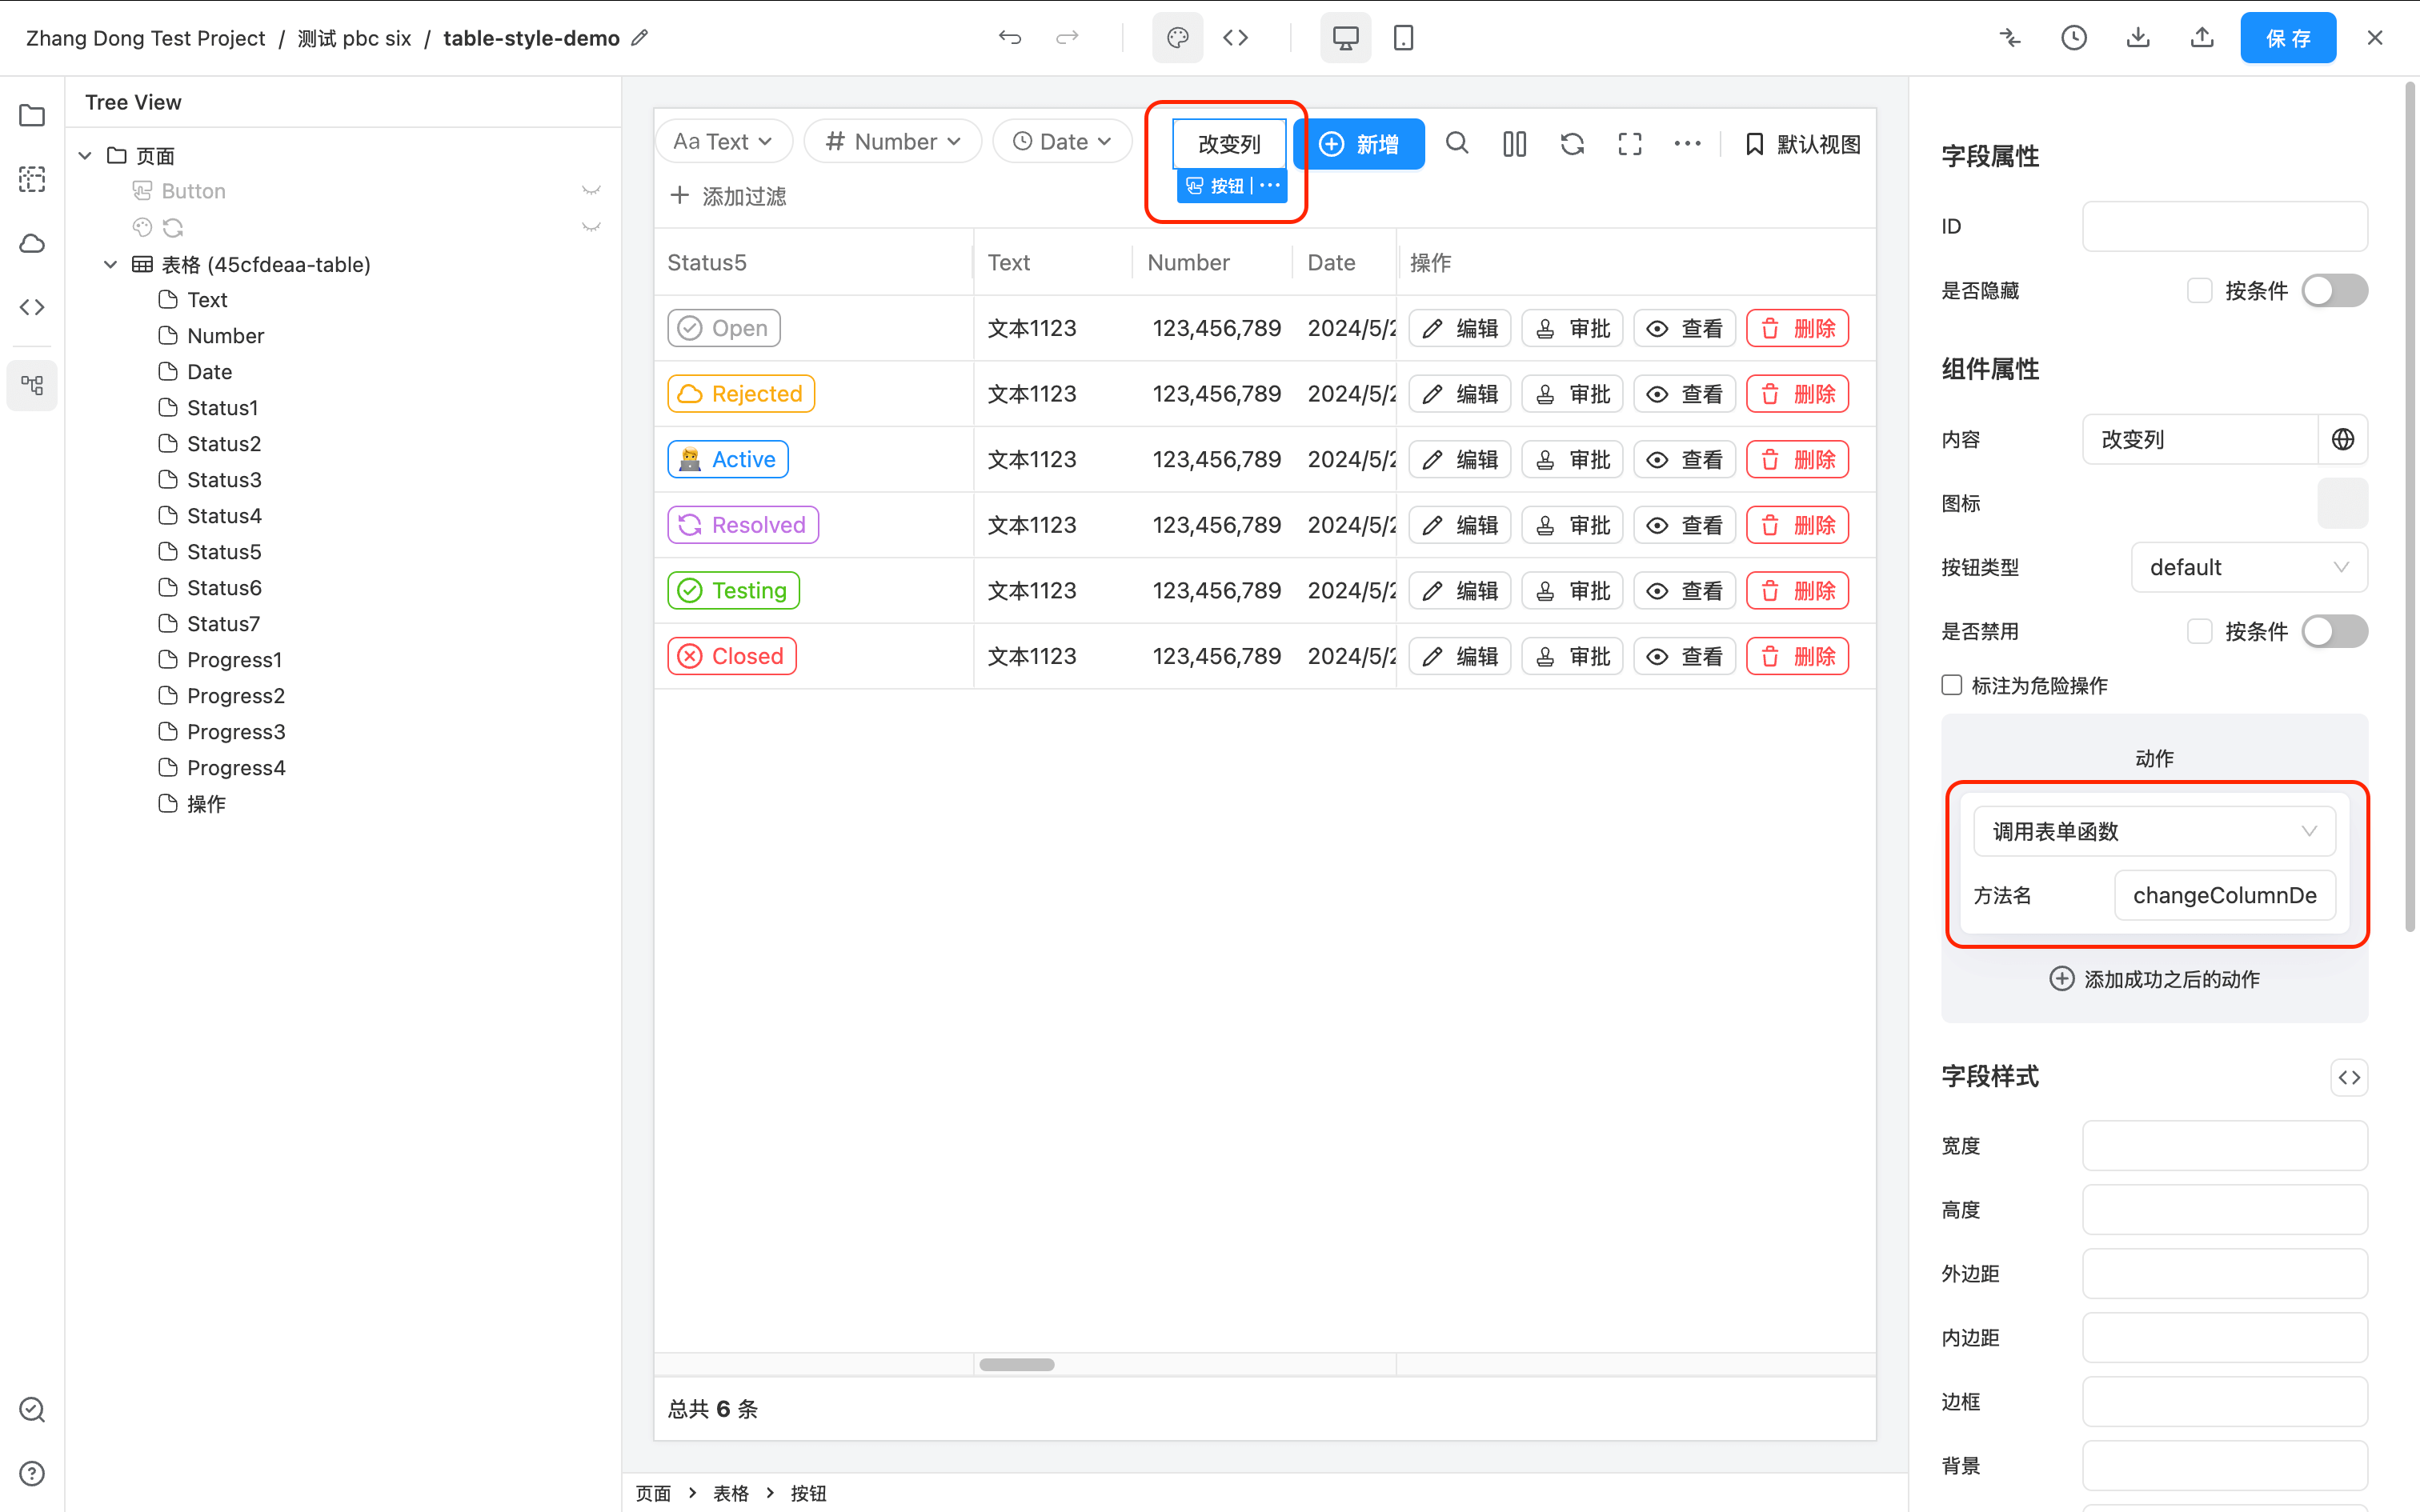
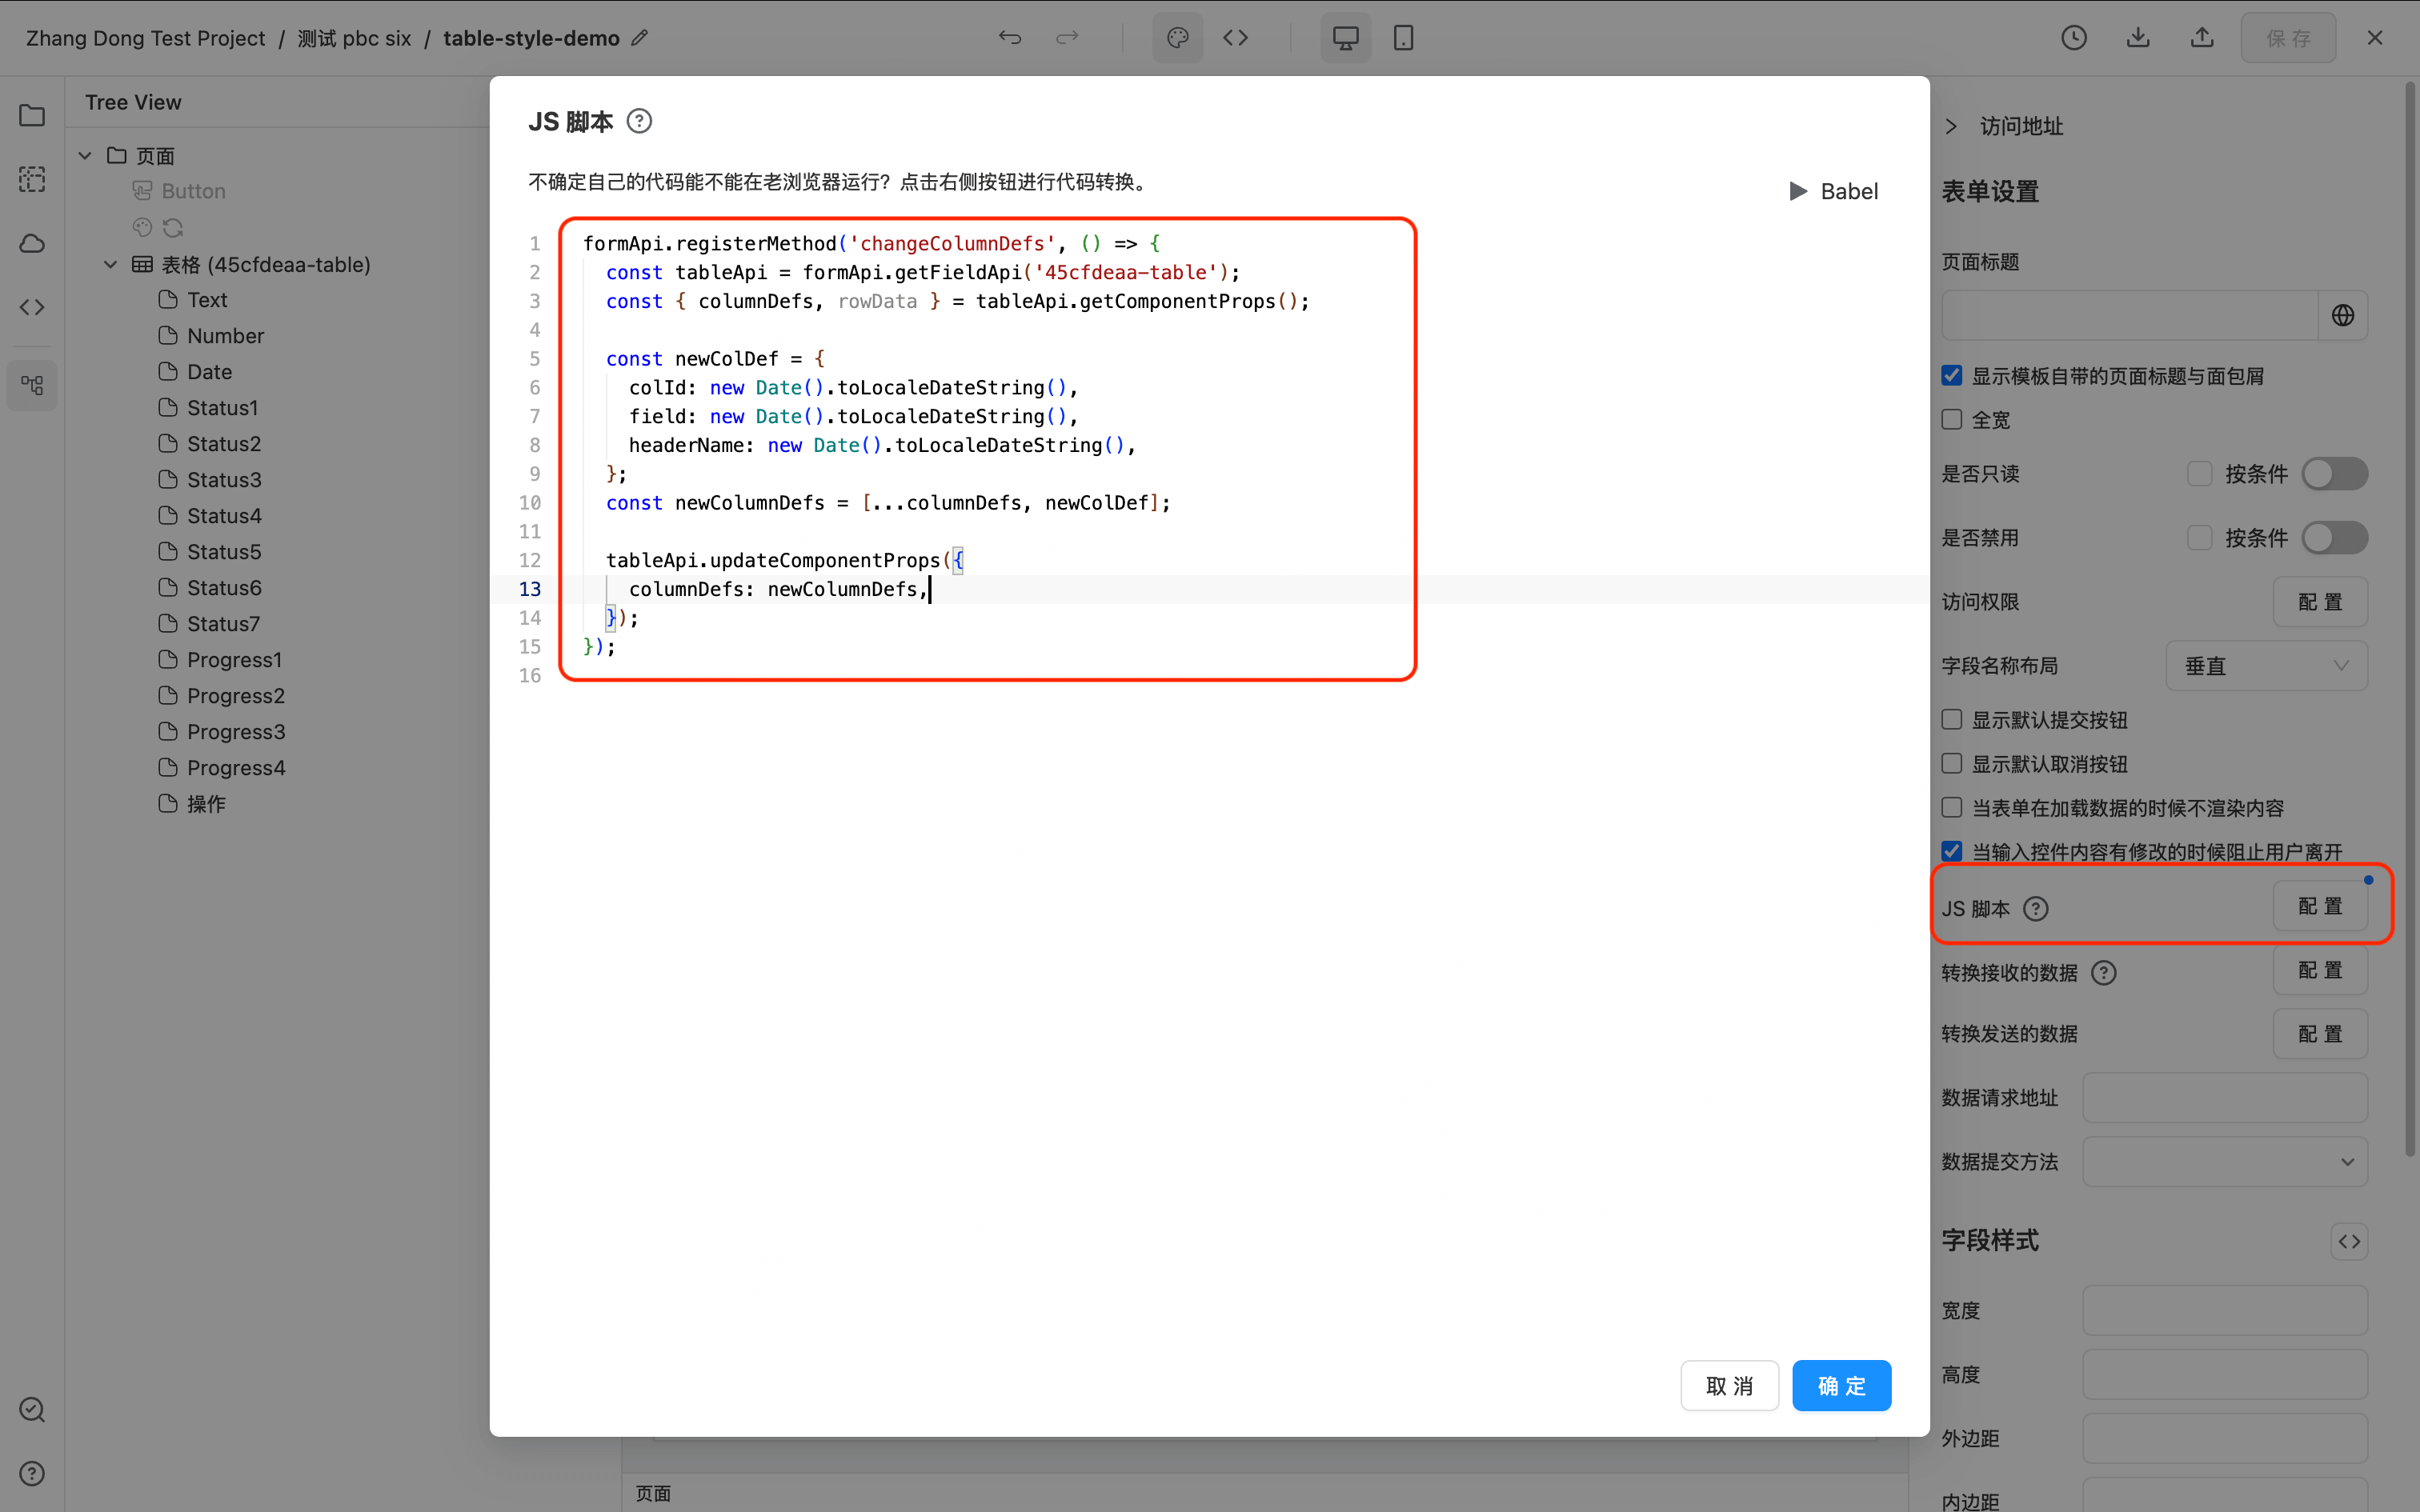
The JavaScript code for this example is as follows:
formApi.registerMethod('changeColumnDefs', () => {
  const tableApi = formApi.getFieldApi('45cfdeaa-table');
  const { columnDefs } = tableApi.getComponentProps();

  const newColDef = {
    colId: new Date().toLocaleDateString(),
    field: new Date().toLocaleDateString(),
    headerName: new Date().toLocaleDateString(),
  };
  const newColumnDefs = [...columnDefs, newColDef];

  tableApi.updateComponentProps({
    columnDefs: newColumnDefs,
  });
});
Saving External Filter Conditions to Table Views
This example addresses the scenario where you don't want to use the table toolbar's built-in filter functionality, but instead configure filter conditions externally. At the same time, you want to store these filter conditions in the table's state (like the built-in filter does) so they persist across page refreshes. Additionally, you want to save external filter conditions to table views for easy switching.
As shown below, the top-left has a custom "feature" filter condition. Changing the feature refreshes the table's filter request. The condition is also saved to a view named "view 2" in the table toolbar's top-right corner. Switching to "view 2" next time will automatically restore the feature filter condition.
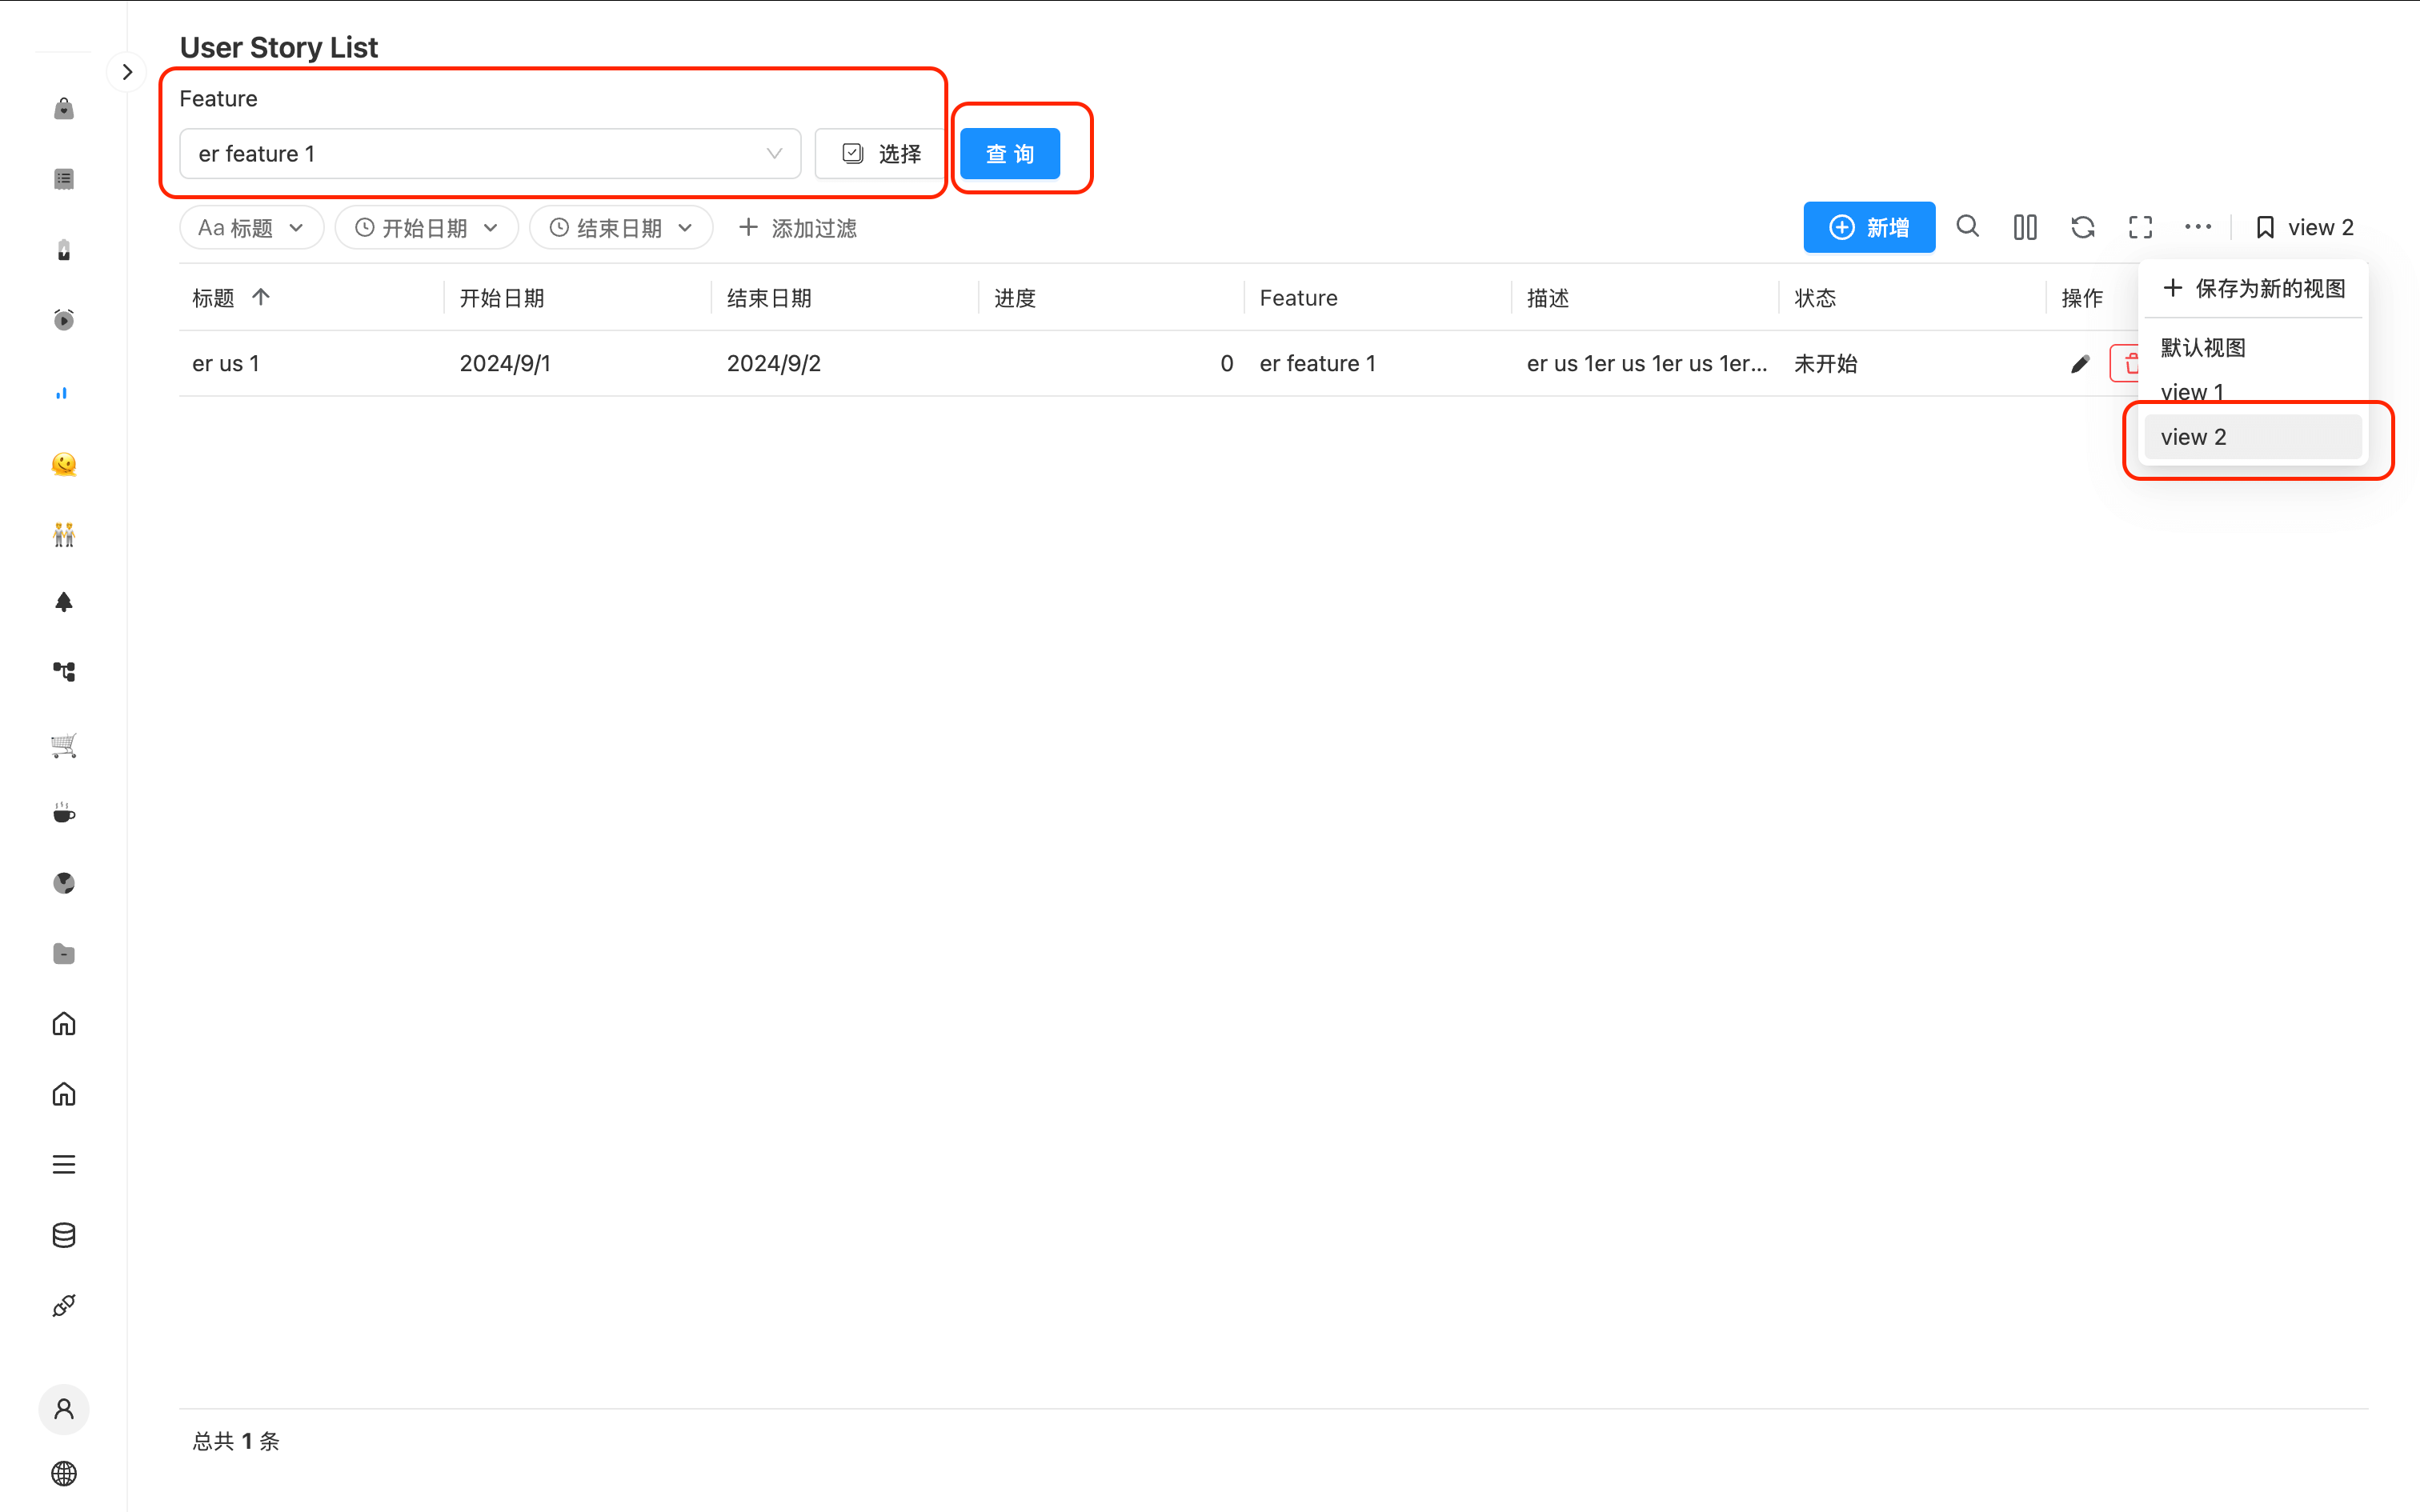
The implementation steps are as follows:
Linking External Filter Conditions to the Table
In this example, an external filter condition ACL with ID feature is configured. The table's ID is user-story-list-table.
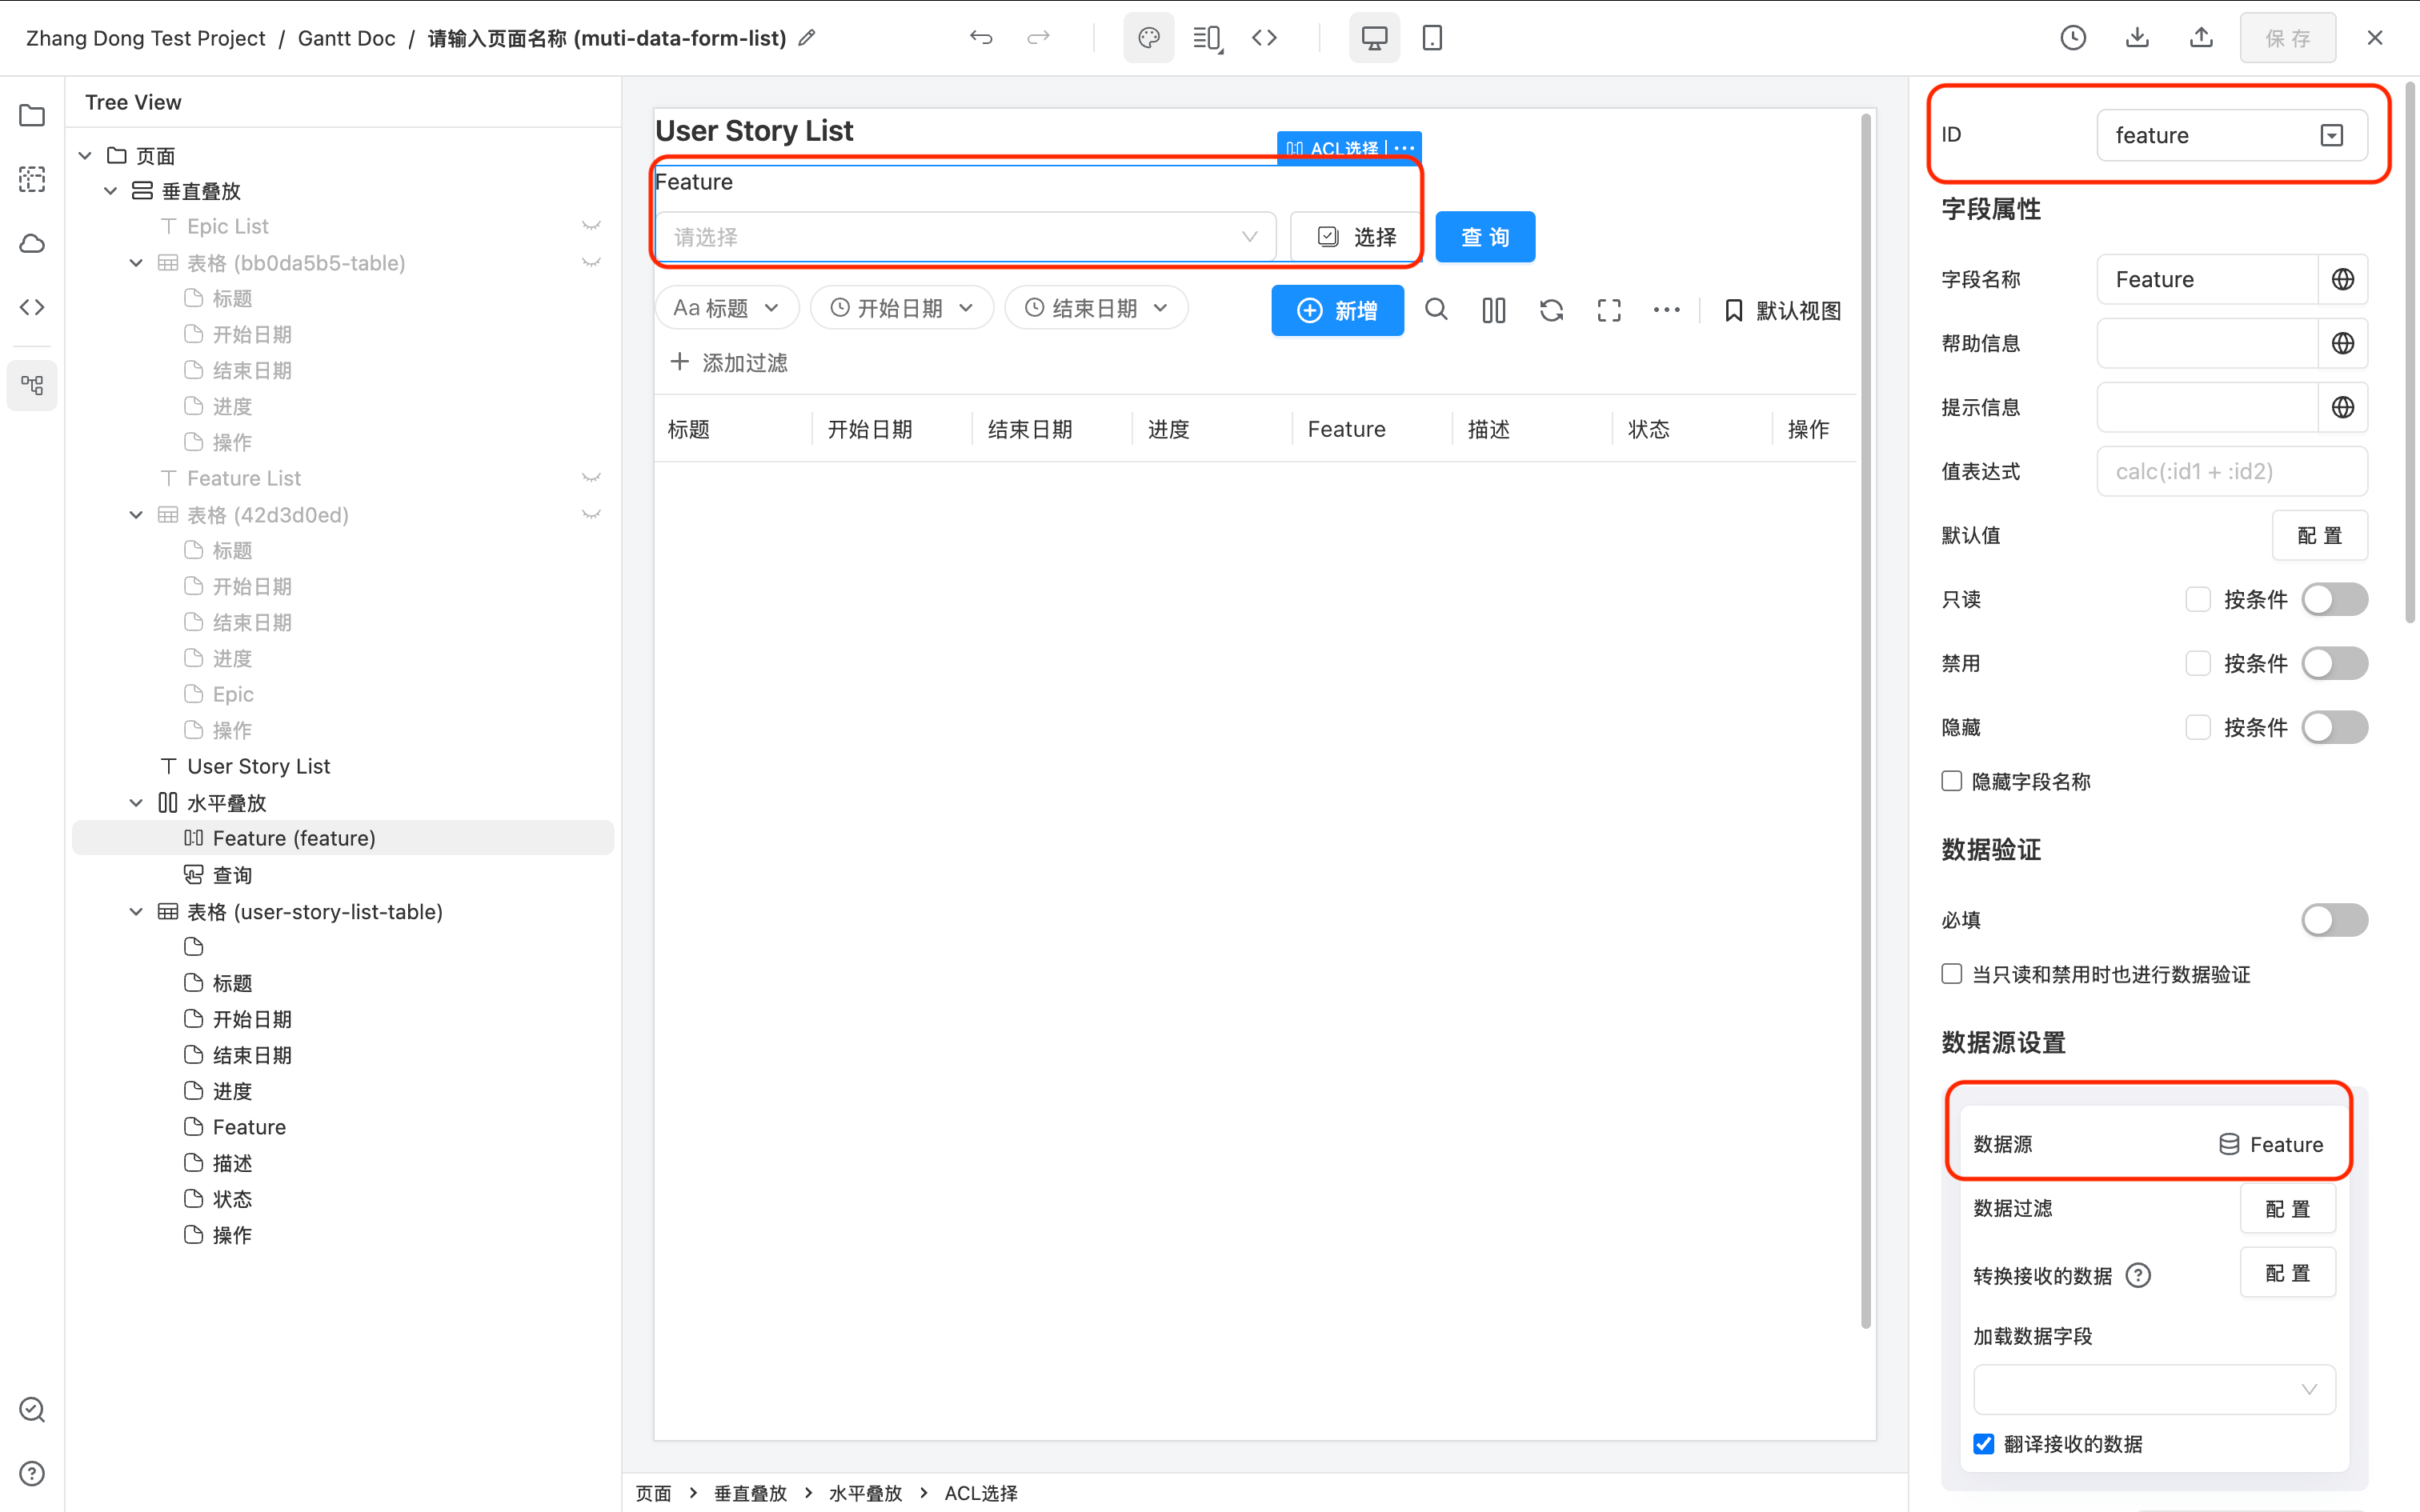
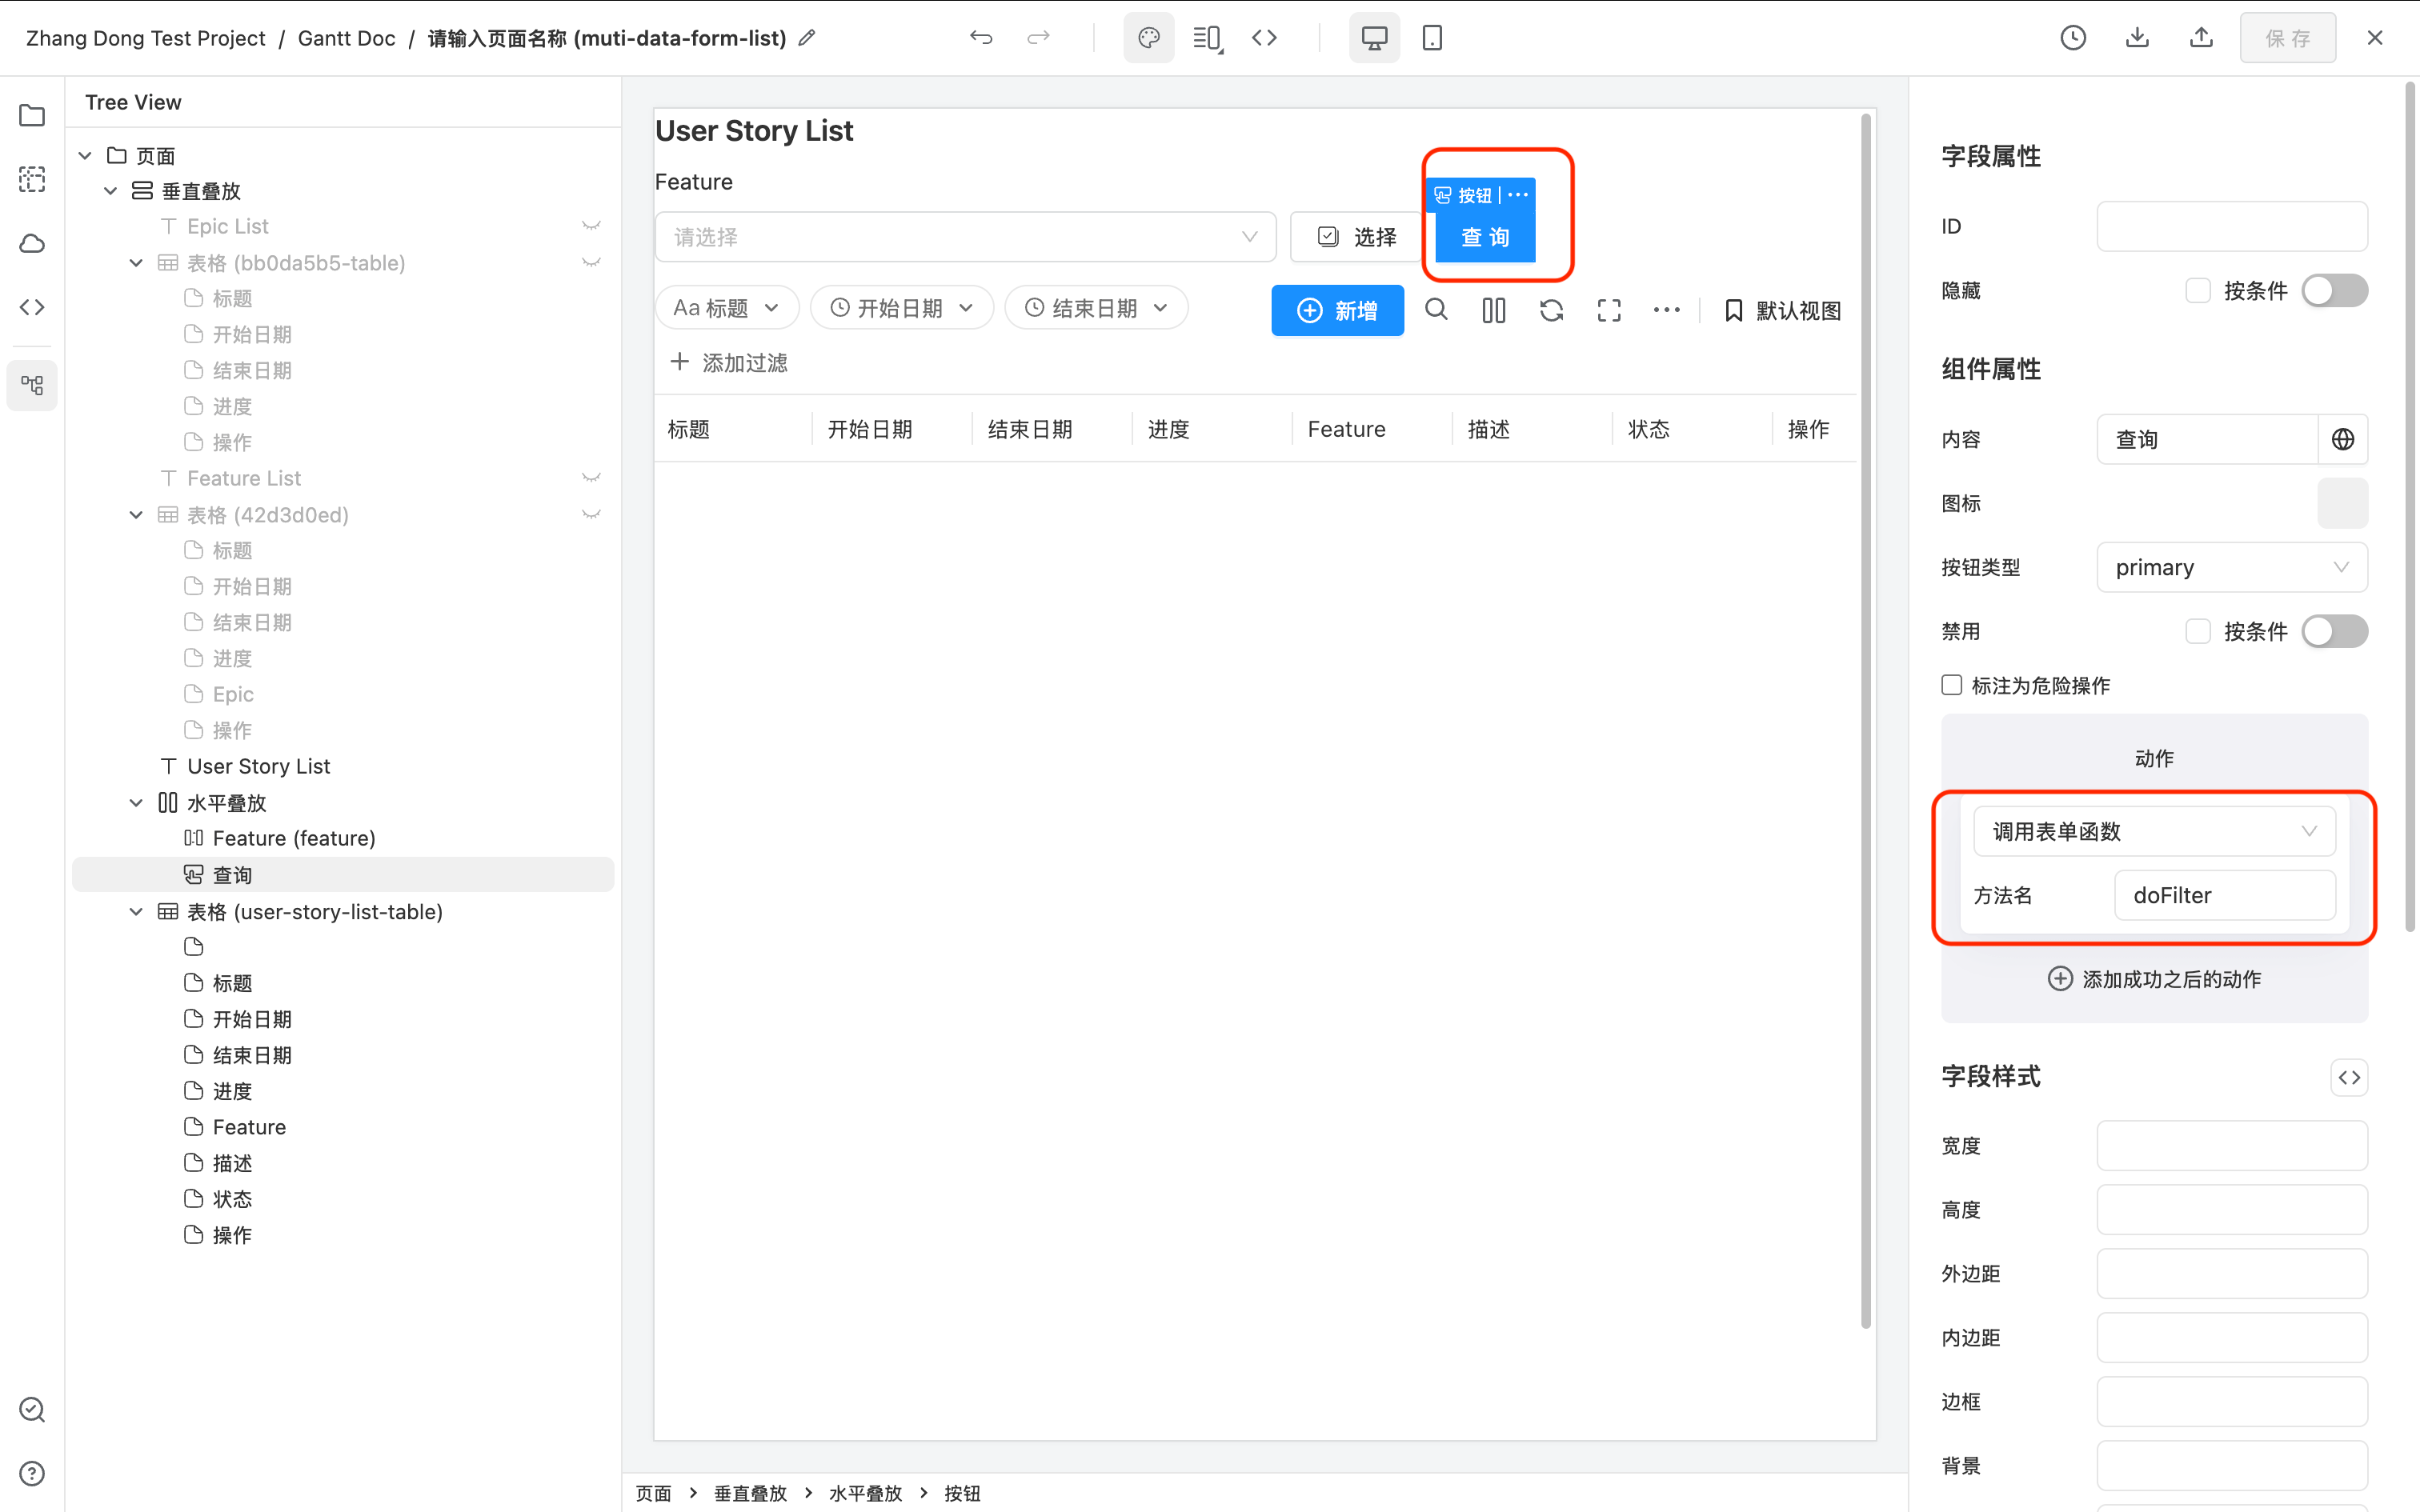
Then, configure the table's data source filter to reference a dynamically changing form data field. In this example, the form data field is called :formData.customUserStoryFilters. The name customUserStoryFilters can be changed to anything you prefer, as long as it matches the key used in the JS code below.
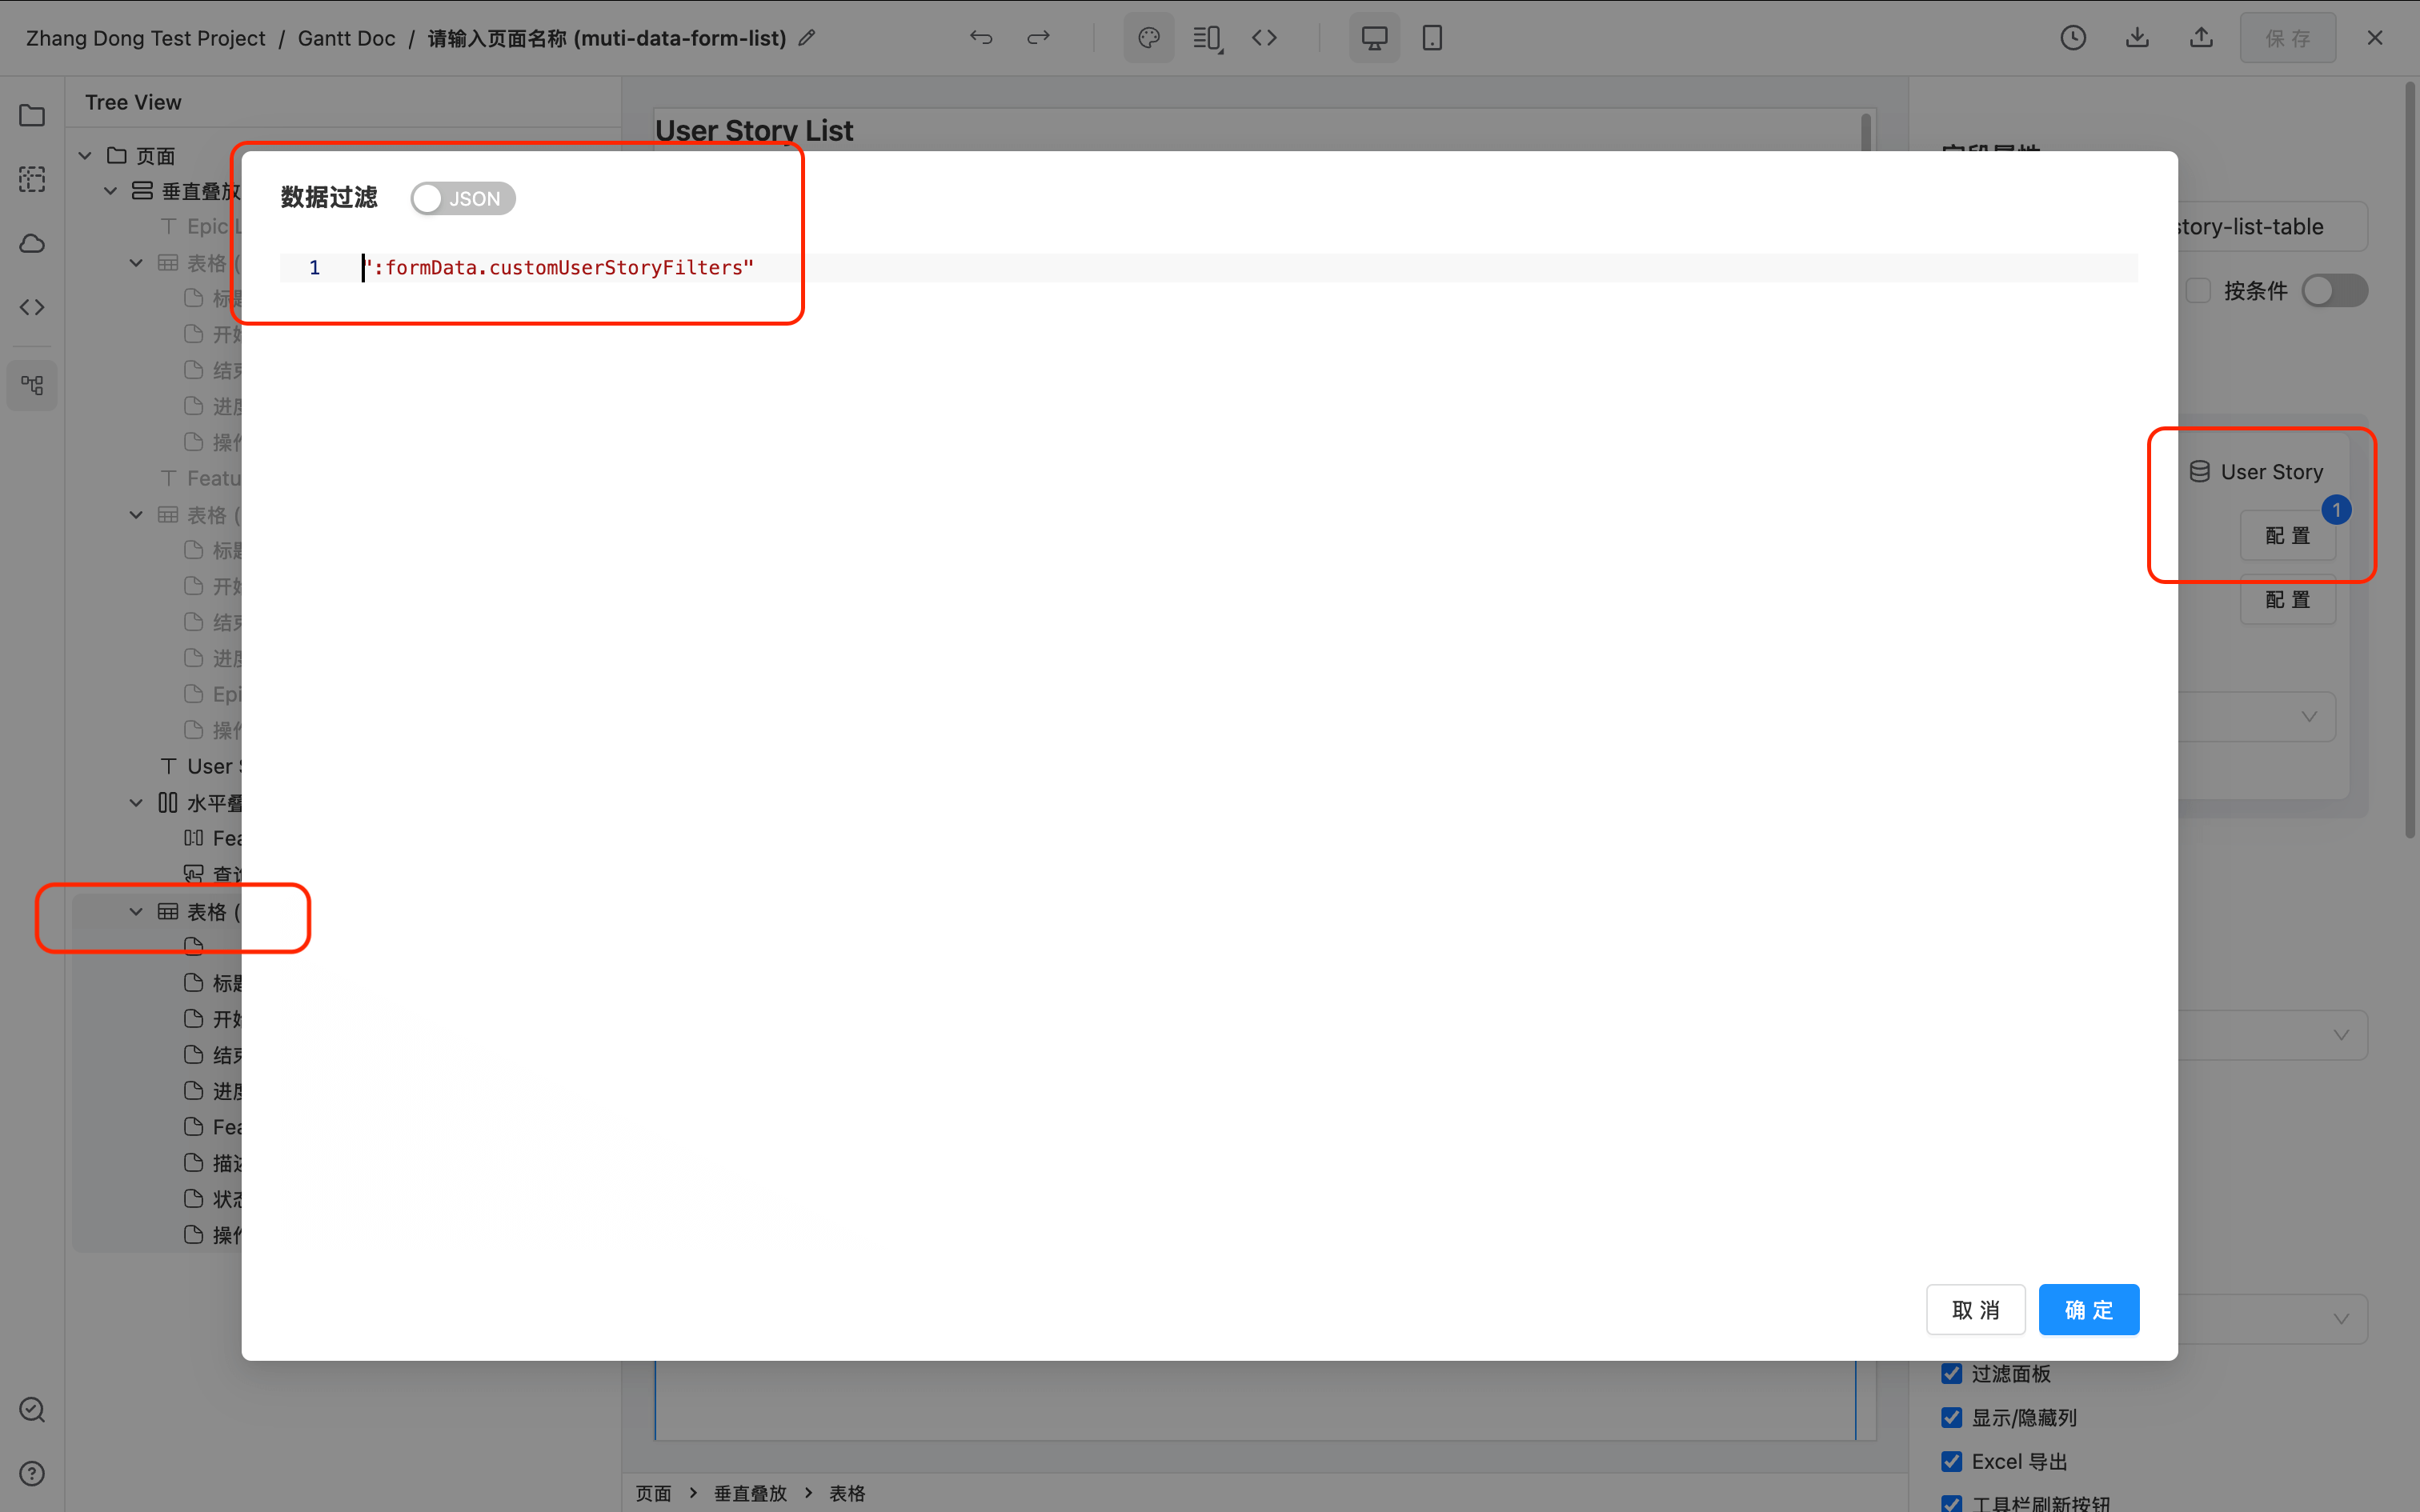
Use the method formApi.on('fieldValueChange', (id, newValue) => {}) to listen for changes in the external custom field value.
When the external custom field value changes, call formApi.setValue('customUserStoryFilters', dataFilters); to set the table's bound data filter customUserStoryFilters.
Storing External Filter Conditions in Table State via JS
Use the table API tableApi.setTableState() to save external filter conditions to the table's state.
Then use the table event onSwitchFavoriteView to listen for view switching operations in the table toolbar's top-right corner, and retrieve the previously saved customUserStoryFilters.
The complete JS code for both steps is as follows:
function customFilterModelToApiDataFilters(customFilterModel) {
  if (!customFilterModel) return null;
  return customFilterModel.map((item) => {
    if (item.filterType === 'set') {
      return {
        ...item,
        // The backend API filters by label, so send labels
        values: item.values.map((v) => v.label),
      };
    }
    return item;
  });
}

function setCustomFilterToTable(customFilterModel) {
  // Convert to the filter format required by the API
  const dataFilters = customFilterModelToApiDataFilters(customFilterModel);
  // Set to the table's componentProps.dataFilters dependency, the table will automatically refresh data requests
  formApi.setValue('customUserStoryFilters', dataFilters);
}

function restoreCustomFilter(customFilterModel) {
  // Set as needed — set as many fields as required. For many fields, use formApi.setData() for batch setting
  const feature = (customFilterModel || []).find((item) => item.colId === 'feature');
  if (feature) {
    formApi.setValue('feature', feature.values);
  } else {
    formApi.setValue('feature', null);
  }

  setCustomFilterToTable(customFilterModel);
}

function initialCustomFilter() {
  const tableApi = formApi.getFieldApi('user-story-list-table');

  // If your table exists when the page first loads, simply get the customFilterModel saved from the last page visit via tableApi
  const customFilterModel = tableApi.getTableState().customFilterModel;
  // If your table is hidden when the page first loads, retrieve it from your own localStorage
  // Example: const customFilterModel = JSON.parse(localStorage.getItem(customFilterKey));

  restoreCustomFilter(customFilterModel);
}

formApi.setFieldComponentProps('user-story-list-table', {
  // Listen for table view switching to apply the custom customFilterModel
  onSwitchFavoriteView: (view) => {
    restoreCustomFilter(view.customFilterModel);
  },
});

formApi.on('ready', function () {
  // If customFilterModel was saved from the last page visit, retrieve it and set it to the custom filter fields and the table's dataFilters property
  initialCustomFilter();
});

formApi.registerMethod('doFilter', () => {
  const formData = formApi.getData();
  const { feature } = formData;

  const customFilterModel = [];
  if (feature?.length) {
    customFilterModel.push({
      colId: 'feature',
      filterType: 'set',
      // Save the complete value-label array for restoring ACL display on page refresh
      values: feature,
    });
  }

  setCustomFilterToTable(customFilterModel);

  // Save the custom filter to tableState so it can be saved with table views,
  // retrieved on page refresh via tableApi.getTableState(), and obtained during view switching via onSwitchFavoriteView
  const tableApi = formApi.getFieldApi('user-story-list-table');
  tableApi.setTableState({
    // The name can be anything — here it's called customFilterModel
    customFilterModel: customFilterModel,
  });

  // For the case where the table doesn't exist initially, store a copy in localStorage if needed.
  // IMPORTANT: The key must be stored per user, otherwise all users will see the same data.
  // You can follow the table's default localStorage key pattern. Use the following code to get the username and pbc token:
  // const { pbcToken, userProfile } = formApi.getContext();
  // const customFilterKey = ['table', pbcToken, 'optionally add formEntityToken and layoutToken here', 'your-table-id', userProfile.username].join('.');
  // localStorage.setItem(customFilterKey, JSON.stringify(customFilterModel));
});
API
For the complete Table API reference, please refer to Table