Manual
Codifier is a version control and deployment tool for platform Seed-Data. It manages configuration data such as Flows, Forms, Pages, Connectors, and SDKs through Git, enabling controlled delivery from development to testing environments.
Background
The Ceta platform's configuration code (Flows, Forms, Pages, Connectors, SDKs, etc.) exists as a single large JSON file (seed-data.json). This causes several core pain points:
| Pain Point | Description |
|---|---|
| No version control | A single massive JSON file cannot be effectively diffed, reviewed, or merged with Git; any change results in a full overwrite |
| No selective deployment | Changes in the development environment must be fully imported into test/production environments; there is no way to deliver only a specific Flow or Form change |
| Untraceable changes | No history of who changed what and when; issues cannot be traced back |
| Difficult multi-environment management | No means to manage configuration differences between development, test, and production environments; prone to accidental overwrites |
| Poor JSON readability | Extensive nested JSON strings within configurations (string values that are themselves JSON); difficult for humans to read and review |
How Ceta Codifier solves these problems:
- Split: Decompose the single large JSON into a directory structure where each Flow / Form / Page / Connector has its own file. Nested JSON strings are automatically expanded into structured objects, and script code is extracted into separate
.groovy/.sql/.jsfiles - Version Control: The split directory structure enables precise Git diff, blame, and merge operations, making it easy to track historical changes
- Selective Packaging (Patch): Select content to deploy on demand (specific Flows of a certain PBC) and generate a minimal ZIP package for import into the target environment
- Merge: Reassemble the directory structure back into the standard seed-data.json format that the platform can import
System Features
| Feature | Description |
|---|---|
| Multiple Git Providers | Supports GitLab and GitHub |
| Multi-project support | Supports multiple projects simultaneously |
| Multi-branch support | Each project can manage multiple branches simultaneously, managing development, testing, production environments separately |
| Internationalization | Chinese / English interface switching |
Workflow
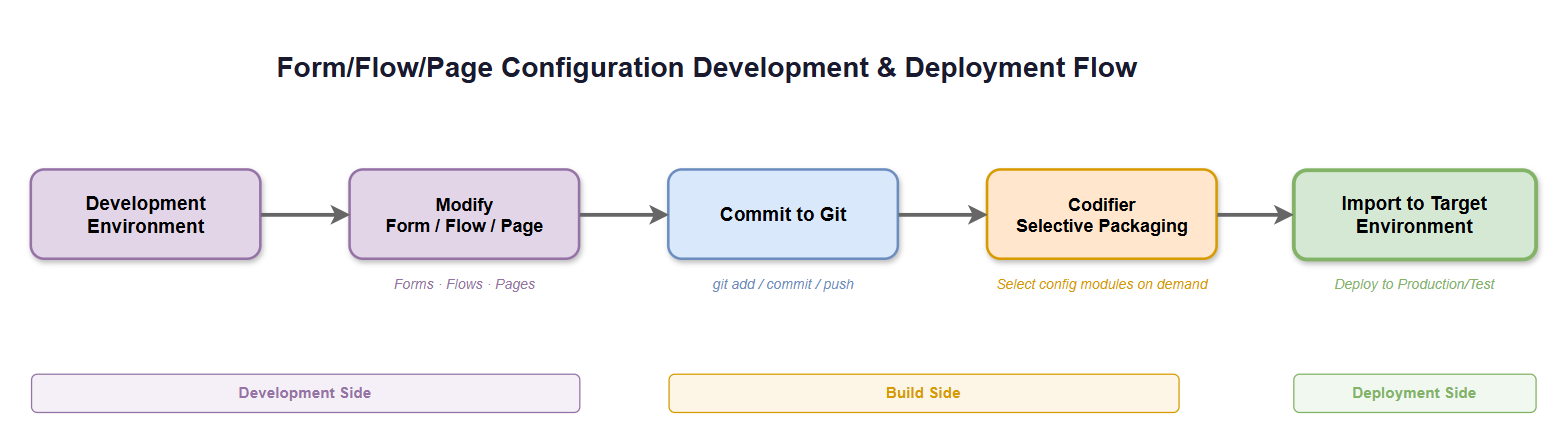
- Developers work normally on the platform and commit related code changes when development is complete
- After development, package the relevant content through Codifier (or full package)
- Download the ZIP and import into the target environment
Repository Strategy Recommendations
Choose an appropriate Git management strategy based on the degree of differences between environments:
| Scenario | Strategy | Description |
|---|---|---|
| Environments with large differences | Separate repositories | When development and production environments differ significantly (different customers, different feature sets), it is recommended to use separate Git repositories for each environment to avoid excessive branch conflicts |
| Environments with small differences | Same repository, different branches | When development and test environments have small differences (only version timing differences), it is recommended to use different branches in the same repository and deliver incrementally via Patch packaging |
Feature Modules
1. Project & Repository Management
| Feature | Description |
|---|---|
| Project configuration | Configure Git repository URL, repository type (GitLab / GitHub), and Access Token |
| Local repository cache | Each project maintains a persistent repository at data/{project}/repo/, using fetch + checkout to switch branches, avoiding repeated clones |
| Clear cache | Delete the project's local data directory; it will be re-fetched automatically on the next operation |
| Branch browsing | List remote branches with their last commit time |
| Multiple repository type support | Supports both GitLab and GitHub with per-project provider configuration |
GitLab Configuration
Create a Project Access Token in the GitLab repository under Settings → Access Tokens:
- Role: Developer
- Scopes:
api,read_api,write_repository
| Field | Example Value |
|---|---|
| Repository URL | https://gitlab.dev.bizops.com.cn/project-seed-data/dxsrm-seed-data.git |
| Token | glpat-e-uzHm7mPJ3kEf5eaMKZ |
⚠️ The token is only displayed once after creation. Please save it securely.
GitHub Configuration
In GitHub, go to Settings → Developer settings → Personal access tokens → Fine-grained tokens and create a new token:
- Repository access: Select
Only select repositoriesand specify the target repository - Permissions:
- Contents:
Read and write(read/write repository content) - Metadata:
Read-only(required)
- Contents:
| Field | Example Value |
|---|---|
| Repository URL | https://github.com/your-org/dxsrm-seed-data.git |
| Token | github_pat_xxxxxxxxxxxxxxxxxxxxxxxxxxxxxxxxxxxxxxxxx |
⚠️ The token is only displayed once after creation. Please save it securely.
⚠️ Fine-grained tokens have an expiration limit (maximum 1 year). Please remember to renew.
It is recommended to create a Private repository to prevent seed-data leakage.
2. Secret Management
Generate API Access Secrets for projects, used for platform commit commitTriggerUrl authentication.
| Feature | Description |
|---|---|
| Generate | Generate a new Secret for a project with configurable expiration and notes |
| Expiration options | 30 days / 90 days / 180 days / 1 year / 2 years / permanent |
| Revoke | Immediately invalidate a Secret; irreversible |
| Delete | Remove from the list |
| Security | Secret is displayed only once after generation; masked in the list |
| Usage | Add X-Project-Secret and X-Project headers to requests |
3. Users & Permissions
| Feature | Description |
|---|---|
| Roles | admin (administrator) / user (regular user) |
| Project-level permissions | Each user can be assigned per-project permissions: download / upload / secret |
| User management | Create, modify roles, modify permissions, change passwords, delete (admin only) |
| Change password | Regular users must verify old password; admin can reset directly |
4. Upload & Split
Upload a seed-data ZIP and split it into a Git directory structure, then push to a new branch.
| Feature | Description |
|---|---|
| Branch duplicate check | Returns an error if the target branch already exists |
| Auto split | JSON → directory structure (pbc/connector/sdkDefinition/frontend/i18n) |
| Push | Automatically commits and pushes to the specified branch after splitting |
Steps
- Switch to the Upload tab on the Codifier homepage
- Select the Git repository
- Enter a new branch name (e.g.,
mainordev1) - Select the exported seed-data ZIP file
- Click "Upload and Process"
The system will automatically split the ZIP and push to the specified branch.
5. Patch Packaging (Core Feature)
Selectively package content from the Git repository to generate an importable ZIP.
Full Download
Go to Codifier homepage → Select repository → Refresh branches → Click "Full Download" to download the complete seed-data package with all content.
Patch Mode (Recommended)
Selectable Content
| Type | Icon | Description |
|---|---|---|
| Frontend config | 🎨 | frontEndConfig (menus, routes, themes, etc.) |
| i18n | 🌐 | i18n language files, selectable per language |
| Connectors | 🔌 | Expandable to Action-level individual selection |
| SDK Definitions | 🧩 | SDK groovy/json definition files |
| PBC | 📦 | Each PBC allows individual selection of Flows ⚡ / Forms 📝 / Pages 🖥️ |
Three Filtering Methods
| Method | Description |
|---|---|
| Keyword | Real-time text matching; all types participate in filtering |
| Type | Dropdown to view only one category (Flows / Forms / Pages / Connectors / SDK) |
| Git filter | Enter a base branch/tag/commit/date (YYYY-MM-DD) to automatically identify and check changed items via diff |
Output Content
| File | Description |
|---|---|
project-seed-data.json | Merged Seed-Data (containing only selected content) |
patch.yaml | Selection manifest recording the scope of this package |
i18n/*.json | Selected language files |
Packaging Rules
- Incremental packages contain only the selected flows/forms/pages
- Incremental packages include the PBC metadata of the selected Forms/Flows/Pages
- Incremental packages include project metadata
- Full packages contain all content
6. Codifier Commit (Batch Commit)
Pull seed-data from the Ceta platform and commit to the Git repository. Supports diff preview and selective batch commits.
Workflow
- Configure Ceta Commit settings (Ceta URL, Token, target branch)
- Trigger sync: Download data from Ceta → Split → Calculate diff against Git branch
- Preview differences: View list of added/modified/deleted files
- Selective commit: Check the files to commit, enter a commit message, and commit to Git
Features
| Feature | Description |
|---|---|
| Selective commit | Supports select all / deselect all / per-file selection |
| Diff viewer | Side-by-side layout with file tree on the left and file diff on the right |
| File filtering | Supports keyword filtering of the diff file list |
| Auto author info | Uses the current logged-in user as the commit author |
Ceta Commit Configuration
Each Codifier project can have multiple Ceta Commit configurations, each corresponding to a target branch:
| Field | Description | Example |
|---|---|---|
| Target branch | Git branch to commit synced data to | main |
| Ceta URL | Ceta platform access URL | https://your-platform.example.com |
| Ceta Project ID | Numeric project ID in Ceta platform | 123 |
| Ceta Token | Authentication Token (supports OAuth auto-retrieval) | eyJhbGciOiJIUzI1NiIs... |
| Default commit message | Default commit message for scheduled commits | — |
| Cron expression | Scheduled sync expression (optional) | 0 0 3 * * ? |
| Enable scheduled sync | Toggle | — |
Configuration steps:
- Go to the Codifier Project Management page
- Select the target project and click Edit
- Find the Ceta Commit Configs section
- Fill in the Platform connection information (URL, Token, Project ID)
- Save the configuration
Use case: Batch-sync changes from the Platform to the Git repository, or manually commit when the Platform does not have commitTriggerUrl configured.
OAuth Token Authorization
Click "Get Token" to redirect to the Ceta platform authorization page. After authorization, the token is automatically saved via callback. CSRF attacks are prevented using the state parameter.
7. Scheduled Commits
Supports Cron-based scheduled automatic Ceta → Git sync tasks.
| Feature | Description |
|---|---|
| Cron configuration | Each Ceta Commit configuration can have its own cron expression |
| Auto refresh | Scheduled tasks are automatically reloaded after configuration changes |
| Manual trigger | Configured scheduled tasks can be manually triggered from the UI |
| Example | 0 0 3 * * ? means sync at 3:00 AM daily |
8. Platform Commit (commitTriggerUrl)
After saving a Flow/Form/Page on the platform, click the Check-in button to commit to Git. The commit button on the PBC page only includes PBC metadata, not the Flows/Forms/Pages underneath it.
Configuration
In the Ceta platform under Project Settings > Configuration Management > Application Configuration, configure the commit trigger URL:
{
  "client": {
    "commitTriggerUrl": "https://ceta-codifier.int.bizops.com.cn/codifier/api/commit/dev2?X-Access-Token=v7ICDMqy1WWINY2hR_xxxxxxxxxxxxxxx_mYrcSin8E"
  }
}
URL Format
- If the Access Token's project matches the Codifier project name:
{codifier-url}/api/commit/{git-branch}?X-Access-Token={secret} - If the Access Token's project differs from the Codifier project name, explicitly specify the project name:
{codifier-url}/api/commit/{codifier-project-name}/{git-branch}?X-Access-Token={secret}
Usage Flow
After configuration, developers work normally on the platform:
- Modify Flows, Forms, Pages
- After saving, click the Check-in button to commit to the Git repository
- Each check-in corresponds to one Git commit
9. Branch Comparison
Compare differences between two branches/tags/commits and generate a structured report.
| Feature | Description |
|---|---|
| Comparison scope | Supports branch names, tags, and commit SHAs as base and target |
| Categorized statistics | Groups differences by PBC, with total file count and line change statistics |
| JSON-level comparison | Analyzes JSON field-level change details of Flows/Forms/Pages (node count changes, field additions/removals, etc.) |
| Custom labels | Assign labels to base and target (e.g., "Production", "Development") |
| HTML export | Comparison report can be exported as an HTML file |