Quick Start Guide
Process Overview
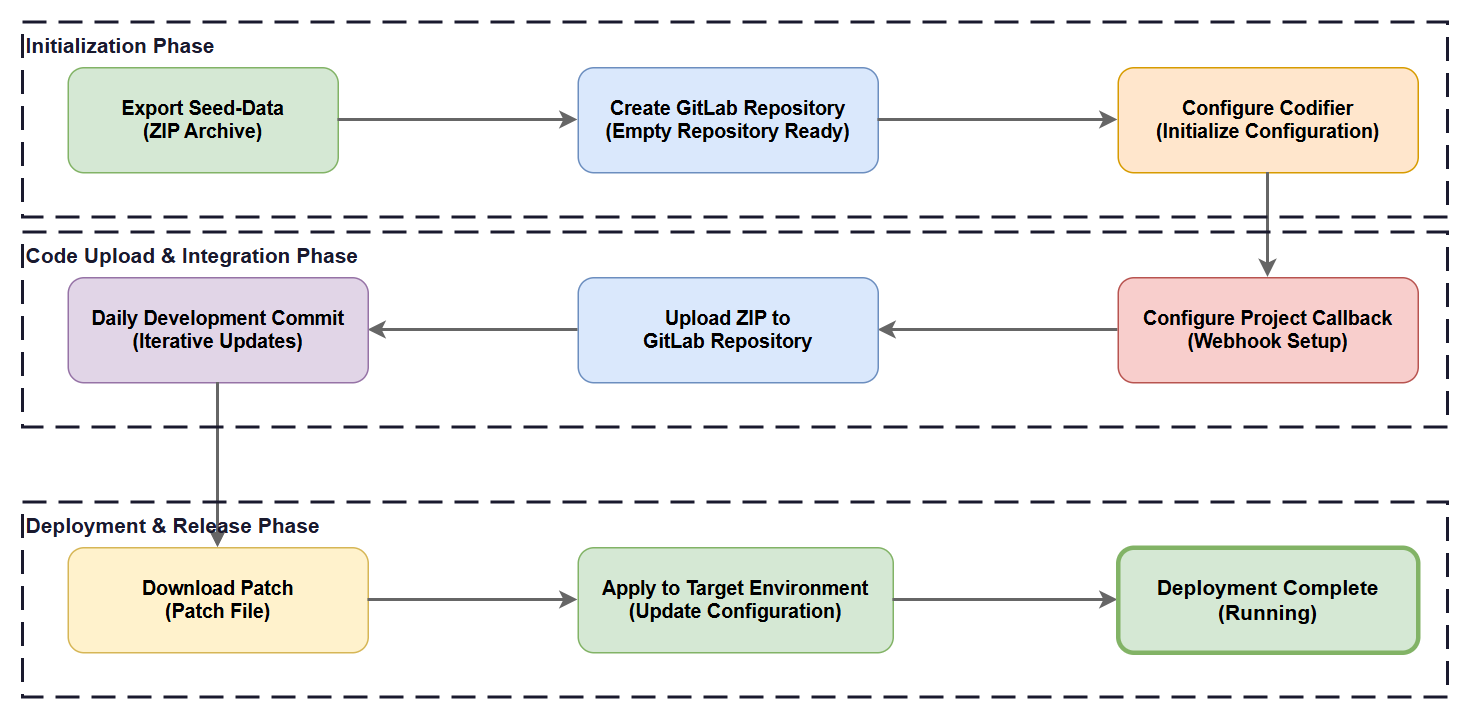
Step 1: Export Seed Data
Export the project's seed-data from the platform as a ZIP file.
Step 2 (GitLab): Create a GitLab Repository and Access Token
2.1 Create a Repository
Create a new repository in GitLab to store seed-data:
Example:
https://gitlab.dev.xxxx.com.cn/your-org/dxsrm-seed-data.git
2.2 Create an Access Token
Create a Project Access Token in the GitLab repository under Settings → Access Tokens:
- Role: Developer
- Scopes:
api,read_api,write_repository
Example Token:
glpat-e-uzHm7mPJ3kEf5eaMKZ
⚠️ The token is only displayed once after creation. Please save it securely.
Step 2 (GitHub): Create a GitHub Repository and Personal Access Token
2.1 Create a Repository
Create a new repository in GitHub to store seed-data:
Example:
https://github.com/your-org/dxsrm-seed-data.git
It is recommended to create a Private repository to prevent seed-data leakage.
2.2 Create a Personal Access Token (PAT)
In GitHub, go to Settings → Developer settings → Personal access tokens → Fine-grained tokens and create a new token:
-
Repository access: Select
Only select repositoriesand specify the target repository -
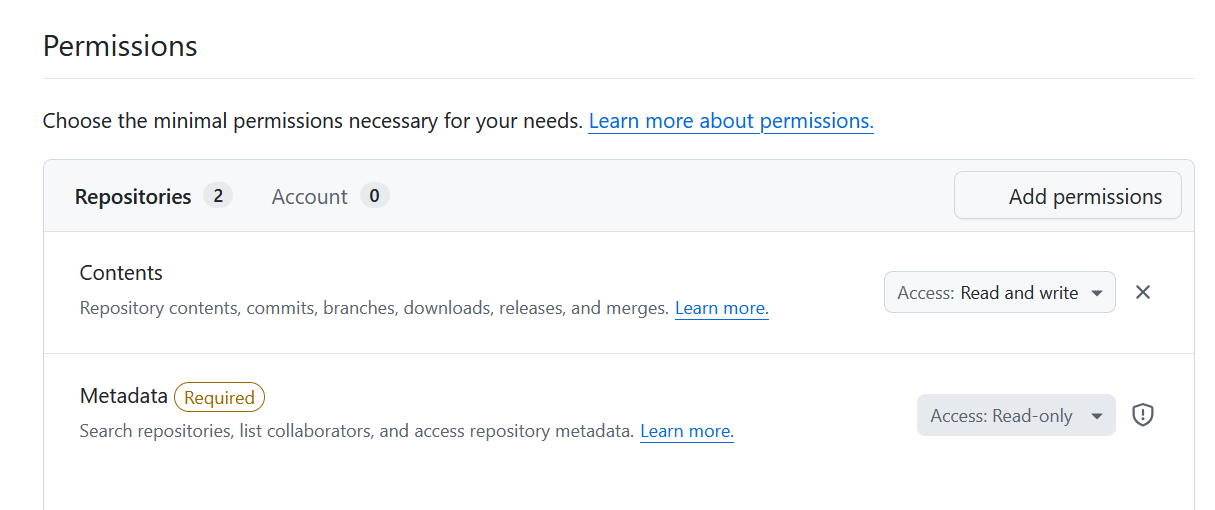
Permissions:
- Contents:
Read and write(read/write repository content) - Metadata:
Read-only(required)
- Contents:
Example Token:
github_pat_xxxxxxxxxxxxxxxxxxxxxxxxxxxxxxxxxxxxxxxxx
⚠️ The token is only displayed once after creation. Please save it securely.
⚠️ Fine-grained tokens have an expiration limit (maximum 1 year). Please remember to renew.
2.3 Repository URL Format
When configuring a GitHub repository in Codifier, use the HTTPS URL:
https://github.com/your-org/your-repo.git
Step 3: Configure Codifier
3.1 Create a Project
Log in to the Codifier platform, go to the Project Management page, and create a new project:
GitLab Example:
| Field | Example Value |
|---|---|
| Repository URL | https://gitlab.dev.xxx.com.cn/project-seed-data/dxsrm-seed-data.git |
| Token | glpat-e-uzHm7mPJ3kEf5eaMKZ |
GitHub Example:
| Field | Example Value |
|---|---|
| Repository URL | https://github.com/your-org/dxsrm-seed-data.git |
| Token | ghp_xxxxxxxxxxxxxxxxxxxxxxxxxxxxxxxxxxxx |
Step 4: Upload ZIP to Codifier
Switch to the Upload tab on the Codifier homepage:
- Select the Git repository
- Enter a new branch name (e.g.,
mainordev1) - Select the ZIP file exported in Step 1
- Click "Upload and Process"
The system will automatically split the ZIP and push to the specified branch.
Step 5: Configure Ceta Platform Commit and Submit Changes
5.1 Create an Access Token (Codifier Secret)
Go to the Secrets page under Project Management in Codifier to generate an access key for the project:
- Select project → Click "Generate Secret"
- Set the expiration period
- Copy the generated Secret
Example Secret: v7ICDMqy1WWINY2hR_xxxxxxxxxxxxxx_mYrcSin8E
5.2 Configure commitTriggerUrl
In the Ceta platform under Project Settings > Configuration Management > Application Configuration, configure the commit trigger URL:
{
  "client": {
    "commitTriggerUrl": "https://ceta-codifier.xxx.com.cn/codifier/api/commit/dev2?X-Access-Token=v7ICDMqy1WWINY2hR_xxxxxxxxxxxxxx_mYrcSin8E"
  }
}
URL Format:
- If the Access Token's project matches the Codifier project name:
{codifier-url}/api/commit/{git-branch}?X-Access-Token={secret} - If the Access Token's project differs from the Codifier project name, explicitly specify the project name:
{codifier-url}/api/commit/{codifier-project-name}/{git-branch}?X-Access-Token={secret}
5.3 Initiate a Commit (Check-in) from the Ceta Platform
After configuration, developers work normally on the platform:
- Modify Flows, Forms, Pages
- After saving, click the Check-in button to commit to the Git repository
- Each check-in corresponds to one Git commit
Step 6: Initiate a Batch Commit from Codifier
6.1 Configure Ceta Commit Configs
Before using the "Ceta Commit" feature, you need to configure Ceta Commit Configs in Project Management to specify connection information for downloading seed-data from the Platform:
| Field | Description | Example |
|---|---|---|
| Ceta URL | Platform address | https://your-platform.example.com |
| Ceta Token | Platform Access Token | eyJhbGciOiJIUzI1NiIs... |
| Project ID | Project ID in the Platform | 123 |
Configuration steps:
- Go to the Codifier Project Management page
- Select the target project and click Edit
- Find the Ceta Commit Configs section
- Fill in the Platform connection information (URL, Token, Project ID)
- Save the configuration
6.2 Initiate Ceta Commit
After configuration, on the specified branch of the Codifier project, click the "Ceta Commit" button:
- Codifier automatically downloads the latest seed-data package from the Platform
- Compares it with the current content in the Git repository to identify changes
- Commits the changes to the specified branch
Use case: Batch-sync changes from the Platform to the Git repository, or manually commit when the Platform does not have commitTriggerUrl configured.
Step 7: Download SeedData Package
When you need to apply changes to other environments:
Full Download
- Go to Codifier homepage → Select repository → Refresh branches → Click "Full Download"
Patch Mode (Recommended)
- Click "Patch Mode" → Select the desired content
- Use Git Filter to quickly locate changes (enter base branch/tag/date)
- Click "Generate Patch Package"
- Download the ZIP
Step 8: Apply to Target Environment
Import the downloaded ZIP file into the target environment (e.g., QA environment):
- Use the traditional import script/API to import the seed-data package
FAQ
| Issue | Solution |
|---|---|
| Branch already exists | Use a different branch name when uploading |
| Token expired | Recreate the Access Token in GitLab and update the Codifier project configuration |
| GitHub Token expired | Regenerate the PAT in GitHub Settings → Developer settings and update Codifier |
| Commit not taking effect | Check if the commitTriggerUrl configuration and Secret are correct |
| GitHub 403 error | Check if the Token permissions include repo scope or Fine-grained token Contents permission |